Why You Should Upgrade Your Speedlight to a Studio Strobe
I’d argue that nearly all of us owned a speedlight at some point before we owned a studio strobe. When we’re looking to dip our toes into supplemental lighting, strobes seem like a big investment. It just makes sense to pick up a cheap speedlight to play with, right?
I immediately wished I’d done it sooner. Here’s why.
Defining Strobes and Speedlights
Firstly, let’s all just get on a similar page with the whole speedlight and strobe thing as there are some who think they’re the same thing.
Speedlights
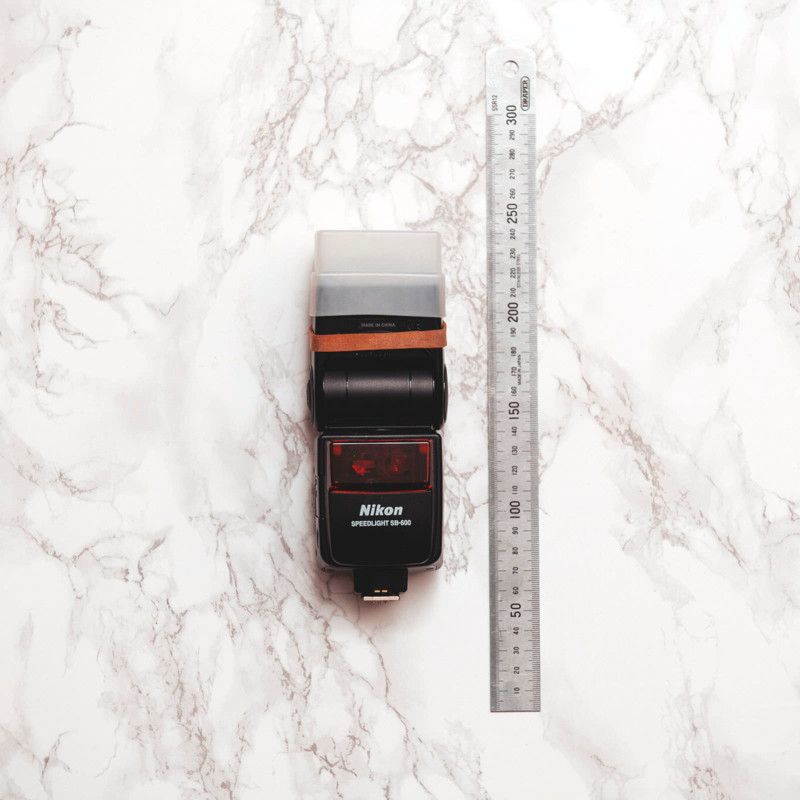
To clarify what I will be referring to as a ‘speedlight’ in this article, I mean the little black boxes that bend in the middle and are usually designed to sit atop your camera via the hotshoe.
There are a million and one cheap versions of these, but you can also spend a lot of money for more features if you need them.
Speedlights are also battery-powered and will often have a small LCD screen on them that displays limited info regarding power, battery life, and outputs, etc.
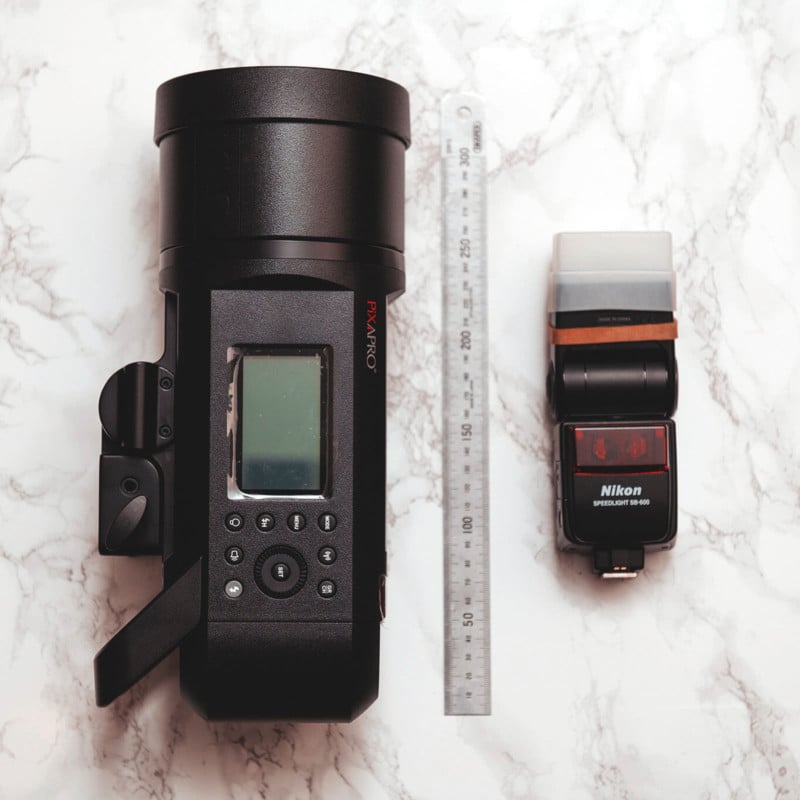
Studio Strobes

From here on out, I’ll be referring to these simply as strobes and these lights are very different from speedlights so shouldn’t be confused.
Firstly they are a lot bigger and a lot heavier making them impossible to mount on your camera via the hotshoe adapter. Plus, although many use speedlights off-camera, many see strobes as the more sensible OCF (off-camera flash) option due to a multitude of reasons I’ll explain in a moment.
Strobes also tend to be significantly more powerful than speedlights (they can produce a brighter light) and although some older strobes are still powered by cables plugged into the wall, many consumer-level strobes are now battery powered.
The Features and Benefits of Both
As I know many people will likely feel attacked if I just simply appear to trample all over speedlights, let me be clear that all some photographers need, is a speedlight. Strobes are not for everyone, but I do think that some photographers are using speedlights that should, or at least could, be using strobes to improve their work and their skills in the long run.
Is a speedlight right for you, or should you get a strobe?
For me, the primary reason for using a speedlight is…(wait for it), speed. If you are someone that absolutely needs to get the shot at a split-second’s notice with very little to no prep time, speedlights are definitely the way to go.
Wedding shooters, paparazzi, reportage, journalists, certain sports, all of these disciplines thrive with the use of a speedlight. You can grab a shot at a moment’s notice and no matter if it’s inside in a dingy corridor or outside on a gloomy day, you have the power to properly illuminate a scene in front of you. Yes, you can use your speedlight off-camera and trigger it like a strobe, but this does require a little prep time. Plus, wouldn’t a strobe be a better choice for this if you had that extra time?
Is a strobe right for you?
If you’re someone that has a little more control and time prior to firing the shutter, chances are you’re ready for a strobe. If you’re working indoors, whether it be on location or in a studio and you have the ability to talk to and communicate with your subject or otherwise have complete control of it, chances are that a strobe is going to be a good fit. Portrait shooters, car photographers, still life, fashion, editorial, family, really anything that involves you having a little time and control, strobes are probably the best fit.
Still not convinced? Read on and I’ll explain where your speedlight may be letting you down, plus I’ll also talk about a third option that may be perfect for you.
What’s Wrong with My Speedlight?
Some of you may be perfectly happy with your speedlight and you may be happy with the shots you’re taking with it. But could they be better? It’s my opinion that yes, yes they can.
I can wholeheartedly say that I would never, ever want to go back to shooting with speedlights. Almost every shot I take now is better because I use a strobe instead of a speedlight. Yes, that’s just me and my particular work, so your mileage may vary, but if you don’t believe me, ask around. Ask some of your friends or colleagues that now own a strobe, ask them how often they still use their speedlight. Why would they?
So if everybody who gets a studio strobe never looks back, what are you potentially missing out on?
For me it comes down to quality of light and the vast majority of the time, speedlights simply can’t compete with strobes in this regard.
What does quality of light even mean?
This is a very difficult thing to quantify and even if I showed you, you still may not be able to see it yet. Essentially speedlights illuminate their subject in a very tell-tale way and to the experienced photographer, you can often spot a shot lit by a speedlight over a strobe a million miles away. This is not a good thing. This is not user error, this is simply the physics and constraints of a speedlight.
By its very design, a speedlight has to fire a ton of light down and out of a very small chute. There’s no way around this as the poor little thing is perched atop your camera and no amount of prisms, cloudy Tupperware, or cigarette papers is going to soften that very hard light enough so that it looks non-speedlight-like and more natural and pleasurable to look at.
It’s in the Delivery
Here is where I’ll start to give my opinions on where the limits of a speedlight are and how a strobe can potentially outperform them.
TL;DR It’s all about how the flash delivers light to the modifier they are attached too.
I mentioned at the start that there was a ton of options for both speedlights and strobes and you can get both cheap and expensive versions of each. But don’t think this is about money, because it isn’t. In fact, you can get many speedlights that cost a lot more than strobes, but I, and many others, would happily use the cheap strobe over the expensive speedlight, because like I said, it’s all about the delivery of light.
I am of course referring to the delivery method of the flashlight or photons themselves. The speedlight is unfortunately always held back by that tiny chute to deliver its light, whereas the strobes will often have their light source fully exposed for all to see. These two delivery methods will provide drastically different results, but take a look below to see what I mean.

At this stage, you may be thinking, “Well, I want my light to actually illuminate what’s in front of me. Not what’s above, below, and to the side of me. Why would I want a light that does that?”
Of course you’re absolutely right, the light needs to illuminate what’s in front of you, you just need to remember that it’s rarely the bare bulb light that is hitting the subject, as the light is nearly always modified by a lighting modifier like a softbox, beauty dish, grid and so on first.
Speedlights are excellent straight out of the box with no lighting modifiers, whereas strobes really do need a modifier to work as intended. It’s when we start to add lighting modifiers into the mix that speedlights start to fall apart.
Quality of Light
I wrote about this same subject specifically many, many years ago and you can read the original article here, and although I cover my concerns with speedlights there, it’s most certainly worth a revisit here as the physics of light hasn’t changed, nor are they likely to anytime soon.
A quick recap on what we’re looking for in quality of light: a clean and aesthetically believable light that doesn’t look artificial and jarring to the viewer when seen.
Elements of light that can trigger this almost ‘uncanny valley’ of ugly light are blotchy or patchy light. Light that drops off from light to dark in unbelievable ways, light that covers a large area but fades at the edges, and more. Yes, there are many more examples of unnatural light and yes, although these characteristics in nature can occasionally happen, there are specific circumstances surrounding them.
One well-known characteristic of light is that it travels in straights lines (again there are extreme cases where light bends thanks to gravity, but for the most part, it goes straight). The light from the sun travels to us directly and as such, creates strong shadows thanks to how small the sun is in relation to us.
Remember: The smaller the light source relative to the subject, the harder (more contrasty) the light becomes.
The sun is a tiny spec in the sky, so its light is extremely ‘hard’ resulting in very bright highlights and very dark shadows. This is known as very hard light, or contrasty light.
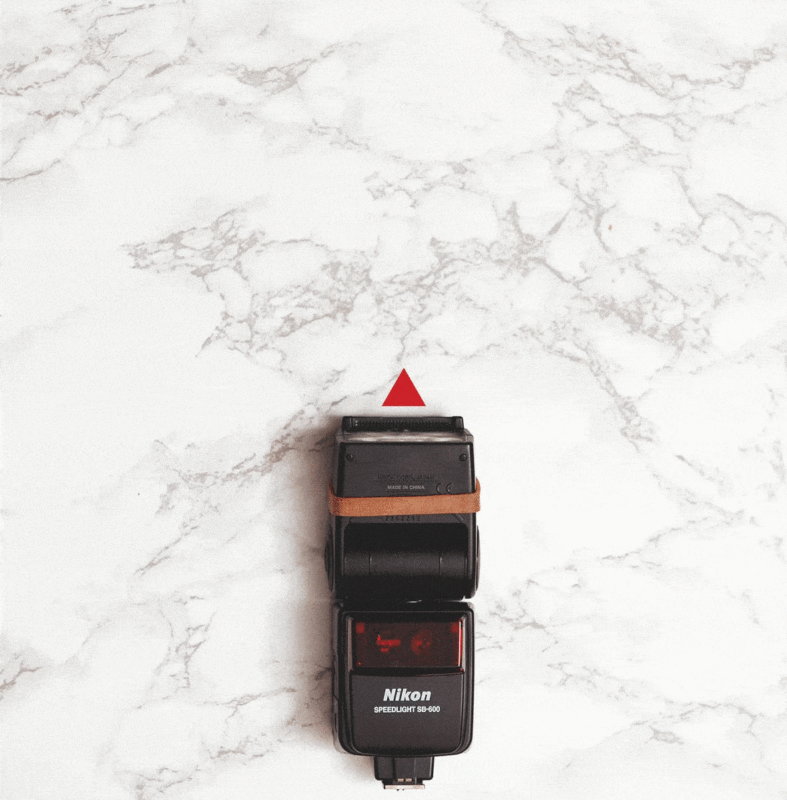
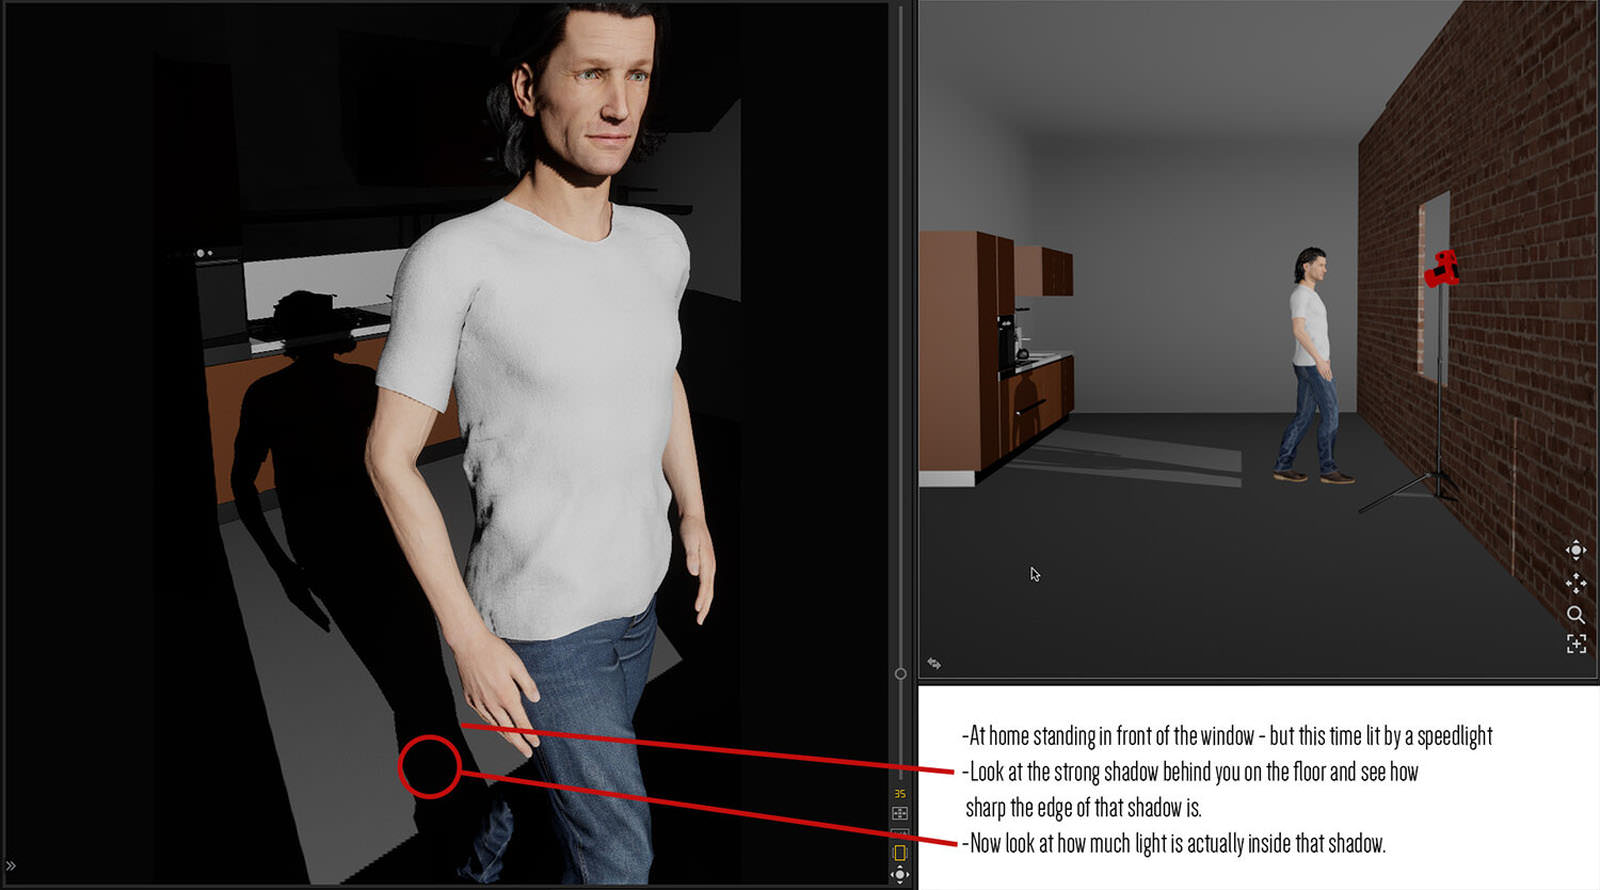
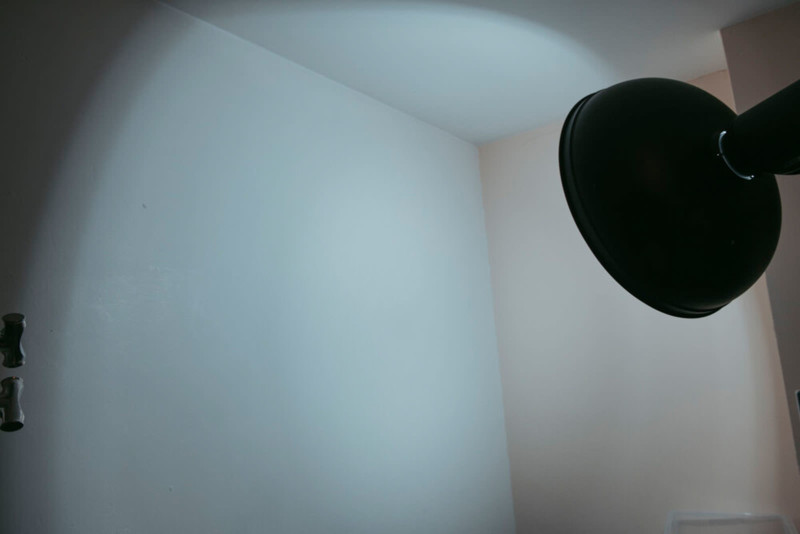
Now picture yourself at home on a bright sunny day and the light is coming through the window in front of you. You cast a shadow on the floor behind you, right? The edge of that shadow is very sharp thanks to the sun being a very hard light source, but how come your shadow isn’t jet black? How can you see detail in that shadow if no light is reaching it?
The reason for this is because sunlight is also hitting and bouncing off everything around you. This results in that light also falling onto that very dark shadow as well and it’s why it doesn’t appear jet-black.
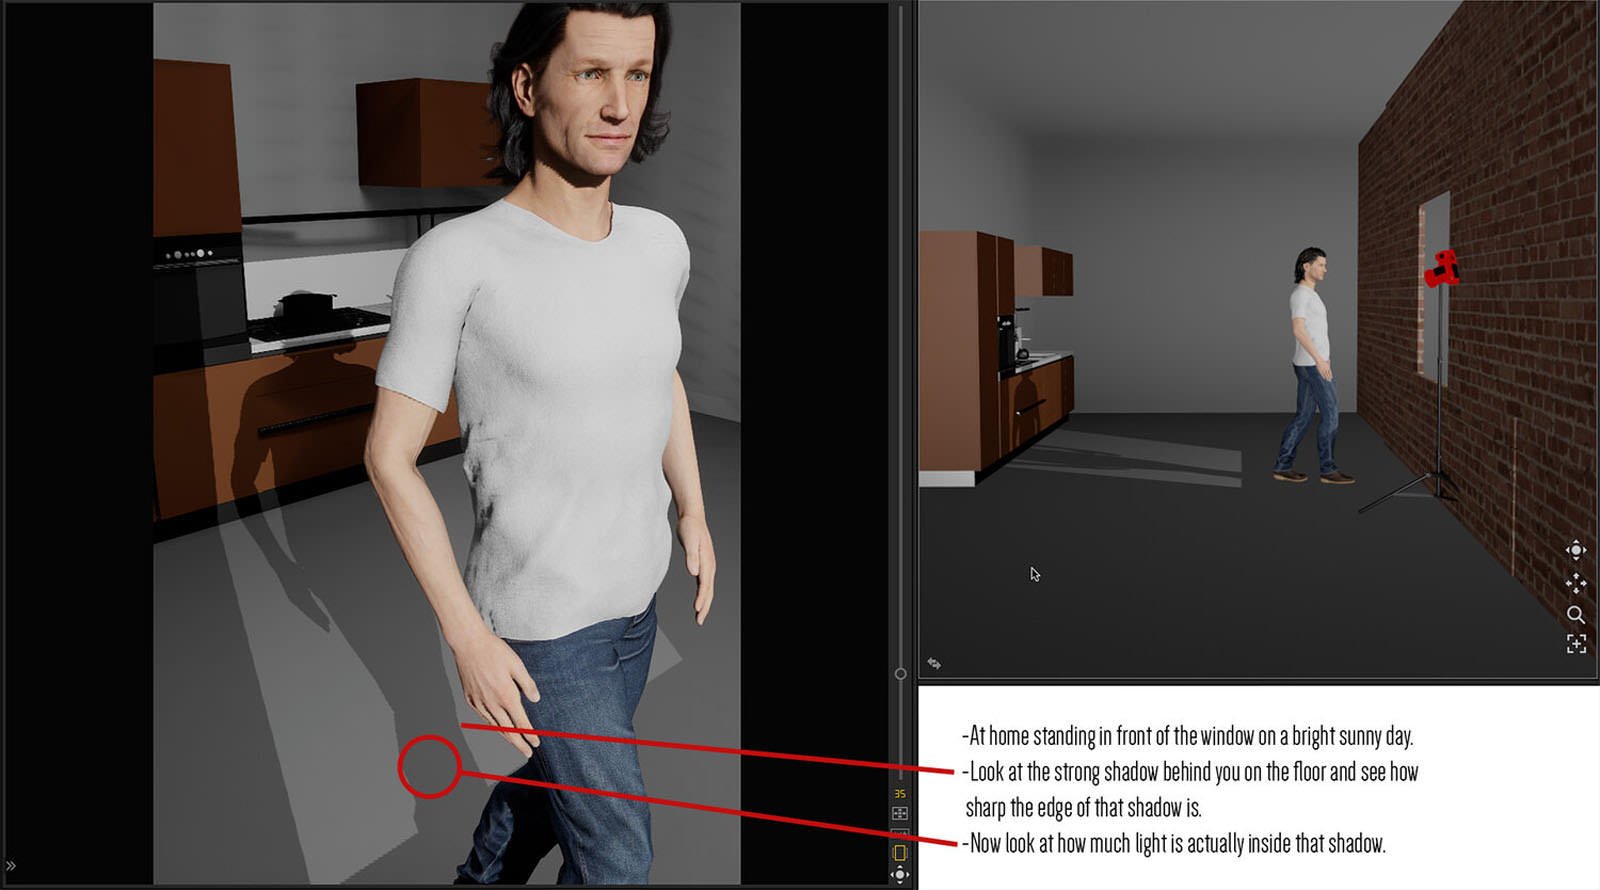
As you can see in the image above, the shadow has light within it and this is how we see the world around us the whole time, nearly every shadow actually has light within it. I won’t get too involved in this here, but this is what I’ll often refer to as ‘shadow light’ in my workshops and training and although many don’t teach it, it’s a fundamental part of every image we see and take, yet many overlook this in studio lighting.
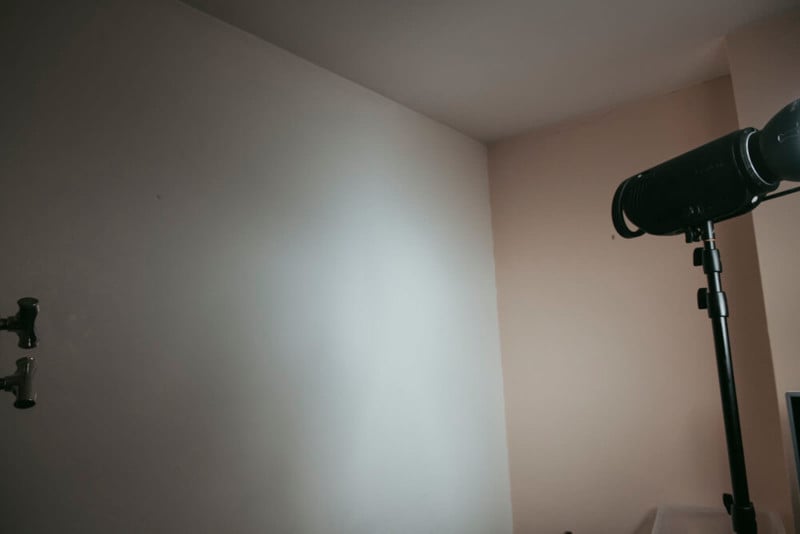
The same scene, but lit with a speedlight
Now let’s shoot the exact same scenario with a speedlight. After all, the sun is a tiny spec in the sky and casts very hard shadows, surely the speedlight should do the same right?
It should now be immediately obvious as to where the speedlight is falling short. Yes, it creates the same bright, contrasty highlights and razor-sharp shadows, but those shadows are jet black with almost no light in them whatsoever. I’m sure many of us have taken a very similar speedlight shot with those exact same jet-black shadows.
The reason for this is the very directional light that speedlights produce. They fire that hard light straight out and it has no chance to bounce around and spread onto other surfaces. It’s this type of light that immediately looks unnatural and wrong, even though many of us may not be able to explain why.
To be clear, I’m by no means saying that strobes produce light similar to that of the sun, but I do want you to start seeing the differences between a hard light that spreads light in multiple directions like a strobe and a hard light that only spreads light in one direction like a speedlight.
Practical Comparisons
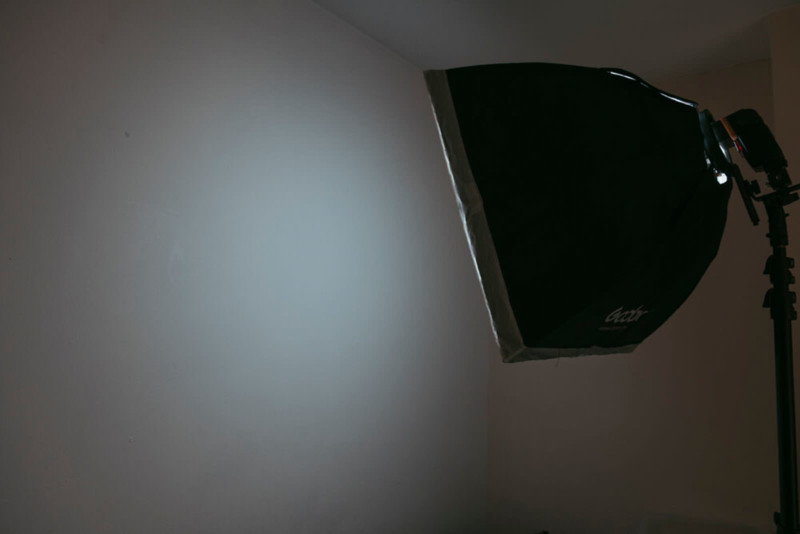
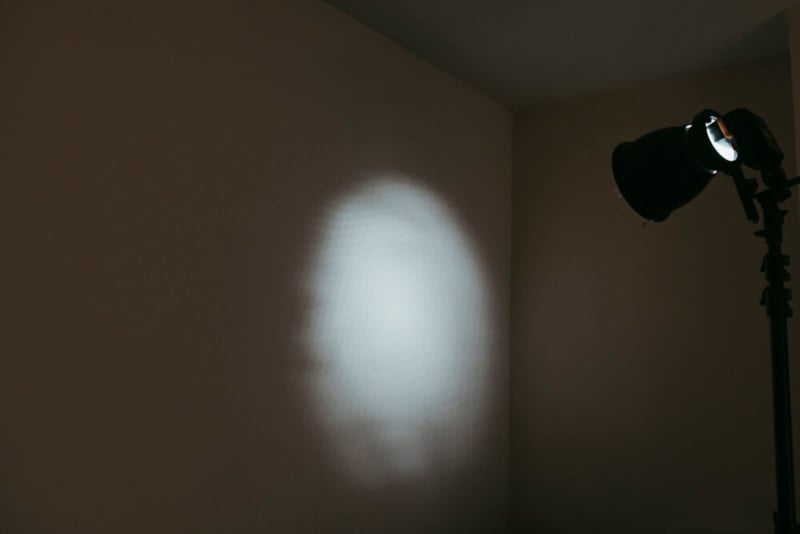
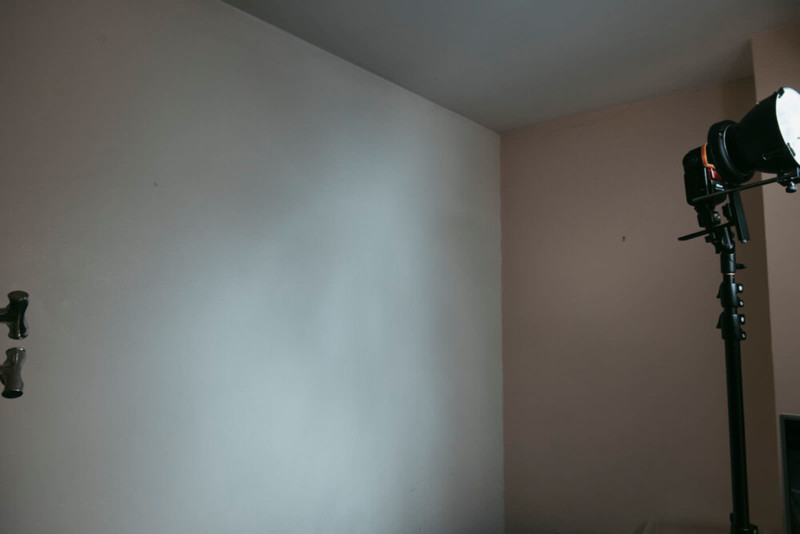
So how do speedlights actually compare to strobes in terms of quality of light in the studio? In this section, I’m assuming you will be modifying your lights with softboxes, umbrellas, grids, etc. And here I want to show you how both the speedlight and strobe lighting looks after it has been modified.
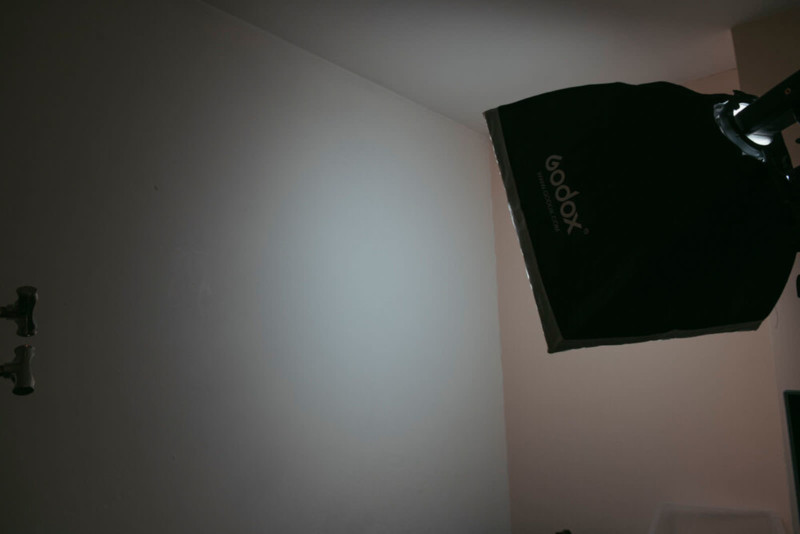
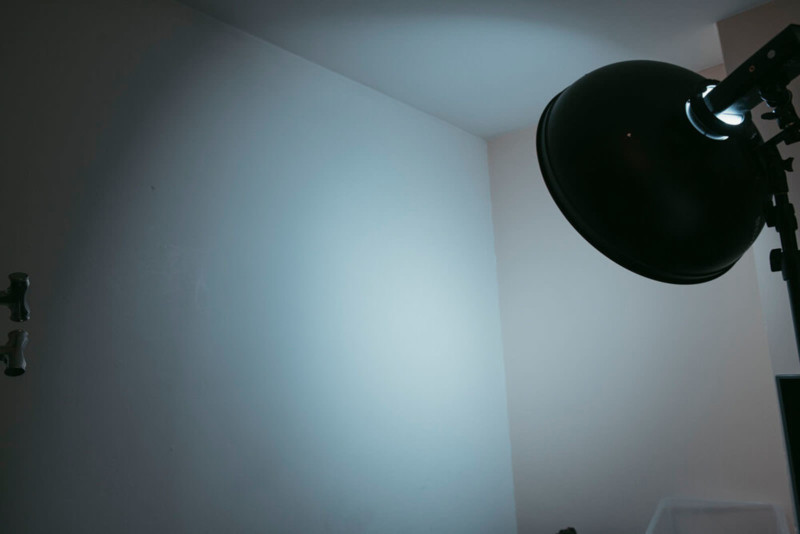
Here is the resulting light from a softbox attached to a strobe and a speedlight.

Here is a strobe and a speedlight with a grid

Here is a strobe and a speedlight with a silver umbrella
Here is a strobe and a speedlight with a beauty dish

What should be apparent by now, is just how different a speedlights quality of light is compared to a strobes quality of light. The speedlight holds up remarkably well when dealing with very diffused modifiers like the softbox, but when you move into more directional shapers of light, things start to fall apart. The grids leave a distinct honeycomb pattern on the wall, the umbrella leaves a mottled and marbled pattern and the beauty dish is simply nowhere near fit for purpose.
The speedlight simply cannot compete with the strobes and nor should it. Speedlights are quick and responsive solutions to lighting situations and in that test, they would beat strobes every time.
But can we have both lightweight and great quality of light from our flash?
I think by now we’ve established a few key things. Speedlights are great if you need a fast and lightweight solution for when you absolutely have to illuminate the scene in front of you and move on. This is obviously ideal for wedding and paparazzi shooters for example. In contrast to that, the studio strobe is great for when we really want beautiful quality of light and we don’t mind sacrificing time and maneuverability to get it. This is ideal for fashion and still-life shooters who work in a studio.
But is there a middle ground? Is there a way to have both lightweight and maneuverable lights, that also have fantastic quality of light?
Thankfully, there might be.
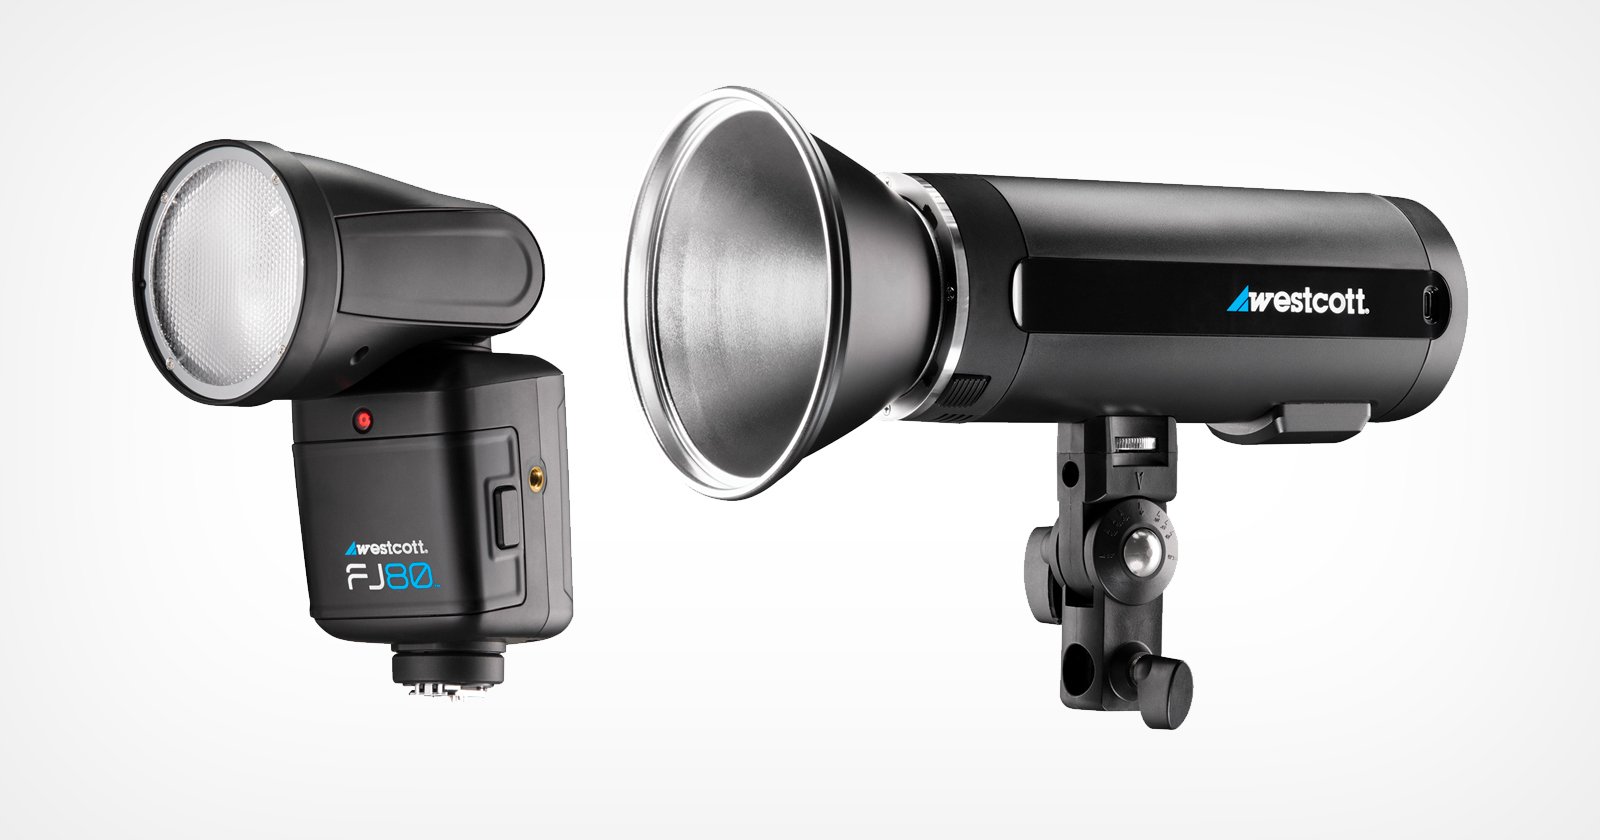
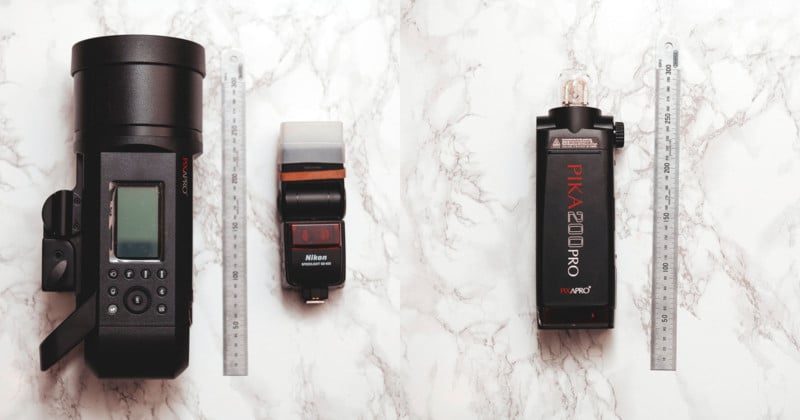
There is a flash out there that is only slightly bigger and heavier than a speedlight, but it also has the ability to deliver strobe-level quality of light. This little flash is the Godox AD200 (AKA PIKA200 here in the U.K.).

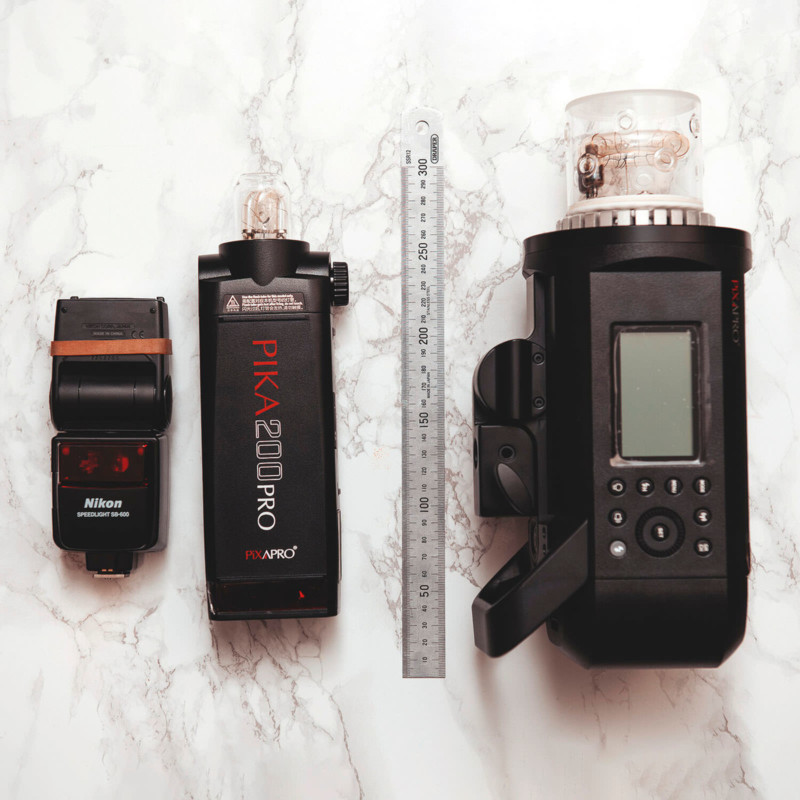
As you can see from the image above, the AD/PIKA200 is tiny (compared to a studio strobe) and at 880 grams (560 grams without battery and flash head), it’s pretty damn lightweight too. For reference, a typical speedlight weighs around 12.3oz/350g plus 4x AA batteries at 0.95oz/27g each and a 200w strobe (Lumina 200) weighs around 4.4lbs/2kg.
Note: Godox lights are almost always called something different in each country. Godox sells the lights to distributers and they often brand them differently. For example, in the U.K. they are branded as ‘PixaPro’ lights by Essential Photo and in the U.S. they are branded ‘Flashpoint’ by Adorama. My point here is that if they look like these lights but are called something different, they are likely the exact same lights made by Godox in China but with a different label.
So what’s the big deal?
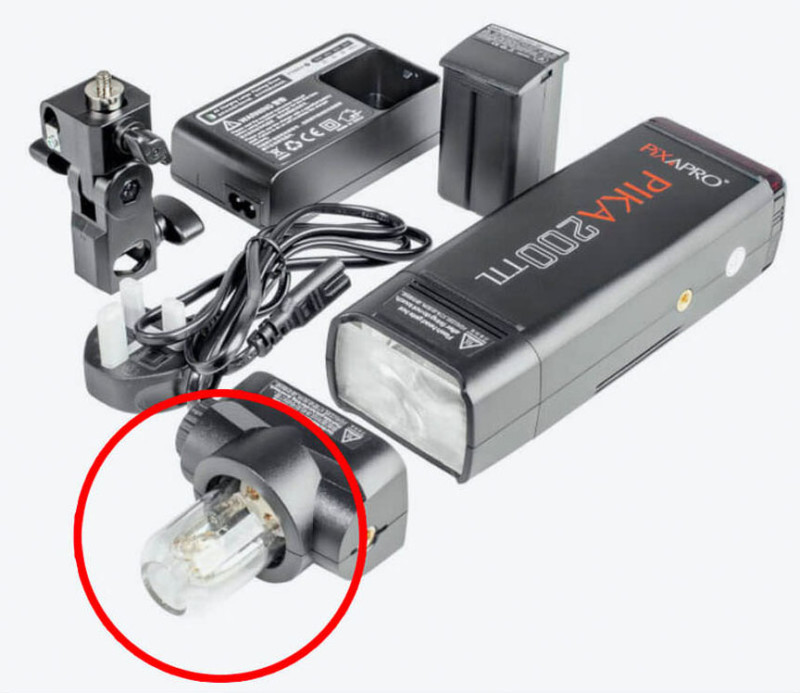
The big deal is the genius exposed flash tube attachment! This little feature changes everything in my opinion as this allows us to access and properly use so many modifiers that were previously rendered almost useless to regular speedlights.
Take a look at how the PIKA/AD200 performs with some of the modifiers I used earlier and make your own decisions.


I think you’ll agree that the exposed bulb of the AD200 easily proves itself as being able to provide beautiful quality of light, plus it comes in a tiny package too. The softbox is as expected and although I would avoid the grid modifier here, the umbrella and beauty dish lighting qualities are marked improvements.
Note: My guess as to why this AD/PIKA200 doesn’t quite match strobe quality level lighting, for example the grid modifier, is likely due to the bulb being physically smaller. Yes, the bulb is exposed, but it is small in size and this results in a harder light. This is seen most noticeably on the grid as that little bulb shoots straight out.
Field Testing
Firing it at a white wall is one thing, but how does the AD200 perform in reality on a portrait shoot. In the following images, I’ll show you how the AD/PIKA200 looks when used as a keylight on a portrait shoot compared to the same image being taken with a studio strobe.


Conclusions
I think even the most skeptical would agree that the AD/PIKA200 holds up remarkably well when compared to a regular studio strobe. The quality of light is excellent and the exposed bulb attachment is making the most of the lighting modifiers that have been specially designed for studio strobes.
So why aren’t we all running out to get these AD200?
As you may imagine, these little pocket-rockets have some limitations you should be mindful of…
Power Output
These are 200w strobes so if you’re used to a 500w strobe, these will be less than half as powerful. But is that as bad as it sounds? In reality, no. With lighting, you have to double the power to get 1 stop extra of light. So if we had a 500w strobe that we were already firing at full power, yet we needed one more stop of light, we could either get a 1000w strobe and fire that at full power, or we could simply increase our ISO from 100 to 200 on our cameras. Both of those would result in the same increase in brightness.
You start to see how little an impact having a 200w strobe may be compared to a more powerful 400w or 500w strobe, it’s simply the difference between increasing your ISO one stop or opening up your aperture one stop.
Shoot Time
The AD200 quotes as having a battery power equivalent to 500 full-power flashes. Chances are that’s enough for most people for one shoot and I expect it’s highly likely that you won’t be using it at full power the entire time. Remember how I explained power output above? I mentioned that to get one more stop of light, you’d need to double the strobe output. The same applies here, so if you were to fire this AD200 at one stop below full power, you’re immediately looking at 1000 flashes compared to 500 at full power (it’s likely not quite as much as this in reality, but it will be a significant increase).
Chances are, this battery power is more than enough for most shoots and even if you did need more, you can simply slap in another battery if it runs out. -For context, the bigger studio strobe that costs more than twice as much as the AD200 (the Godox Citi400 Pro (Wistro AD400), provides 390 full-power flashes from a single battery charge.
Recycle Times
Another factor is recycle times. If you’re not sure what this means, it’s essentially the time delay between firing the flash and firing it again. For example, on the AD200 it will take 2 seconds between full power flashes at 200w, compared to around 1 second at full power on the CITI 400 at 400w. This may not be an issue for you, but if you’re one of those crazy fashion shooters who’s firing off a million frames a minute, this slower flash charge time may be a factor to consider.
Color Consistency
I personally believe this is less of an issue than people make out, but color consistency refers to how much the color temperature of your flashbulb fluctuates between flashes. For example, the AD200 fires a flash with a color temp of 5600 Kelvin, but that can fluctuate up or down by 200K. By comparison, the CITI400 quotes a flash color temp of 5600 Kelvin, but between each shot that temp will only fluctuate up or down by 75K. Is this a deal-breaker? I doubt it very much. Most of us are shooting raw and that color temp can easily be adjusted, plus many wouldn’t even spot the difference anyway. On top of that, bulb age. environment and modifier will also affect this from shoot to shoot so this is a non-issue for me and many others. Just be mindful that this gets more apparent if you’re shooting with multiple lights. For example; one light could be +200K and another could be -200K. This is extremely unlikely of course, but with a deficit of 400K, this cannot be easily fixed in post when multiple lights are varying color temps. Again, this is rare and only applicable to the highest end of users.
Build Quality
Another important area to consider with the AD200’s is build quality. There is absolutely nothing wrong with the build of the AD200, but they will not stand up to the regular use and abuse a full-blown metal cased strobe like the CITI400 may experience over years of shooting. If you’re only using the AD200 a couple of times a month and you’re sensible, keep it in its case and don’t leave it rolling around in the boot of your car, I’m sure this will last many, many years.
Modeling Bulb
A modeling bulb is a small light that is always on when you have your flash unit switched on. The modeling bulb can help to focus in low-light situations as well as help you get an idea of what your light is doing before you fire the flash. Most speedlights do not have a modeling bulb, but most strobes do. Ironically, the AD200 exposed strobe bulb attachment does not have a modeling bulb, yet the speedlight attachment does. If you’re a speedlight shooter, you’re likely very familiar with dealing with no modeling bulb, but if you’re a strobe shooter this may be awkward to deal with at first.
Closing Comments
I’ve tried to be as objective as my conscience would allow up until this point, but now I’ll be a little more candid for my closing thoughts. Feel free to skip this if you’re easily triggered though.
The AD200 is a truly excellent little strobe unit. It’s crazy-cheap for what it can do, it’s lightweight, packs up small, takes a ton of shots on a single charge, and most importantly… it produces excellent quality of light shots.
The exposed bulb attachment on the AD200 is the secret weapon here (yes you can use it with the alternative speedlight head that it comes with, but I recommend not doing so). This exposed bulb allows for the light to properly fill the modifiers that we’re all familiar with using and remember, the modifiers were all designed with that exposed bulb flash delivery in mind.
The reason I’m laboring this point is that your speedlight, or even your strobe with an enclosed bulb, may be holding you back. and just because this AD200 is cheap, doesn’t mean that it’s crappy at all, in fact, I would go as far as to say that I would use this over a Profoto B1 that costs nearly 10 times this!
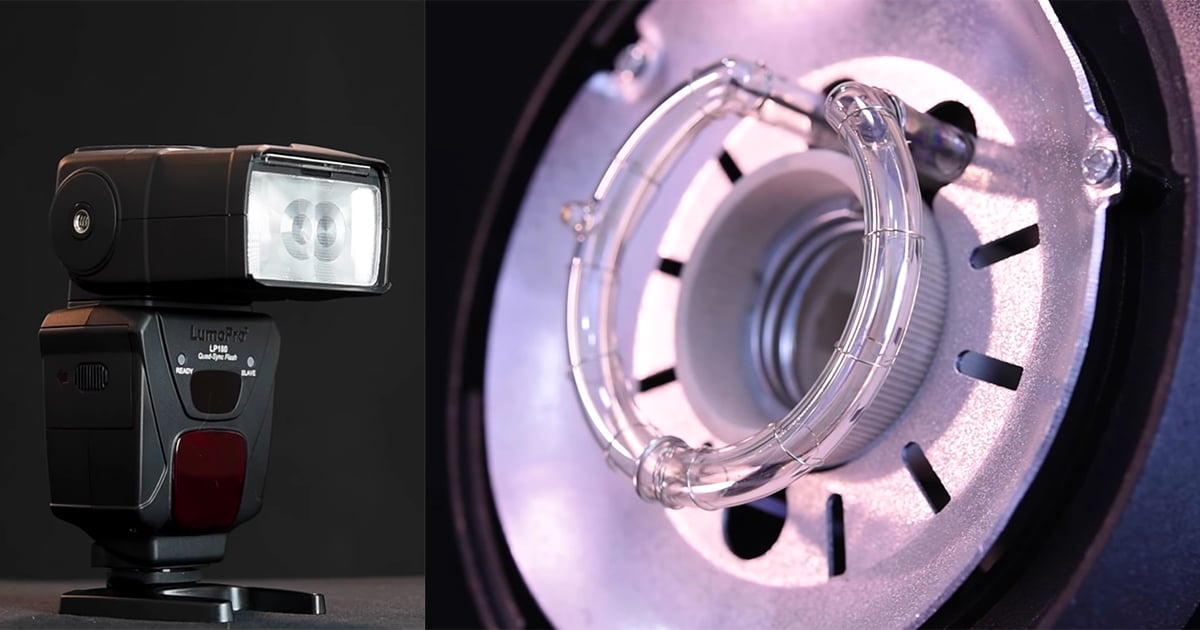
Now, just before you close this tab and walk away laughing, hear me out. Profoto, according to many professionals, myself included, dropped the ball a little with their B1s and D1s. Why? Because of their somewhat bizarre design choice to recess the flash tube in that long tube. Take a look below at the B1 and D1 if you’re not familiar with them.
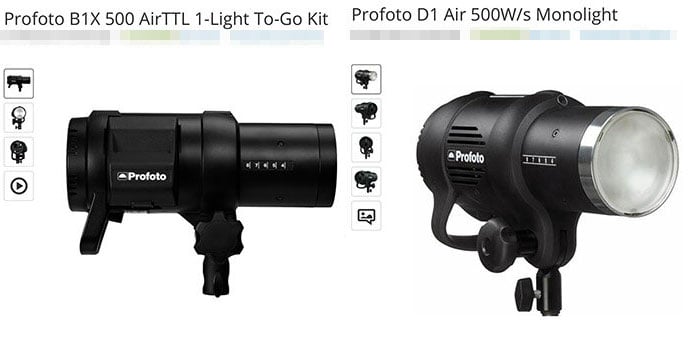
To be clear, I’m not crapping on these lights, as they are likely excellent units and many, many photographers are extremely happy with them. But, for what I do and the modifiers I use, they are simply not fit for purpose and many were baffled by their decision to place the bulb where they did. Don’t just take my word for it though and you can easily find more examples online where others are voicing their confusion.
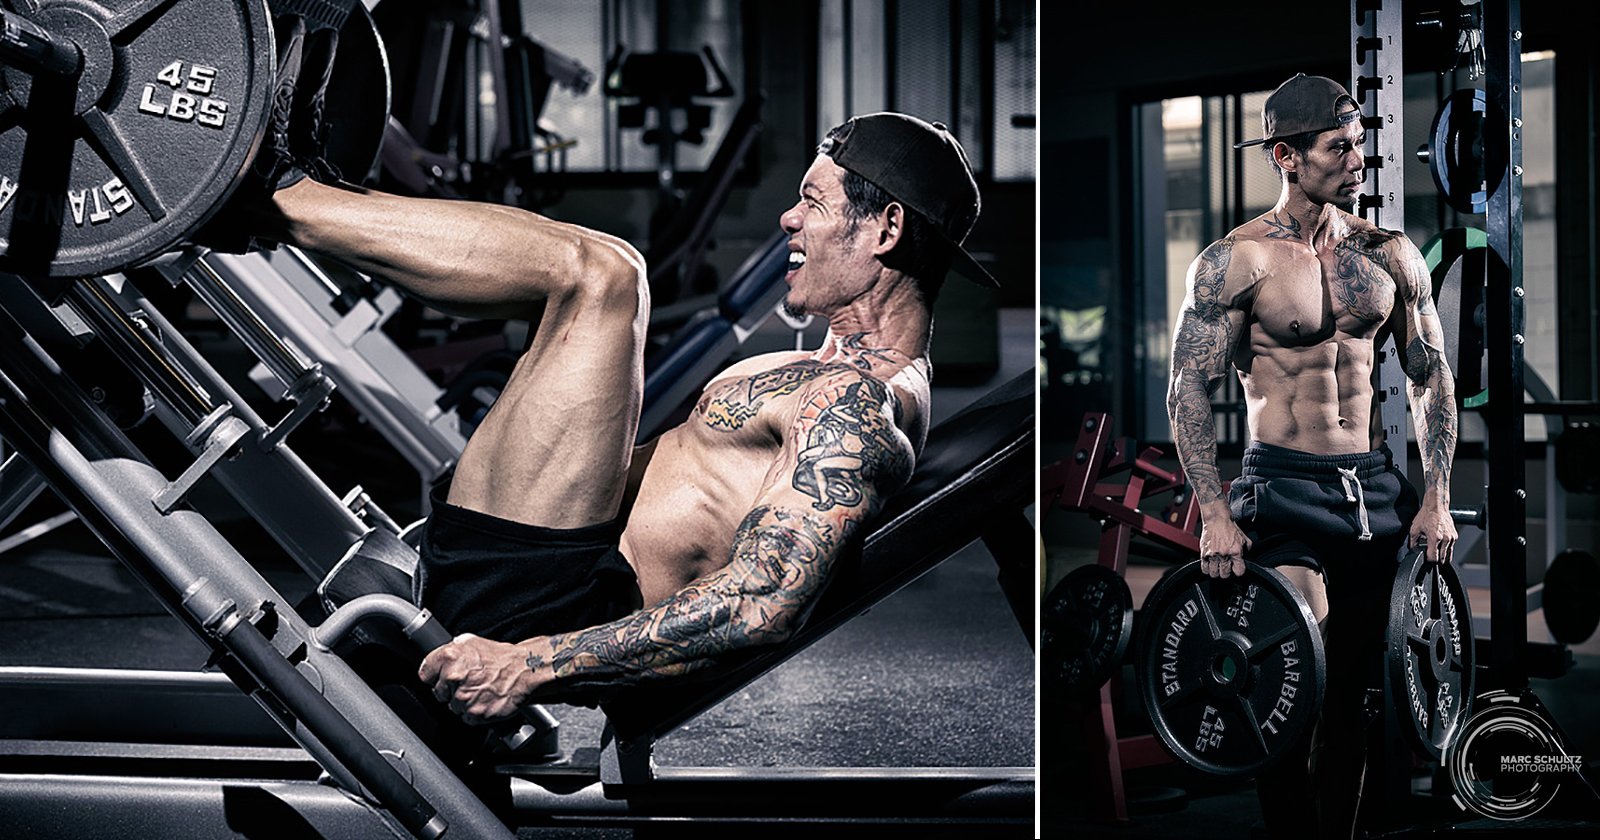
Yes, the bulb is very protected in that tube and that is clearly a more sensible place to put it for a battery-powered strobe that is designed to be used on the road and up a mountain if that’s where you are using it. Plus, if you’re a shooter that predominantly uses softboxes, this will be absolutely fine too (within reason and a hot spot is still apparent in certain sizes and depths), but if you’re a photographer like me that uses a wide variety of modifiers, this will cause you issues. What was most bizarre though, was that Profoto didn’t seem to test this new design with their own popular modifiers. Take a look at the quality of light from their very popular beauty dish on the B1 below.
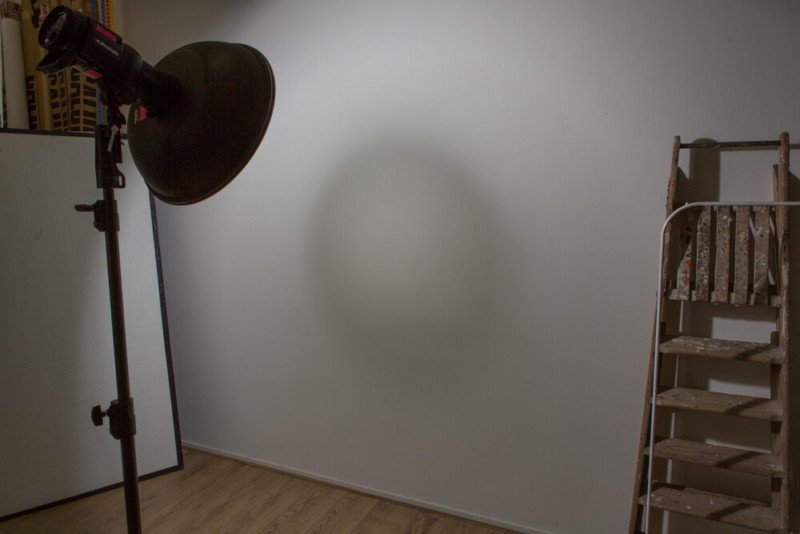
I think it’s safe to say that Kasimir was not impressed with the results. Just in case you were confused, the huge black circle in the center of the light is not a good look for a portrait!
To be fair, Profoto did almost admit that there was an issue with their design and if you were among the many concerned photographers that bought one of these recessed bulb strobes, you could purchase some frosted domes that sat on top. These supposedly spread the light a little more.
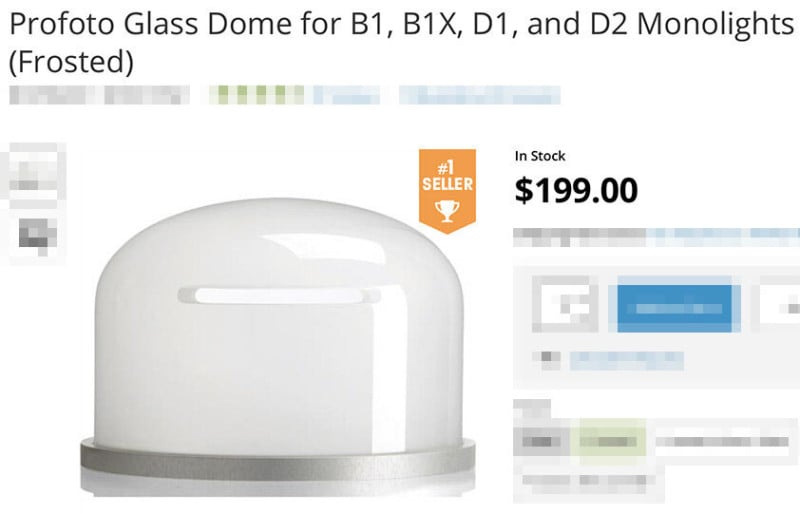
Putting aside the fact that these little domes cost nearly $200 each, sadly they really did very little to change anything because…. you guessed it, the flash tube is still recessed in the bottom of that tube.
Look, I’m not going to turn this into a slagging match, and if you’re a Profoto user that is very happy with your strobe, that is fantastic and you are making it work for you and your images. Those portable B1s and D1s strobes are excellent for shooters on the move and everybody has different requirements from their kit. But, if I hire a studio that comes equipped with B1s or D1s etc., I need to be aware that I may need to hire alternative lights for the work that I do, or I need to use alternative modifiers.
Lighting modifiers are designed with an exposed flashbulb in mind, the recessed flash tube is a modern thing after all, and using a strobe or speedlight with recessed flash tubes may well result in poor quality of light.
All I’m asking is that you be mindful of everything I’ve spoken about here today. One thing to try is to test your current flash unit against a white wall like I did above. Test it with a variety of your favorite modifiers and see how they do. But don’t beat yourself up if you cant achieve certain looks with these recessed flashtube products, as it’s one of the rare cases where your kit is holding you back.
Will I be switching all my lights to AD200?
No. The build quality, although fine, it isn’t great for busy and varied shoots both in and out of the studio long term. Plus, there is the extra faff with the lighting modifier holder that I need to set up each time too. But, if I were starting out today and I didn’t already own 10 studio strobes, this would be a no-brainer purchase.
I’d urge anybody to skip the speedlight step in your photography career and go straight to these.
Plus, if you do decide to get into strobe photography more seriously later on, you can still use these in conjunction with your new strobes too.
The other deal-breaker for me is the lack of modeling light when using the exposed bulb attachment. I do find it a lot easier to see and understand the light when there is a modeling bulb. Plus, it obviously makes focusing in a dark studio much easier when you have a modeling bulb to light your subject.
If you’re someone who only uses the flash a few times a month and will be taking care of it, this little AD/PIKA200 will serve you well for many years. If you’re someone who plans to use this outside to add a little pop of light in a portrait, this is ideal. Plus, if you’re all too familiar with lighting without a modeling bulb from your speedlight experience or you’ll be shooting indoors in a well-lit space and you can focus easily without the modeling lamp, the AD/PIKA200 is perfect for you.