How to Optimize Lightroom Classic for the Best Performance

One of the consequences of reviewing computers for PetaPixel and running benchmark after benchmark is that you learn a thing or two about working in Lightroom. From weird quirks to the optimal performance settings for import, export, and editing, there are a few key changes you can make to coax a little more speed out of Adobe’s Raw editor.
So if you, like me, are addicted to the Adobe monster, here are a few simple changes that could save you a little bit of time and a whole lot of frustration.
Table of Contents
Enable GPU Acceleration
One of the simplest (and quickest) changes you can make to improve performance in Lightroom Classic is to enable full GPU acceleration. For whatever reason, this feature is not fully enabled by default.
So go to Preferences > Performance, change the dropdown menu at the top from “Auto” to “Custom,” and check the box next to “Use GPU for image processing” to enable full acceleration. This can make a noticeable difference to your actual editing workflow, especially if you edit on a 4K display, and Adobe is adding GPU acceleration to more image processing tasks with nearly every update.
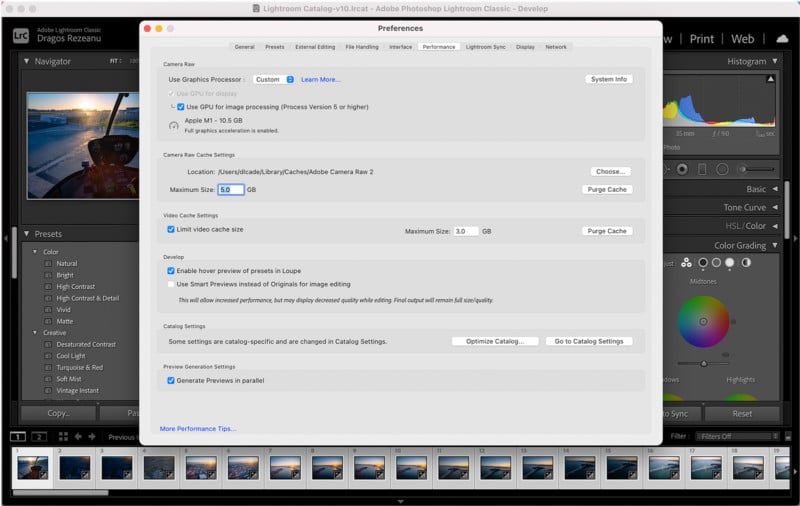
Obviously this will have the most impact if your computer (laptop or desktop) has a discreet GPU. But even the latest integrated Intel graphics or the graphics built into Apple’s M1 chip can and should be used to their full potential.
Screen Resolution
A lot of people don’t realize that Lightroom penalizes you for increased screen resolution. No, really. Adobe confirmed this to me several months ago when I asked why the 13-inch MacBook Pro I was reviewing was importing images faster than a 2020 Razer Blade Studio. The 4K display on the Razer takes a bite out of overall performance and hurts import times because the laptop has to create larger Standard previews by default.
We’ll talk more about previews in a second, but on some level this is a natural consequence of using a graphics application that has to literally draw more pixels when you’re using a higher-resolution display.
You can get around this a few ways. According to Adobe’s own documentation, you can speed up performance by simply making the Lightroom window smaller:
A high-resolution display has a native resolution near 2560 x 1600, and is found on 30-inch monitors and Retina MacBooks. To increase performance on such displays, reduce the size of the Lightroom window, or use the 1:2 or 1:3 views in the Navigator panel.
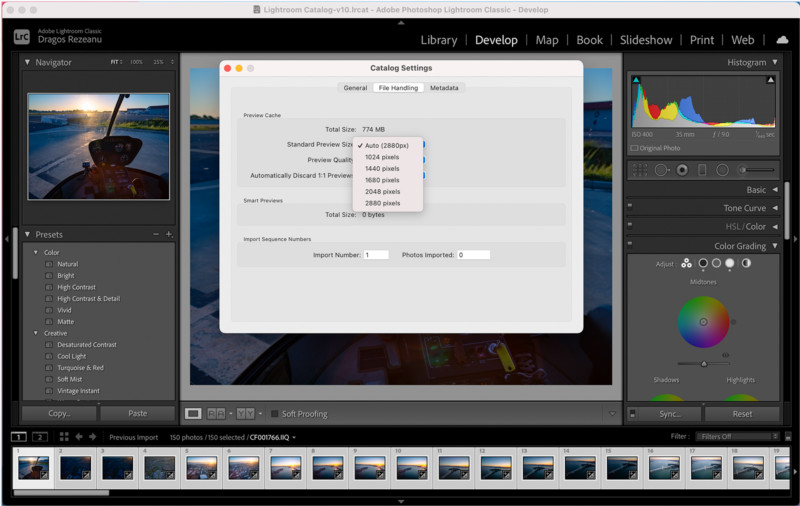
There’s one other setting you should check. Go to Catalog Settings > File Handling and make sure the Standard Preview Size matches the longest edge of your screen resolution. This is particularly relevant if you’re using a 1080p display. Lightroom may be generating Standard Previews that are larger than they need to be and hurting performance as a result.
Optimizing Previews
Okay, let’s talk about previews. Lightroom gives you four options when importing images: Minimal, Embedded & Sidecar, Standard, and 1:1. The smaller the preview, the faster your import, but the harder Lightroom will have to work while you’re actually editing images.
Golden rule: always create either Standard or 1:1 previews. If you don’t, Lightroom will have to do this in the background every time you work with an image, slowing performance way down.
For the best possible performance during editing tasks, create 1:1 previews. It takes a lot longer at import, but checking this box will automatically generate Minimal, Standard, and 1:1 previews at the outset, allowing Lightroom to pick and choose the one it needs on-the-fly when you’re actually editing.
Finally, if storage space isn’t an issue and you’ve decided to generate 1:1 previews, make sure that Lightroom keeps those previews for as long as you intend to work on them.

Go to Catalog Settings > File Handling and make sure that “Automatically Discard 1:1 Previews” is set to After 30 Days or Never, depending on long you tend to work on a project before it goes into the long-term archive. If each photo shoot is in and out in 7 days, there’s obviously no reason to take up disk space by setting this to “Never.” But if you’re going to dedicate the time to import 1:1 previews, don’t throw them away before you’re done editing.
Your Camera RAW Cache
Another really simple change that can have dramatic consequences is to increase the size of your Camera RAW cache. By default, Lightroom Classic sets a size limit on your Camera RAW cache (5GB on all of my machines), but if you have the storage space to spare, you absolutely want to increase this to 40 or 50GB. You can find this setting in Preferences > Performance, in the section Camera Raw Cache Settings:
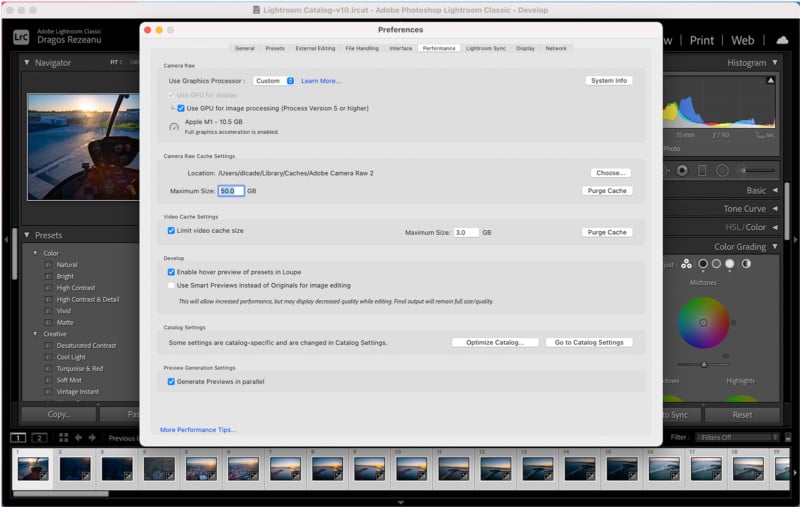
50GB might seem like a lot, but with how big modern-day Raw files can be, storing a full photo shoot’s original image data in the cache will save Lightroom a lot of work every time the program has to look up a photo… which is basically every time you view or edit the image.
Once you’ve increased the default size of your cache, make sure it’s stored on your fastest hard disk. If you use an SSD for your operating system and a traditional hard drive for storage, go back to Preferences > Performance > Camera Raw Cache Settings, click the “Choose” button, and make sure the cache is being stored on your SSD and not the spinning disk.
Optimize RAM settings in Photoshop
Finally, one weird quirk of Lightroom is that its RAM limits seem to be controlled by a setting you access inside of Photoshop. If you use both programs, and especially if you switch between Lightroom and Photoshop a bunch, be sure to go into Photoshop Preferences > Performance and increase the amount of RAM that the program is allowed to access.
By default, my copy of Photoshop CC usually sets this limit at about 70% but I usually increase it to 90% when I’m reviewing a laptop and running benchmarks. This makes a big difference, sometimes increasing the overall score of a PugetBench run by 20 or 30 points.
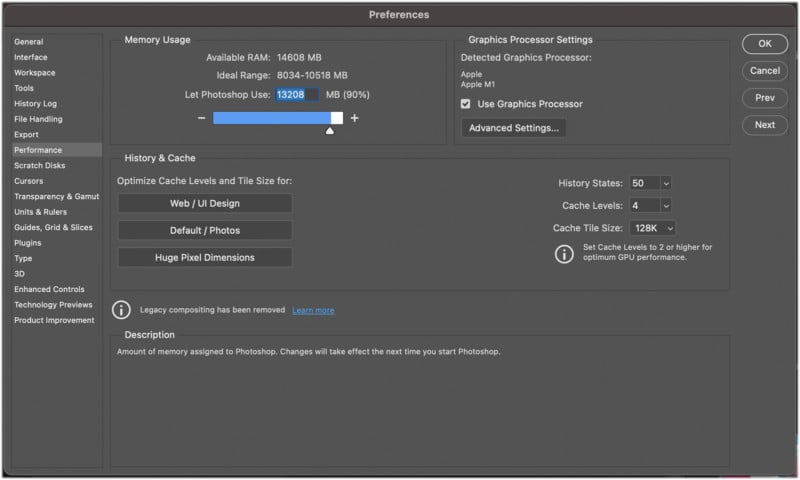
Obviously this can cause problems if you’re running multiple programs at the same time because it allows Photoshop and/or Lightroom to hog all of your RAM, but if you want the best performance, then close down all your other programs (especially Google Chrome) and let Lightroom and Photoshop have all the RAM they can handle during any heavy-duty post-processing session.
Final Thoughts
The above isn’t a comprehensive list of optimizations that you can make by any means. Adobe has a whole support page that goes a bit deeper on some of these points and touches on several others. I just wanted to share the optimizations that made the biggest difference for me—changes that I actually noticed over the course of about 100 import/export runs and countless hours of editing on everything from a 13-inch two-in-one to the most powerful and expensive 16-inch MacBook Pro.
If I missed any important optimizations that have made a huge difference for your workflow, please drop them in the comments (“use Capture One Pro instead” doesn’t count). After all, any advice that will speed up Lightroom Classic performance is worth its weight in torn out hair.
In the meantime, may your CPU stay cool, your RAM plentiful, and your graphics card discreet.