How to Photograph Darker Skin Tones with an Off-Camera Flash
I used to think that skin tone was irrelevant to lighting setups. When I photograph people with a flash, I don’t have go-to numbers for the position of my light (distance, height, and angle). My workflow is placing my light somewhere I think it’ll work and fine-tuning from there.


It took me a while to realize that my lighting positions are actually quite different when shooting people with different skin tones. The first time I discovered this was during a studio shoot. My first model had very pale skin and my lighting setup was perfect for the light effect I wanted. After I start photographing the second model, who had a darker skin tone, I realized that my first lighting setup was quite off.
I ended up having to change the position of 2 lights (the 3rd one was back ground lighting) and also change the power level as well. I was a bit surprised by the number of changes I had to make to my lighting when photographing these 2 models. But actually, this makes a lot of sense. One fact can explain all this.
A lighter skin tone will bounce more light, which makes the shadow harder to preserve. For this reason, when photographing people with lighter skin tones, our light needs to be positioned so the shadow will be protected.
Does this mean photographing people in darker skin tones is easier? The short answer is no. It won’t be easier. It’s just different. To be more exact, the controlling of the ratio between highlight and shadow will be different.
Why This Matters
To better explain this. Let talk about an art theory that painters have applied to their art for centuries.
When placing a bright and dark subject right beside each other the bright subject will look brighter the dark subject will look darker.
Take a look at the following 8 squares that are surrounded by larger square backgrounds. The inner squares are all the same value, but the first one at the upper left appears to be the brightest. Why? Because it has the darkest surrounding.

If we use our light on someone with a darker skin tone in the same way as someone with a lighter skin tone, the shadow will be too dark. This will make the highlight appears brighter. So bright that they look like hot spots even though nothing is overexposed. In other words, the image will be too contrasty. Lots of highlight and shadows but lack of halftone.
To fix this issue, we need to move the light a bit closer to the shadow side so part of the shadow will be lit as well — just part of the shadow, not all of them. Pointing the light directly at the shadow side will destroy your shadow and mess up your midtone. The result will be a flat image with a flashy look.
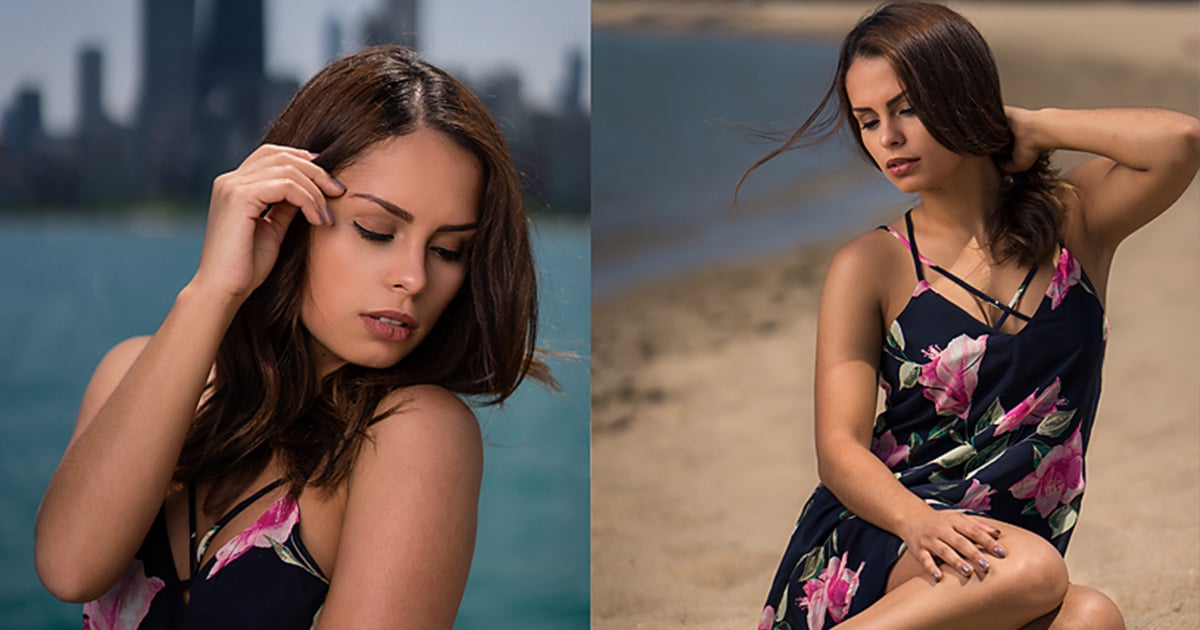
To demonstrate what I mean, the 2 photos below were lit in a very similar way, but take a closer look and you’ll see that I rotated the light a bit more to the shadow side in the first image and more to the highlight side in the second image. The reason is simple: different skin tones.


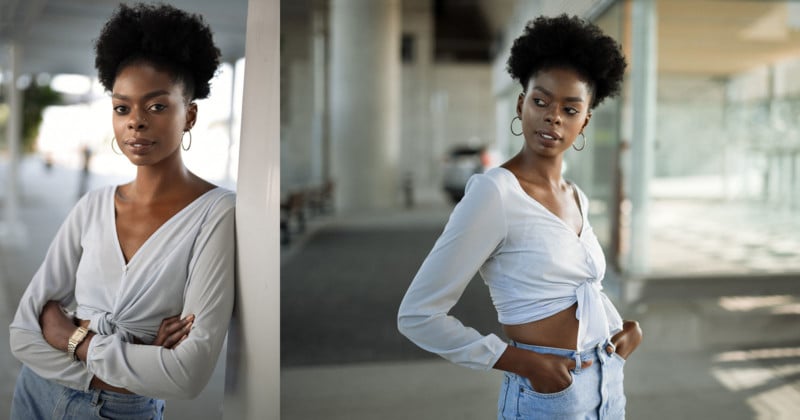
The following are from a recent photo shoot I did with amazing model Chisomo. I used a 24” silver beauty dish in this shoot but the idea is the same. Pay attention to the position of my lighting.
All behind the scene shots were by photographer Hoby Chou.