5 Steps to Ditching Auto and Shooting Manual Mode on Your Camera
If you own a DSLR and have a passion for photography, you have landed in the right place. A lot of people are under the common misconception that buying a new DSLR camera will instantly improve their photography. They place an order, and a few days later, their new, shiny toy arrives on their doorstep. Then things usually get tricky.
Step #1: Set Your Aperture
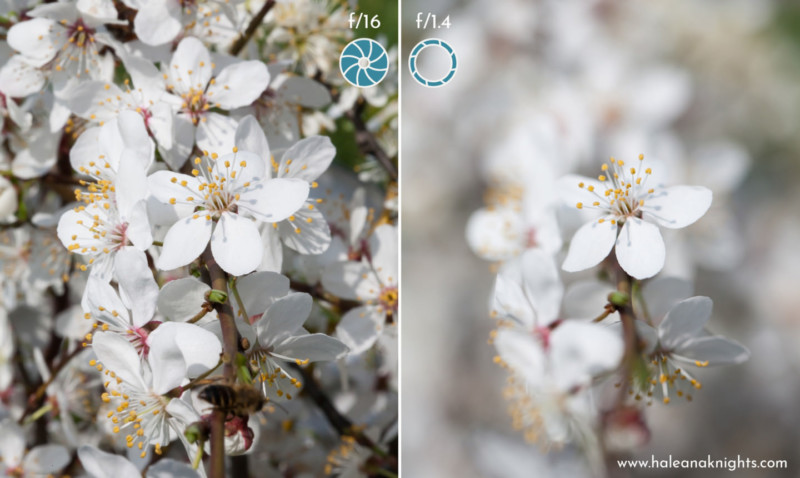
One of my absolute favorite styles of photography is where the subject is sharp, and the background is beautifully blurred. This effect is called ‘bokeh’ and happens when you set your aperture, or your f/stop, to its lowest number. It is also known as shooting ‘wide open’. The lowest number (or f/stop) you can achieve is dependent on the type of lens you have.
For example, one of my favorite lenses is an 85mm prime, and it can shoot down to f/1.8. Imagine that the number equates to the area in focus on the image. The smaller the number, the smaller the area that is in focus (like a face) and the rest of the image is deliberately blurry. This look is impressive if you are shooting against a background of color, like autumnal trees or in a meadow of flowers.
There are many reasons you would want to shoot wide open. My personal favorites are when I’m shooting portraits. I make sure both eyes are on the focal plane (explained below) so that they are both in focus and place them in front of a pretty background. That way, you can guarantee your facial features are all tack-sharp regardless of how low you have your f/stop. However, if you are a landscape photographer, you are going to need to increase your f/stop to a number large enough to bring everything into focus. Popular f/stops for this genre are f/8-11 depending on the scene, the lens, and the camera.
Warning: While shooting wide open can indeed be beautiful, it can also go wrong. The trouble with shooting so wide open is that there is such a small area in focus, if you miss your mark, it can mean that the most significant bits are soft or blurry.
For this bit, you need to understand the focal plane.
Okay, unless you are a super-brain, I would avoid Googling this term. It can kick up some crazy tech-lingo and may put you off. Rather than fumble through an explanation myself, these guys have done a fantastic job of making something rather complicated, straightforward to understand. They also do some pretty awesome presets if you’re interested.
Another thing to understand is this:
A low f/stop (f/1.4) = more light let into the camera
Shooting “wide open” like this means that the diaphragm of the lens opens up and more light reaches the sensor. It also means that a smaller area will be in focus.
A high f/stop (f/16) = less light let into the camera
“Stopping down” like this means the diaphragm in the lens closes, restricting the amount of light that reaches the sensor. It also means a larger area will be in focus.
Step #2: Set Your Shutter Speed
The shutter speed is the amount of time that your shutter is open looks like this: 1/125. All this means is that the shutter is open for 1/125th of a second. It could also be 1/250, 1/500, or even 30 whole seconds or more (if you have a tripod and a trigger!). The type of camera you have will determine what it is capable of, but unless you are shooting specialist areas such as astrophotography, most basic settings will be more than you need.
When shooting moving things like children or animals, try to avoid setting the shutter speed slower than 1/125 as it will help to prevent your image from becoming blurry and out of focus. Even this setting can be too slow, but it depends on whether you want a little motion blur in your image to give the effect of movement. If you’re going to freeze your subject completely, increase your shutter speed.
Top tip: You will find that if your shutter speed is too slow (let’s say 1/35), your image can be affected by camera shake (if you are holding your camera and it isn’t on a tripod). Another rule of thumb is always to shoot at a shutter speed value which is larger than the most extended length of your lens. For example, another of my favorite lenses is my 70-200mm, and I always shoot at 200mm. Therefore I will make sure that my shutter speed is at a MINIMUM of 1/200.
Here is the technical bit: The lower your shutter speed, the longer your shutter is open. This means two things; one is that more light is reaching your sensor as the shutter takes longer to close. The other is that more movement is happening in your scene while the shutter is still closing. It is that which causes blurring.
Let’s look at it from the opposite angle. The higher your shutter speed, the less time your shutter is open. It’s snapping shut, which means that less light reaches your sensor as it has no time to get through. It also means that very little happens in your scene in the time it takes to close so you will end up with perfectly frozen shots.
Again, choosing either of these settings will depend on what you want to achieve with your image. If you’re going to shoot a babbling brook and wish to have beautiful, silky, smooth tendrils of water, you will need a tripod, a trigger, and a slower shutter speed. This means the scenery itself such as the rocks, the ground and the trees will be sharp and in focus, but the water will be blurred and soft as it moves through the scene.
It’s a popular technique in landscape photography. However, if you want to freeze your subject entirely, you choose a much higher shutter speed. A lot of sports photographers shoot at a minimum of 1/800 to freeze a shot say of a footballer booting the ball into the back of the net.
Warning: It is worth bearing in mind that the slower the shutter speed, the MORE light gets to the sensor. The faster the shutter speed, the LESS light gets to the sensor. Want to freeze motion? Then you cannot compromise your shutter speed, but you CAN adjust your aperture to counteract. If you find the scene is now too dark because you’re shooting at 1/400, you can lower your f/stop to f/2.8 to allow more light in that way. If you cannot do that, you may find you are stuck. It’s at this point you need to consider your ISO.
Step #3: Check Your ISO
Your ISO setting can and will be the thing that saves your shot when you need your shutter speed and aperture to be where they are. ISO stands for International Organisation Standard (which is pretty meaningless) but measures the sensitivity of the sensor in your camera. By increasing the number, you are increasing the sensitivity of your sensor to light. Kind of like tricking it into thinking that more light is available than there is. It’s a pretty handy little trick when you’re stuck in a low light situation. However, as you’ve probably noticed with everything else I’ve written so far, there is a trade-off.
Your new camera is likely to be set at ISO100. 100 is the number for a lovely, sunny day outside in the garden. From here on most entry-level cameras you can move up to 250, then 400, 650, 800, 1200, and 1600. Beyond that, unless you have bought yourself a professional level DSLR, your camera will most likely not cope, and your images will become noisy (grainy).
As a general rule of thumb, the following settings are good starting points:
ISO 100: Outdoors on a sunny day
ISO 400: Outdoors in the shade
ISO 800: Indoors on a bright day
ISO 1200: Indoors on a cloudy day
You can adjust up or down from any of these starting points. Bear in mind that the setting you need will depend on what aperture and shutter speed you are using and what kind of camera and lens you are using too.
Handy tip: If you make sure that your exposure is always correct by using your exposure meter in the viewfinder, you are less likely to get such an issue with grain.
Step #4: Exposure
If you look through your viewfinder, along the bottom, you will see a little exposure meter. It will look something like this:
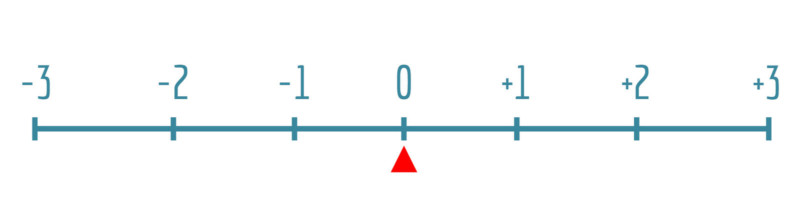
Now you have learned about setting your aperture, shutter speed, and ISO. By adjusting these three things, you will be able to get the perfect exposure for your images. Just nudge each of them until you have the little arrow/”ticker” is in the center on the zero. This is technically ‘perfect’ exposure, but a lot of photographers have preferences.
I always try and aim for the zero and then tweak my levels in post-processing to achieve the look I want. However, my post-processing technique will vary depending on what my image is, whether it’s backlit, the time of day, indoors, outdoors, and many other factors. A lot of photographers like to shoot very slightly overexposed; some even shoot underexposed. Ultimately it is up to you; however, a good rule of thumb is to aim for the center and work from there.
Step #5: Choose the Right White Balance
Making sure the color temperature is suitable is essential when taking your photograph. Correctly setting your white balance removes unrealistic color casts from your image and means that you will get more natural colors. You will have the choice of the settings below:
![]()
AWB (Auto White Balance): A good all-rounder and will work well for most scenarios.
Daylight: There’s no rocket science here. Use this one when shooting in daylight. Best used on a sunny day outdoors.
Cloudy: Again, easy peasy. Just set to this mode when you are outdoors and on a cloudy, overcast day. It will bring warmth back into the shot where the clouds would cool everything down in tone and color.
Shade: Use this setting in the shade and your color temperature will be warmed to compensate for the cool tones in the shadows.
Tungsten: This one can be a lifesaver when you are shooting in public buildings. A lot of pubs, village halls, registry offices, and even a lot of churches have this awful lighting, and this setting cools down the orange tones of this offensive cast.
Fluorescent: This setting is another convenient one for public buildings. Village halls are the WORST for fluorescent lighting! You could use this setting to counteract the awful green tones here.
Flash: I use this setting a lot. While it is supposed to be used with flash, I sometimes use it without to add a lovely, earthy warmth to my pictures. I always use this setting when shooting using strobes in the studio, but that is for another time.
Custom: This setting is for when you want to set your white balance manually. You’ll have to refer to your camera’s manual on how to do this.
Is your brain going to explode yet?
This article is a basic introduction to mastering manual mode. I hope you have enjoyed this lesson and to help you with your journey into mastering manual mode; I have designed and prepared an epic guide for you to download for free.
About the author: Haleana Knights is a UK photographer specializing in weddings, lifestyle, and portraits. The opinions expressed in this article are solely those of the author. You can find more of Knights’ work on her website, Facebook, and Instagram. This article was also published here.