How I Shot My Own Wildlife Short Film for Less Than $100
As a true fan of the wildlife documentary genre, I have been itching to create my own short wildlife video project ever since I started doing wildlife photography. That being said, and despite having some previous experience with videography and video editing, producing a high-quality wildlife video always seemed like a too difficult task for a single person with a non-existent budget and some pretty basic gear, and so I never pushed myself into trying it.
Out of them all, I was fascinated by a certain creature who was making intricate circular patterns on the shore, and I got very curious to know what it was and what is the story behind its actions.
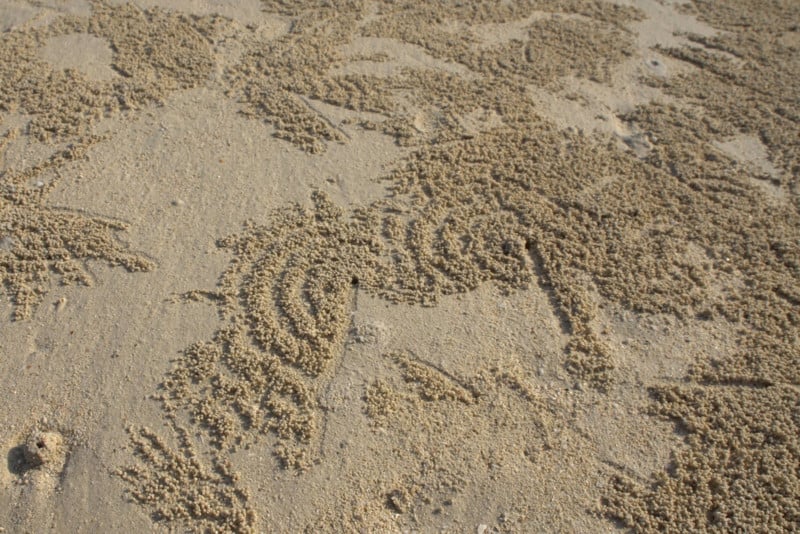
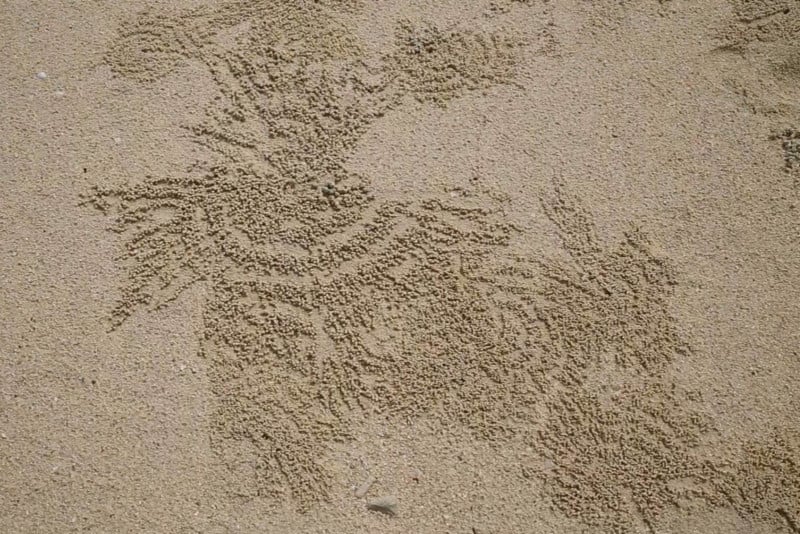
When I sat by these sand patterns patiently and discovered their creator, I knew immediately there’s no way I could leave without filming it. I started on a small scale; a single shot, and after reviewing it on my laptop it became clear to me that this creature and its story deserve a much bigger effort.
At this point, my goal completely shifted — I decided I should focus on trying to achieve the best video result I could possibly get with my limited gear and my own 2 hands. This thought had led me to devote almost all of my time on the islands to creating this 3-minute-long wildlife short film, titled “MYSTERIES IN SAND”:
Here’s how I did it:
Step 1: Pre-production and Research
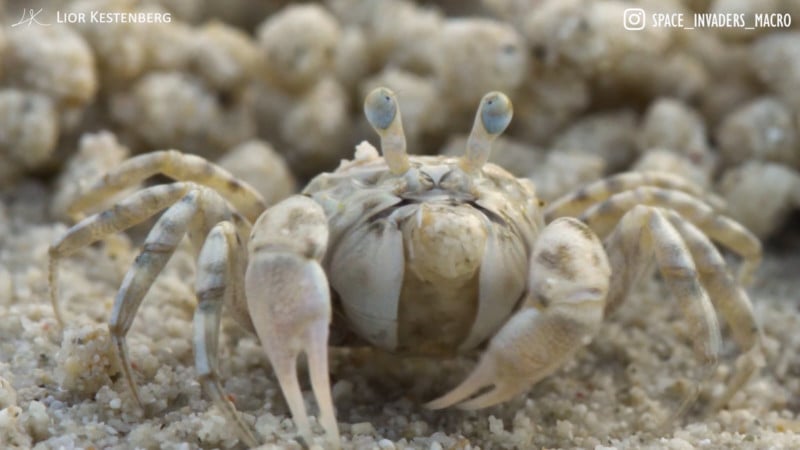
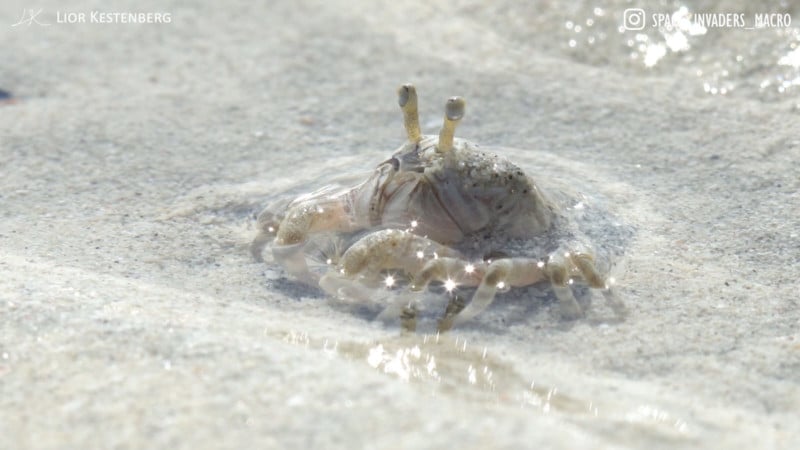
Before I began filming, I devoted a few days to exploring and gathering as much information as I could about my subject. At that time, I didn’t even know they were called sand bubbler crabs, but just by sitting still for a few hours by their burrows, I’ve grasped a great understanding of their behavior and their nature.
I learned how they move, how close I can get, how static I should be so they won’t get scared away, and when they are most active as well as for how long. This information was crucial for understanding how to film them, but more importantly for planning how to tell their story and make sure I depict an accurate, informative picture of their behavior.
Since nature documentaries are based on facts and have no room for speculations, I used a very slow, pay-by-the-hour Wi-Fi service for verifying my observation conclusions while discovering the crab’s official name.
Once I completed my scientific research, it was time to get more practical, and I decided to go on a short location scout for finding the most beautiful places where these crabs spawn. Treating this as an opportunity to have a nice ride, I rented a mountain bike for the minuscule fee of $1.43 per day. I cycled as much as I could on the island’s main road, which is surrounded by the shoreline on one side and a dense, pristine jungle on the other. I checked all of the beaches that were within my reach, only to find that the greatest concentrations of crabs were actually right outside my guesthouse.
One of the most challenging aspects of working with wildlife is the fact that nature doesn’t listen to your directions. You can’t control your “actors” as you would in a regular production. But if you choose a subject that is predictable, such as in my case, you don’t need to. By researching and learning the crabs’ behavior, I could fully anticipate exactly what they are going to do, when, where and why. They say “knowledge is power”, but in this case, it’s a necessity and there’s no doubt the pre-production phase was incredibly important in this project.
Having all the proper information in mind, I was able to construct an initial shooting script, covering all the essential moments I wanted to capture as well as making sure I get diverse enough footage which could be nicely edited together. This is the part where having a former experience as a video editor and watching hours of nature documentaries really paid off.
I could visualize the desired result before I pressed the record button, and I knew how the general structure of the edit is going to look like, enabling me to make a very detailed shot list with the shot size, lens focal length and desired crab behavior in mind. I was then ready for the next stage: filming.
Step 2: Shooting
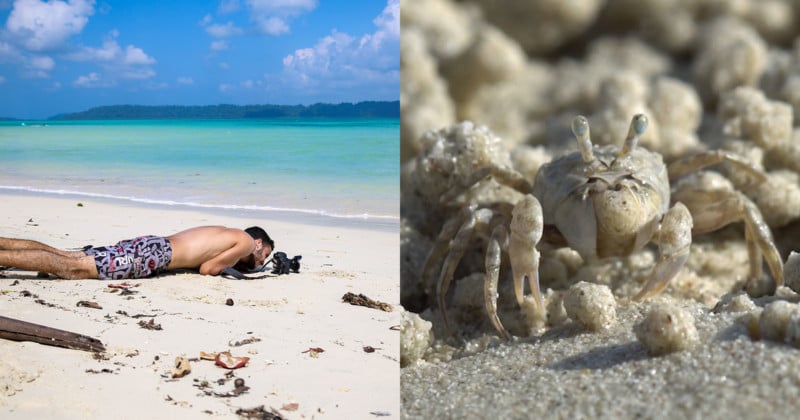
During the next few weeks, I woke up every morning with a specific portion of the shooting script set as my daily goal. Since working on the beach all day meant getting wet, covered in sand, and possibly fry under the tropical sun, I wore nothing but my swimming shorts, a hat, and a shirt-thick layer of sunscreen… seeing a shirtless white guy carrying 2 cameras and tripods determinedly walking into the sea was definitely unusual for the locals and the Indian tourists, but after a few days, they all got used to it and some of them were even asking me daily about my progress with the project.
Filming the crabs according to my lists was a pretty straightforward process, and other than the timelapse it was not a very complicated task. One challenge, however, was camera movements.
When using a macro lens, one of the main disadvantages is how sensitive the camera becomes to vibrations and movements. Even a slight and delicate focus pull can cause the shot to appear shaky. This, along with the fact I didn’t have a dedicated, sensitive enough video tripod/slider etc. made in-camera movements impossible to achieve. I knew, however, that I wouldn’t want all of my shots to be boringly static, and so I found a solution by shooting most of the closeups on a GorillaPod in 4k, out of the intention to edit the movie on a 1080p HD timeline. This gave me the freedom of digitally zooming and simulating basic camera movements in post without hurting the quality, and I composed my shots with the idea of cropping them in mind.
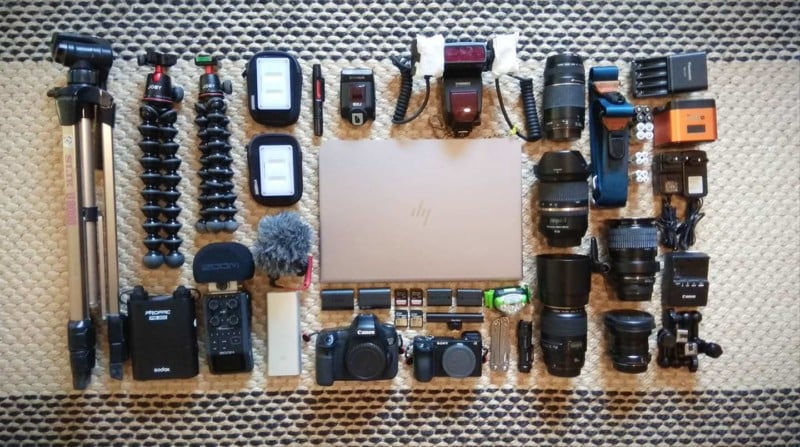
For the close-ups, I used my Canon 100mm f/2.8 Macro lens adapted to a Sony a6500 body. For the wide close-up shots, I used my Laowa 15mm f/4 macro lens, sometimes adapted to my Sony for shooting in 4K and sometimes shot on my Canon 6D for the utilizing the full frame sensor and 15mm look. I also used the Tamron 24-70mm f/2.8 lens, mainly for landscape shots and timelapses.
As I mentioned before, the best thing about the sand bubbler crabs was the fact they were easy to predict. All I needed to do in order for them to act naturally on camera, was to make sure I don’t move, at all. These crabs are super quick and will easily run to their burrows for immediate cover whenever they sense movement. (Even if it’s just a plastic bag carried by the wind.)
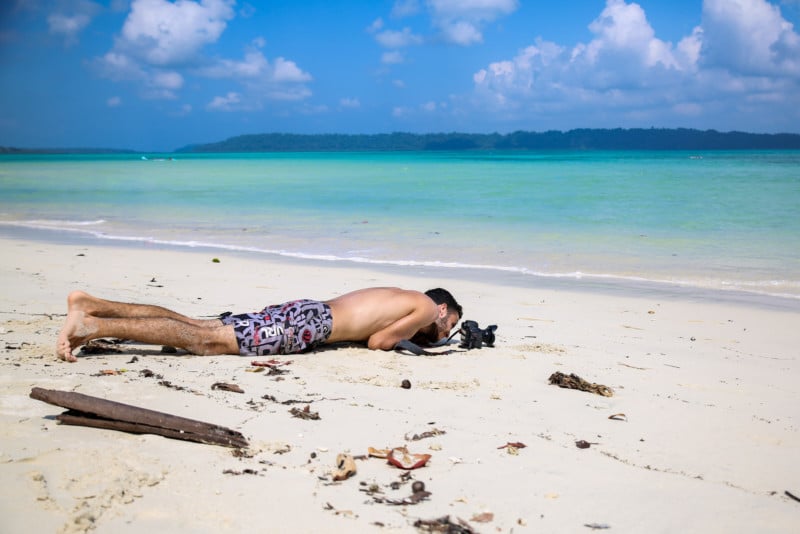
Obviously, when a highly-reflective giant naked ape such as myself approached them, they immediately disappeared. But by sitting and waiting, It was only a matter of time before they came back out, this time undisturbed by my presence for as long as I remained still. For monitoring the shot I would often simply lie there, with my head stuck in the viewfinder and my body frozen in various uncomfortable positions, sometimes even feeling the crabs walking over my toes as if I am part of the landscape.
It was crucial for me to work as low as possible for getting shots from the tiny crabs’ eye level. This contributed greatly to the feeling of being present in their world and watching them through a bug’s eye perspective. The apparent downside to this method other than accidentally eating quite a few grains of sand myself was the fact it didn’t take me long to look like a human penguin, with my back tanned dark and my belly remaining brighter than the sun itself.
When I used a setup that involved a less shallow depth of field such as a wide lens, I was able to set up the focal point and leave the camera on a tripod, while I was watching from a safe distance.
The timelapses were probably the toughest shots to get. Mainly because I only had one chance to take them each day. Once the tide has gotten low and the crabs have already taken over the shore, I was done for the day. I had to stay alert and nail the exact timing where the sea level begins to drop, or when it has just dropped and the crabs are only starting to get out of their burrows. Any unsuccessful attempt required me to try again the next day. Combine that with the incredibly unpredictable weather on these islands (it would often start raining for days even if the morning was sunny and bright) and it ended up taking quite a lot of time to get it right.
On the technical side; for creating these shots, I used my Canon 6D mounted on a tripod with a Magic Lantern intervalometer set to capture an image every few seconds depending on the action that I wanted to capture. By placing my secondary camera on a tripod I was able to use my main one to keep shooting close-ups nearby while the intervalometer was taking its course. This helped me be more efficient in terms of time management.
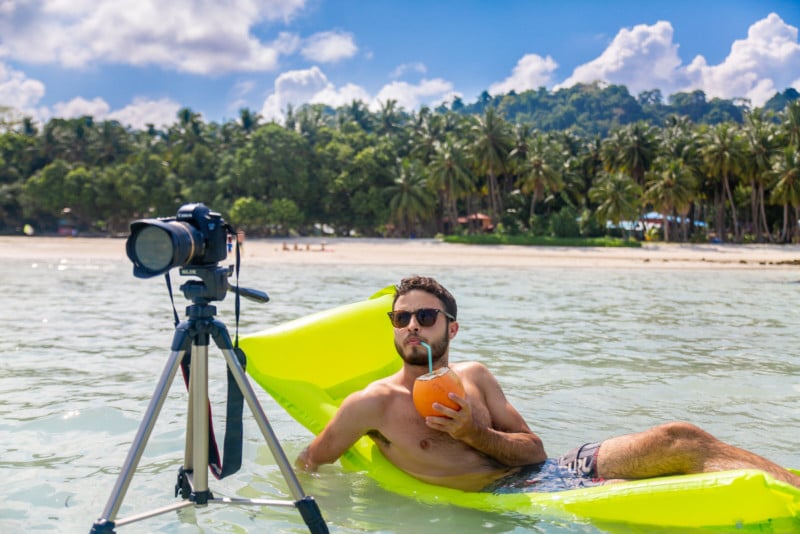
When I placed my camera in a more dangerous position, such as in the middle of the sea, I used the opportunity to have some tropical leisure time, staying close and making sure it doesn’t fall and become an artificial coral reef.
I’ve had my fair share of failed attempts with this part. One of the days in which I tried to capture how the crabs form the sand Mandalas over time (the first timelapse), a stray dog got curious and completely trashed my shot by scaring away all the crabs and leaving footprints in the sand, exactly where my camera was pointed at. On another attempt to capture the tide changing I found out in retrospect that my tripod, possibly inspired by the Tower of Pisa, was very slowly tilting and sinking in the wet sand, resulting in an unusable shot.
Eventually, however, I did get enough attempts to make sure something comes out good enough.
The filming took quite a lot of time, almost 3 weeks total, counting all the failed attempts, stormy weather delays, and some other time-consuming activities. I’m sure it could have been done much faster if the weather had been more consistent and If I had had some helping hands, but the fact that I didn’t rush this helped me make sure I stay on the right track and cover everything I wanted. In fact, before I even finished filming I used some of my time (mainly the evenings) to start building the first rough cut of the project on my laptop, which made me realize to a better extent which of the shots can fit together and what should be done better, improving and correcting my shooting script along the way.
After a certain point of completing my lists, and getting closer and closer to my return flight date, I’ve turned off the cameras and used my last days to get prepared for the long journey back home, where another challenging stage was lying ahead.
Step 3: Editing
“Oh boy.” That’s what I thought when I opened the project folder and discovered there were almost a 1,000 gigabytes of footage waiting for me to sift through. Luckily for me, I’ve done some of the logging and initial selection back in Andaman, but be sure this part took a lot of patience. Obviously, only a small portion of these shots was usable, and since I often placed a recording camera on the ground and waited for the action to take place in front of it- I ended up going through hours of totally inanimate sand, just for finding these two seconds in which the crab exits its burrow…
Having selected the finest parts of my favorite shots, by cutting and placing them together in order to tell the basic story, I’ve finished the first rough cut of the short film. It was mainly made in order for me to estimate how much time it takes to get the point conveyed without becoming repetitive or boring. This was also the point where I processed the hundreds of timelapse raw files, deflickering and unifying them into short clips. Once I felt confident with the main structure and time frame, I proceeded to choose the right soundtrack and edit the second rough cut.
Having no budget for a custom soundtrack, I scoured the internet for days trying to find the right music track to go alongside the story and visuals. I had very specific demands. I needed it to be peaceful or even mysterious at first, to change around when the crabs are starting to appear and to get more energetic and dramatic as the crabs are shown in masses. This search was not bearing any fruit at first, but my salvation came when I stumbled upon “Land” by Piotr Hummel on the Artlist.io stock music platform.
It had in one way or another all the key elements I was hoping to find. A few different phases and a developing tempo. After downloading a preview and playing around with it, I decided I should buy the license and use it for the project. a few modifications to the original timeline later and I felt like the music was now properly synced with the visuals. I could now focus on creating the camera movements in post, locking the edit, applying some color correction and getting ready for the last part: recording and adding the narration.
Step 4: Narration
Knowing exactly how my video is going to look like, how the story unfolds and the amount of screen time each part ended up getting after editing, I was able to write the text for the voiceover that would accompany the film. Being a non-native English speaker, and not an expert on crab behavior either, this was a difficult task and it took additional research to validate the terminology and explanations I have written. I’ve also corresponded with several helpful people who helped me correct any mistake, both in the scientific and the grammatical field.
Preparing the text for recording also required me to make sure it can be properly synced with the action that takes place on the screen. My first draft was way too detailed, and unless it was read extremely fast, it was too long to fit what’s actually happening in the video. Once again, after a few changes, I felt confident that the text is concise and focused, not missing important details but short enough to be matched with the visuals.
In order to find a voice actor, I actually posted a listing on a Facebook group of the city I live in. I got several people who were interested in participating, most of which were inexperienced or simply didn’t have the right voice for this specific project. One of them actually proved to be a great passionate narrator who has an incredible voice and was willing to work with me despite my restricted budget. This was Michael Alan, and it turned out he even lived only a few blocks away from me. (Now that’s convenient…)
Having a friend who is a musician is always helpful, especially if you need access to an acoustic home studio… and so I took the narration script, my zoom h6 recorder and a laptop with my film in it, and scheduled a recording session with Michael, which was finished within 2 hours.
Adding the voice over was a breeze, and other than timing it and slightly improving the audio quality, It took me no effort. At last, my short film was finally completed, after a total of more than 3 months in the making.
In terms of budget, it is true that the stay and travel costs to the tropical islands of Andaman were much higher than a $100, and so is the value of my gear, but I find these two expenses irrelevant since the point of this article is that you can do this project virtually anywhere, with your own gear, on any interesting creature that might even live in your backyard. I didn’t travel all the way for this specific crab, it was just a sighting that sparked my interest to engage in such a project and attempt to chase my dream. Same goes for the gear; my set is actually pretty basic, with nothing really fancy in it. You can achieve similar results with almost any camera and a macro lens.
Overall, the only parts that required me to reach for my pocket with this project were my membership on Artlist.io (which costs me $16 per month for unlimited access to their entire library) and the voice acting session, both adding up to less than $100.
Now, I know that I’m not David Attenborough, and certainly some parts of my project could have been done much better by a real professional crew, better gear, and a reasonable budget, but for something fueled only by passion, made just for fun and for being a one-man band, I ended up very satisfied with how things turned out. I wanted to share my experience with you guys in hope to inspire others and eliminate that same initial thinking that stopped me before — “It’s way too difficult/expensive to properly film wildlife.”
Turns out you don’t need a team, pro gear, or a large budget for achieving a decent result. In fact, all you need is an interesting subject, the right determination and some free time, so go out there with your own gear and create something beautiful.
About the author: Lior Kestenberg is a 22-year-old nature enthusiast and macro photographer based in Israel. His project “Space Invaders” aims to expose people and shed light on some of nature’s wildest, yet tiniest creatures, often hidden right under our noses. You can see more of his works on his Instagram account.