A Multi-Plate, Multi-Lens Daguerreotype Panorama
![]()
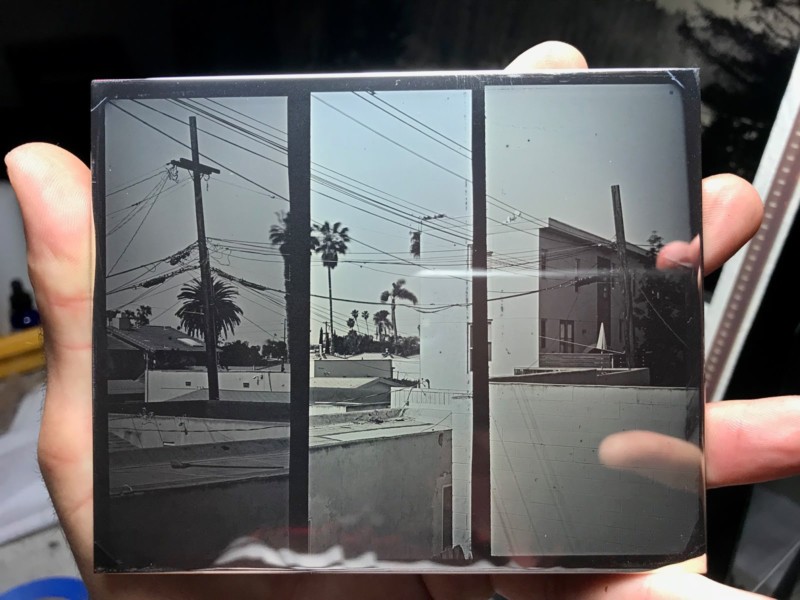
I’ve been experimenting non-stop with a few new daguerreotype techniques lately, and however promising the results are looking so far, those experiments are slow going. But here’s something I thought up and was able to execute in a relatively speedy manner — something I believe warrants a look. I don’t believe this method of making a panoramic image has ever been utilized before, so I’m dubbing it the “Antorama.”
Ever since the 19th century, a multiple plate daguerreotype panorama (made in the usual way, with the same lens for all plates) has been referred to as the ultimate technical challenge in photography.
Daguerreotype plates are made on highly polished silver plates, which are sensitized with fumes of iodine and bromine, and developed in fumes of mercury. Matching all those steps over multiple plates, and getting same tonality and contrast from one plate to another is a task unlike any other I know of in photography. You don’t have to take my word for it, but using multiple lenses adds a whole extra level of fun to the pursuit.

The focal lengths in millimeters of lenses used for the above 4x5in plates from left to right are 120, 150, 180, 210, 180, 150, 120.
Due to daguerreotype being a UV-sensitive medium, various lens coatings used by different companies through the decades (and I also suspect the thickness of glass and the number of elements that light has to travel through) make lenses give surprisingly different exposures when all are set to the same f-value. I suppose that having a full set of the same type of lenses would help here, but I had to work with what I had, so it took me a few experimental plates (shown below) to match exposures of Schneider 150 Xenotar, Rodenstock Sironar 180, and Fujinon-W 210. However, after the first go at the above view, I understood that 5 plates weren’t going to be enough as the composition ended rather anticlimactically on both ends. I then decided to add a frame with 120mm Schneider 120-XL on both sides, which showed parts of the promenade walkways and made it into an approximately 220° view. Based on previous experience with the other three, I guessed the exposure for this lens and luckily got both end plates on the first try.

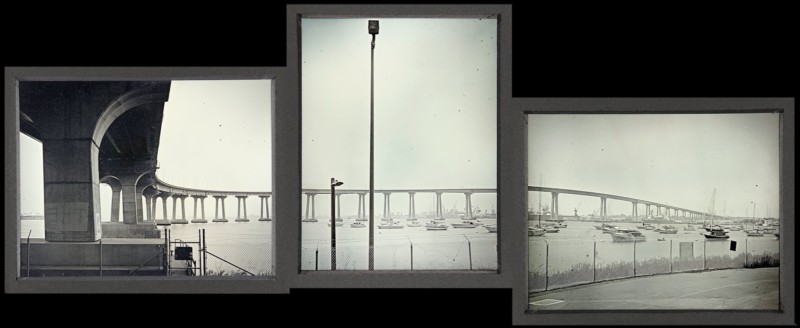
For the above 7-plate antorama to be as I envisioned, the sun needed to be out at 1pm, which is normally something you can bet your bottom dollar on in San Diego from about March to November. I won’t go into details of how much frustration was added by climate change and the fact that it seems that these past two weeks have been the cloudiest and rainiest ever for this time of year here. Anyhow, while waiting for right atmospheric conditions, I decided to capture a slightly less ambitious 3-plate view of San Diego Coronado Bridge, this time with just one plate per lens (again, 150, 180, 210).

These two compositions took a fair amount of effort and polishing hours. At one point, a few days ago, I was going at it for a while and my shoulder got tired. I didn’t want to stop working, so, to switch gears, I decided to see if I can pull off another minor “first ever,” but this time with an easier medium that can be done on the fly: wet plate collodion tintype.
During my Grand Canyon trips earlier in the year, I saw more than enough tourists wielding phones propped upon those ubiquitous selfie sticks. Let us not address here the impact of those sticks on user’s experience of his/her surroundings and the narcissistic tendencies driving their sales, but among social media groups a while back people jokingly speculated if this concept can be applied to collodion. Most people expressed doubt because of the usual understanding of collodion as being a slow methodical technique, which requires long exposures and steady tripods with heavy cameras upon them (though lately people have been using anything from Kodak folders to tin cans to make images with). I don’t recall however anyone every actually going for it and trying it out. Well, no time like a break from polishing daguerreotypes to try something new.
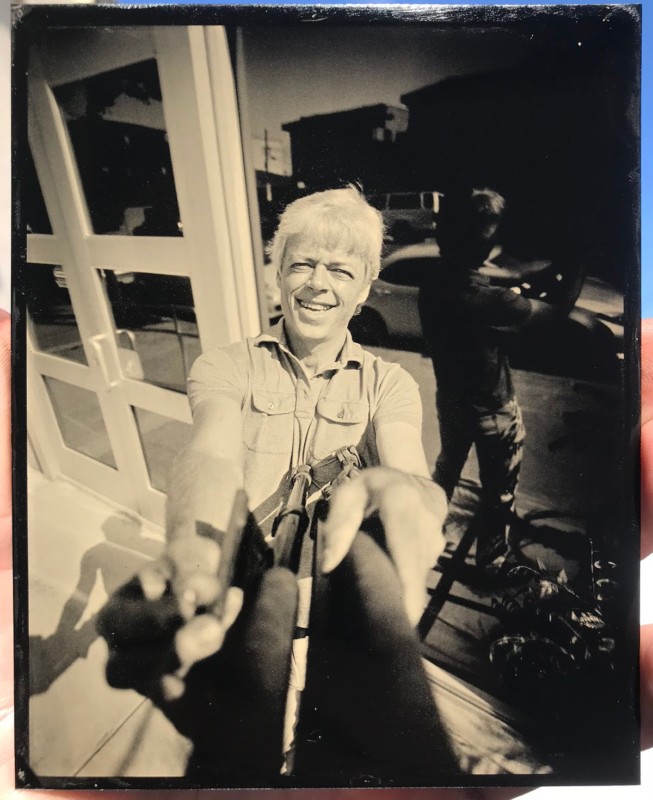
To imitate the wide angle lens of a cell phone, I chose the Burke and James 4×5 Orbitar camera, which comes with a 65mm Schneider Super Angulon. Having the maximum aperture of f/8, that lens wasn’t exactly ideal, but I figured that with my relatively fresh collodion and somewhat healthy silver bath, I should be able to get near ISO 1 speed, which in direct sunlight would give a proper exposure of 1/4s at f/8.

Yeah, holding a 4×5 outstretched on a tripod as a selfie stick for 1/4sec is not exactly something you do when you want for sure to get a sharp image, but I did all right on the first try and the image turned out rather sharp, but a bit on the dark side. I guess my silver wasn’t as good and collodion did age in the fridge over the 4 months that I’ve had it in there… So, 1/2sec was the next try. I held my breath, squeezed the cable release and voila: what I strongly believe to be the first ever handheld collodion selfie.

I’ve been working on daguerreotypes for a few months now almost non-stop. Back to the darkroom for me — the other daguerreotype techniques are calling to be transferred from dream to reality. This year marks the 180th anniversary of the invention of the daguerreotype, so I really think it’s time for its world to be explored beyond that which has been done already.
About the author: Anton Orlov is an analog photographer and the man behind The Photo Palace, a 35-foot school bus that has been converted into a darkroom and presentation area for educational and artistic purposes. He previously created a transparent camera and the world’s smallest tintypes. Visit his website for more of his work and writing. This article was also published here.