How to Shoot and Edit a ‘Holy Grail’ Timelapse at Sunset or Sunrise
A holy grail timelapse sequence is a timelapse shot during sunset or sunrise. As the ambient light changes, so should your exposure settings. In this 11.5-minute tutorial, I’ll walk you through how to set up your camera (any type of camera with a Manual mode will do), how to shoot it properly and how to edit your sequence from beginning to end using Adobe Lightroom and LRTimelapse.
In post-production we’ll be using a specialised timelapse editing software called LRTimelapse to fix this flicker.
How to Shoot a Holy Grail Timelapse
In short: you will be keeping an eye on the histogram or exposure level and adjust the shutter speed and eventually ISO speed in between photographs until the light stops changing. The reason we are using an external remote or intervalometer is that it is much easier to ‘stop and start’ the sequence to change settings and check the exposure than when using a software solution. When triggering the camera from the menus you have to push many more buttons which means you might accidentally change your framing (this kills the shot).
- Frame up your shot, make sure it’s level and focussed, turn off IS and AF.
- Dial in your settings for the proper exposure and set your remote to the desired interval.
- Hit Start on the remote and sit back. I have image review of to save battery life but you can have it on if you want. It might slow down your camera’s operation though so beware!
- Once the light starts changing, hit Stop on the remote right after an image has been triggered. Review the histogram and press Start. Repeat this whenever you want, but make sure to not bump the camera and make sure you start the remote again at the right time. Keep track of the count in your head or say it out loud.
- Once you notice the exposure meter has gone down one-third of a stop change your shutter speed by one third. I use shutter speed first, ISO later.
- Make sure to leave at least 5 photos in between exposure changes.
- Repeat step 4 and 5 but gradually let the exposure drop down to -1 EV. A night shot exposed at 0 EV (the middle of your exposure meter) is usually too bright. We experience night scenes as dark so why should a photograph be as bright as daytime?
- Don’t lose focus. It’s very easy to let the exposure run too dark (or too bright at sunrise) so make sure to stay on top of it. If you struggle with this set up a repeating alarm for every one or two minutes.
- Once your exposure reaches half of your interval you can start ramping your ISO. To be honest, this is just a guideline. You can change either or whenever, this is just to make sure the exposure doesn’t come too close to your interval length which might result in your camera failing to trigger (because it is still processing the previous photo). This will make your footage ‘jump’ in time and is very undesirable.
- Keep changing your shutter speed or ISO speed in one-third of a stop (never more!). One-third of a stop is usually a single click of the wheel. Make sure this is the case (some Canon cameras can be set to one click equalling half a stop) and make sure you don’t accidentally turn the dial in the wrong direction.
- Once the light has stopped changing you can stop changing the settings and let the sequence run for another ten or so minutes. This way you have a nice little extra bit of footage at the end of the clip. Nothing’s worse than wishing your shot was one second longer when you’re editing.
Stop the remote, hit play on the camera and scroll through the images. This will give you an immediate impression of how the sequence looks. It’ll flicker like crazy but that’s what we’ll be fixing next!
How to Edit a Holy Grail Timelapse
- Offload your footage using my Post Haste workflow. I highly recommend reading this article if you haven’t yet. It’s one of the most efficient ways to offload data and ensures that you’ll find your files when you need them years from now.
- Import the contents of your hard drive into Adobe Lightroom or Bridge. Put the timelapse sequence into a separate folder and title it as follows: YYYY-MM-DD-ProjectName-ShotName-RAW
- Make sure there are no test shots or other random photos in this folder.
- Open LRTimelapse 5 and navigate to the folder you’ll be processing.

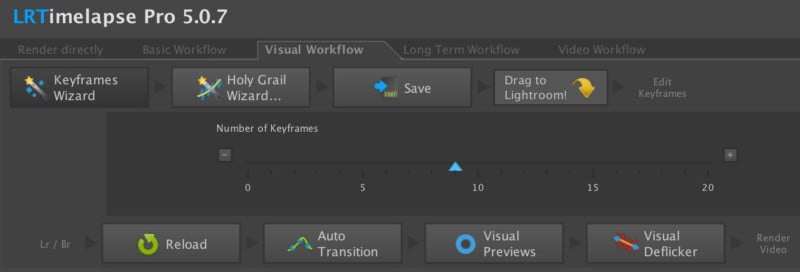
- Make sure you’re in the Holy Grail workflow tab and follow the step by step process at the top right of the window.
- Click Keyframes Wizard. Use the slider to enable a number of blue keyframes. How many you need depends on the number of photos, you can get away with only a few. I used 9 on this sequence.
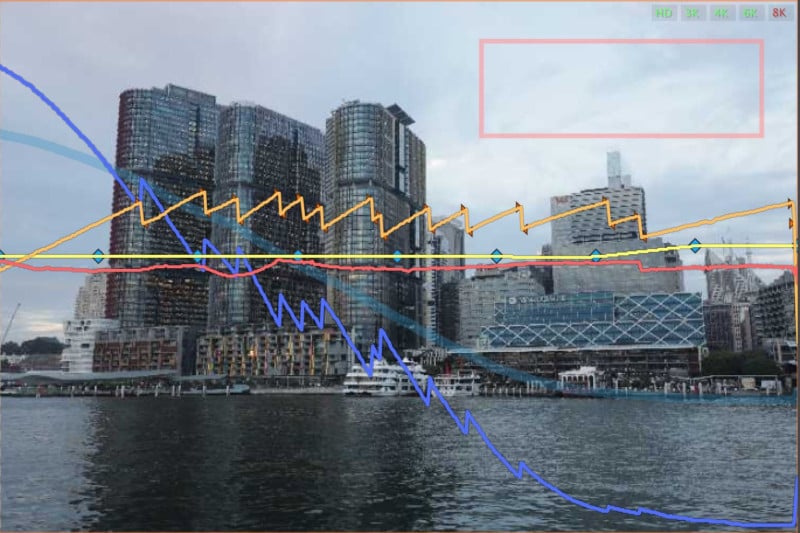
- Click Holy Grail Wizard. Use the Rotate and Stretch slider to get the start and end of the orange curve as close to the yellow line as possible. You will see the changes happen in the viewer window on the left.
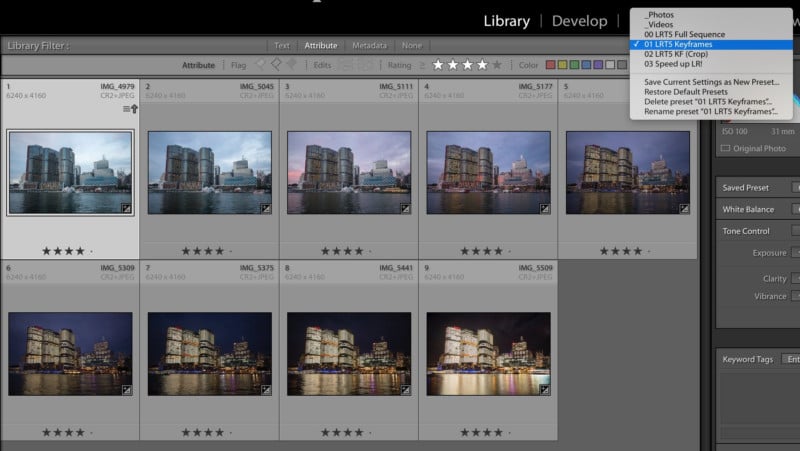
- Hit Save and open Lightroom. Select all photos and hit Metadata > Read metadata in the top menu. This will read the data that LRTimelapse just added to the sequence. You will notice some photos getting a star rating added to them.
- On the top right of the Library, select the sorting button next to the padlock and select ‘01 LRT5 Keyframes‘. This will show you the photos that you gave the blue keyframes to, reflected as 4-star ratings.

- Open up the first photo and edit it as you please. Don’t touch the clarity slider too much as this affects every photo differently and might introduce hard to remove flickering.
- Return to the selection of photos, select all photos with the one you just edited as the highlight and hit the little script icon at the top of your screen. Click ‘01 LRTimelapse sync keyframes‘. This will add the edit data from the first photo to the rest of the images. Don’t just copy and paste the metadata.
- Select the second photo and develop it as you please. Usually you just adjust exposure and white balance. If you’d like to add a gradient to the image make sure to only use the ones that are automatically added to the image by LRTimelapse, don’t add any gradient edits yourself!
- Return to the selection of photos, select the photo you just edited as well as the remaining ones and hit the script icon again followed by ’01 LRTimelapse sync keyframes’.
- Repeat this process until all photos are edited. Select all the edited photos and hit Metadata > Save metadata. Return to LRTimelapse.
- Hit the Reload button on the second row, followed by Auto Transition. This will calculate how to edit the photos in between the ones you edited to make sure every setting gets adjusted or ramped smoothly.
- Select the first photo at the top of the column and drag a square in the viewer window in an area where nothing is supposed to flicker. The sky usually works best for this. LRTimelapse will use this selected area to deduce how to deflicker the sequence.
- Hit the Visual Previews button and let it run. Once it’s done generating preview files hit the play button and review the sequence. This is where you can go back to Lightroom and adjust your 4-star images and repeat some of this process to get the desired look. You’re better off with this preview than letting it export the full resolution file over a few hours only to discover that you want it to look slightly different.
- Once happy with the Visual Preview hit Visual Deflicker. This will add a darker orange curve to the viewer window which is a visual representation of the deflickering it will apply, based on the rectangle in your image. Let this run and generate the complete preview, then review it by hitting the play button. You can refine part of or the entire sequence using the custom settings and run it again. You’ll be surprised at how amazing this step is and how much it can fix.

- Once you’re happy with the preview, drag your folder containing the image sequence into Adobe After Effects (or export it from Lightroom using the LRT and LR combo, just follow the steps in the software, it’s really straightforward). I prefer AE as it gives me more control over stabilizing, adding motion etc to the shot.
- Import the RAW photos as an image sequence and create a composition. Add any effects you want and export the composition. I prefer the full resolution in a ProRes HQ codec for really high-quality shots. Other codecs work too, it’s up to you and what your system can handle.
- Let this export run when you’re not using your computer as it takes up a lot of resources and will slow your system down. I usually let it render overnight.
- Check your exported footage — hopefully it turned out great! If it’s not what you were hoping for then try and analyze the clip to see what went wrong. Worst case you just repeat the process and get better at navigating the software and settings. The better you shoot it, the easier the processing will be.
And that’s it! I know this may seem like a lot but it really isn’t that bad. LRTimelapse has come such a long way (I’ve been using it professionally since 2012), by now all you have to do is shoot a clean sequence and follow the steps in the software. It’s almost completely plug-and-play now. Back in the early days, we had to manually add each and every keyframe and do much, much more work. I’ve actually used the latest versions of LRTimelapse to reprocess older sequences that I thought were unsalvageable. Thanks to Gunther’s great coding work though, the software has become much more powerful and is able to rescue footage from the depths of your ‘failed’ folders.
P.S. Make sure to try or buy your copy of LRTimelapse 5 via this link. If you end up buying it through there I make a small percentage of the sale at no extra cost to you. It’s part of how I make a living and your support is much appreciated.
If you’d like to support me in other ways you can subscribe to my YouTube channel or join the Patreon family where you get early access to videos and tutorials, exclusive wallpapers and more.
You can download a one page PDF cheat sheet to take with you on your holy grail missions here.
About the author: Matthew Vandeputte is a timelapse photographer based in Sydney, Australia. The opinions expressed in this article are solely those of the author. You can find more of his work and connect with him on his website, Facebook, Instagram, Twitter, and YouTube. A longer version of this article was also published here.