Shooting an Epic Time Travel Composite Photo on the Cheap
A while ago, we read an article about how gear doesn’t matter on PetaPixel, while at the same time planning a shoot that would involve a Hot Rod. Inspired by the post, we said, “Let’s do it with a Canon 550D and a cheap lens instead of the Nikon D800,” because we really believe that all the latest cameras are quite good, and gear doesn’t always matter anyway.
So — doing something special — what does it mean to us? It’s actually quite simple: We try to get one good image out of a normal day of shooting. We don’t need two, or five, or even six hundred images. We only need one good image, and so we typically set up our tripod in one spot, taking as much time as we need to get the best composition.
A benefit of this approach is that if you have always the same camera angle, you can use elements from different shots. A big advantage, especially if you’re doing something a bit more complicated.
That being said, it’s important that you be certain about the camera angle you choose. If the camera is ready, we don’t touch it anymore. From that point on, settings and such are modified using DSLR-Assistant or a CamRanger. This makes the post production very easy.
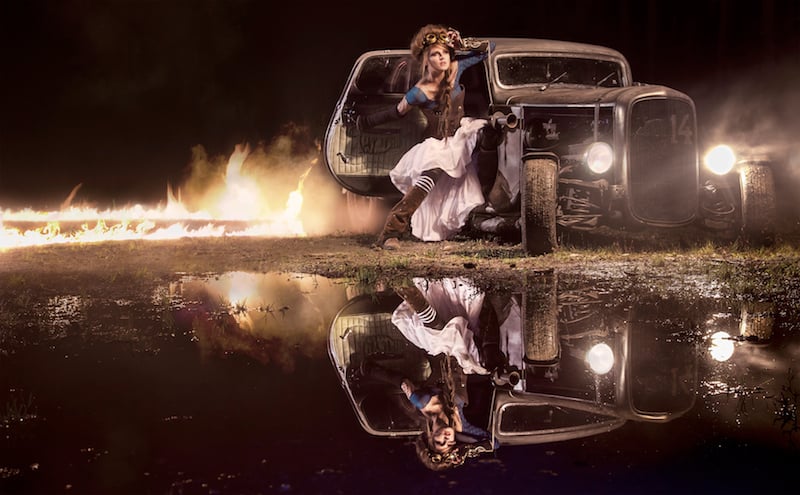
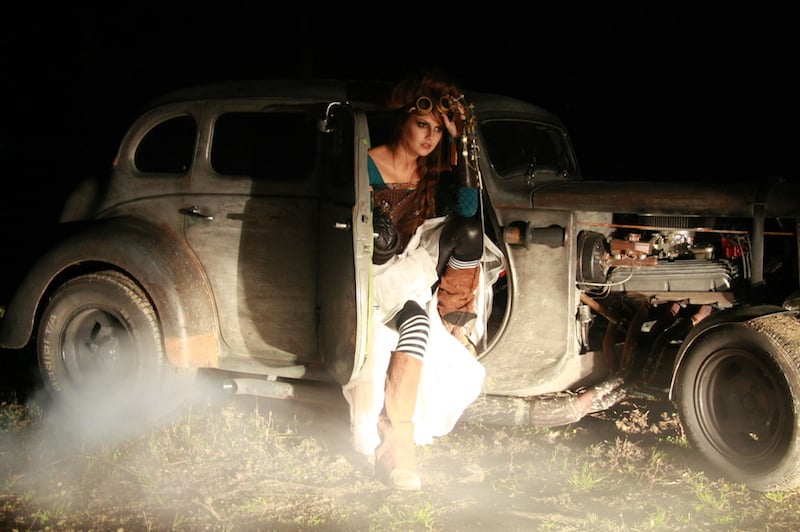
But before we set up to take a picture, we need a story to tell. And so, for the Hot Rod shoot, we dreamt up some amazing ingredients and developed a storyline.
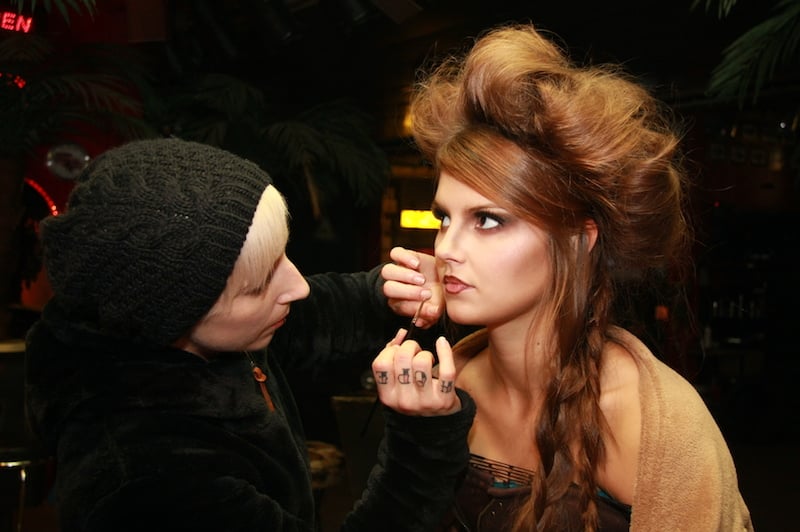
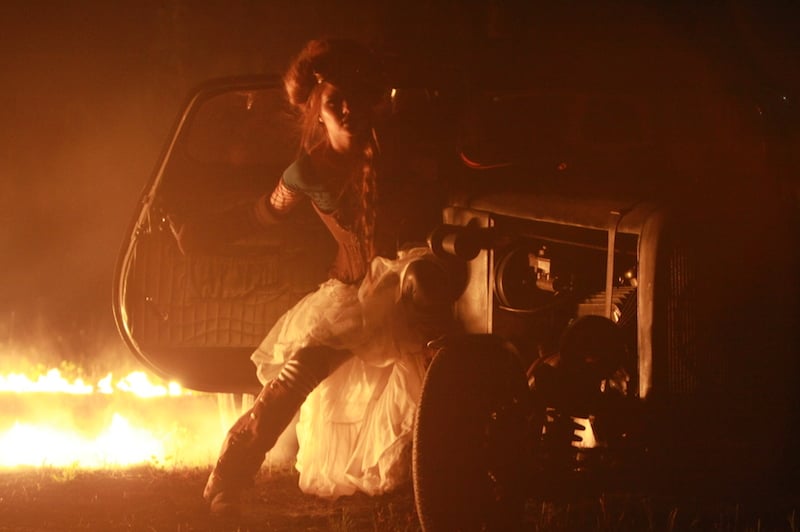
First, our model Christina. She is a time traveler with a matching outfit. We knew that a little bit of steam/dieselpunk would help illustrate that she was coming from the past, and so we got to designing the costume.
The mechanical arm attached to her left forearm was build a few days before the shot using mainly parts found on eBay. The wooden stuff was simply made of Fimo Clay and a pasta machine, and then we used superglue to attach the components to a leather arm guard. Some chains and rings were fixed on the fingers to help flesh out the details. She also had some glasses with gear wheels.
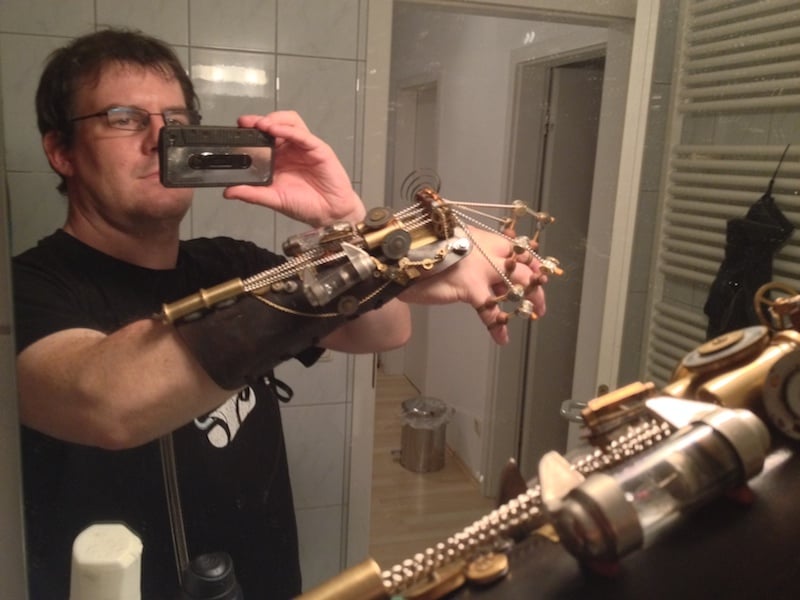
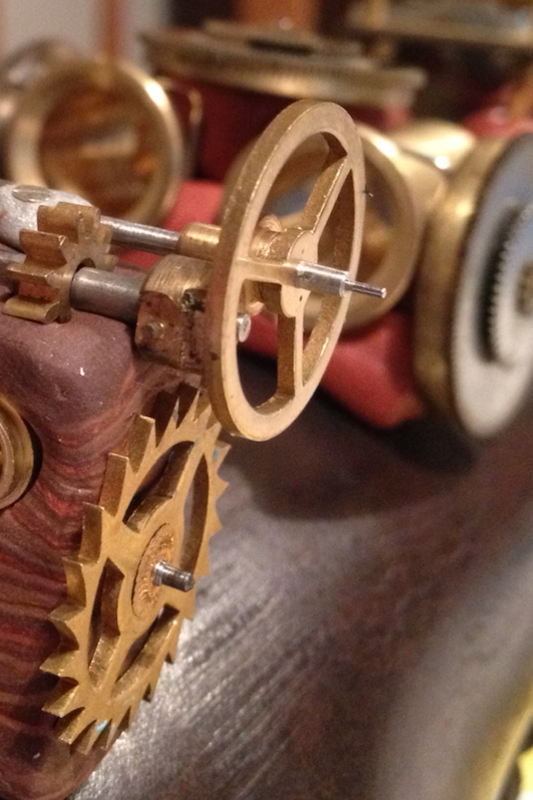
Of course, you can’t see all the stuff on the image unless you look really closely, and in some cases not at all (the screws on the arm are only 1mm in diameter) but, as they say, the devil is in the details: the mechanical arm we build had to be perfect. Plus, the detail and love we obviously put into building the arm helped Christina understand how much the shoot meant to us, so that she could better sell the story of the time traveller.
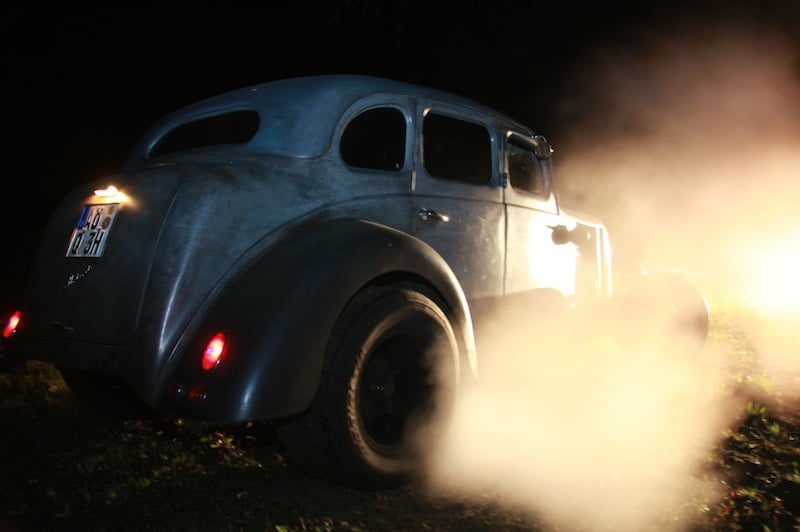
Next came the car, or rather the “time machine,” which was played by an old Morris 8 — a car from 1946 lent to us by our friend Charly.
The car roof was chopped in the 60s, and the 46HP engine was replaced by a 385HP V8 from a Mustang 302 Boss. It was used for high-speed races in the 60s, and Charly did an amazing job converting it into a “Rat Rod” over the past few years. To give you an idea of the kind of work that went into it, about 20 layers of paint were applied by hand with a brush to get that amazing look…
As you can imagine: this is another level of detail that no one will see in the image, but we those details, and so this was exactly what we were looking for. If we ever find a way to build a real time machine, we would definitely model it on this car. It’s unreal… it’s sexy… it’s just plain awesome.
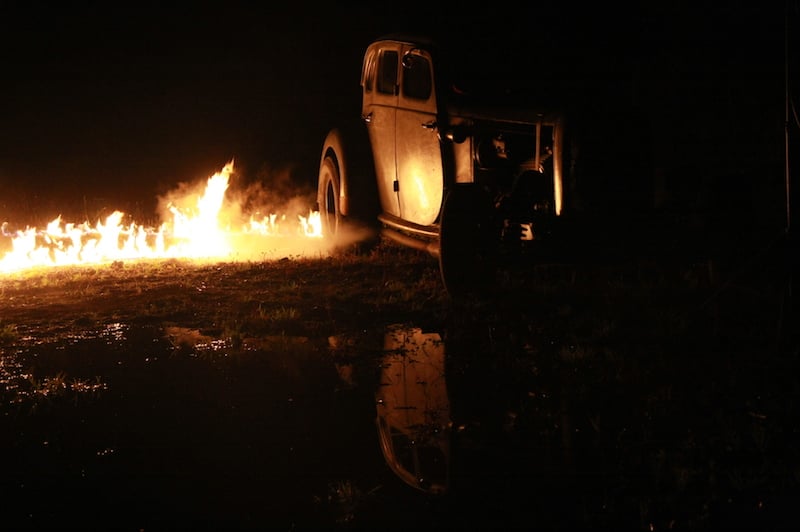
The last detail was the fire. By our logic, if there is a “time machine,” there should be fire — we had to at least do the tracks of the wheels. And so we called our friend and professional fire artist Christian. Because he is a professional at doing what he does, we could simply say “more fire” and he would oblige — he gave us exactly what we needed while sparing us the need to worry about safety or keeping an eye on what exactly was burning where.
It’s important to call people who understand what you want from them, and (for us) it’s important to work with people who understand what’s possible. Christian definitely knows both.
Unfortunately, we didn’t have a battery-powered fog machine, and we couldn’t get smoke bombs for the shot, but we managed to luck out there as well. Because we had a 4.6 liter V8 running in temperatures of about 8°C the car provided real smoke! Better than everything else, because it made the shot more authentic. Lovely, isn’t it?
When we arrived at the location, we found a small wet spot on the ground. We discussed it and decided to push the idea for the shot further. And so, instead of “placing” the car, we decided to power slide it into place. I mean, the floor is on fire, our girl breaks all the rules of physics, but the car is clean and just placed there? No. It doesn’t happen like this.
It wasn’t possible to use the hand brake to get the car in the final position, but with that huge amount of power we could do just the opposite and drift it in place. After a few attempts, the car was in place and some nice mud did a great job of decorating the car and tires. Again, you might not immediately notice it in the image, but it adds authenticity… by now you get the idea.
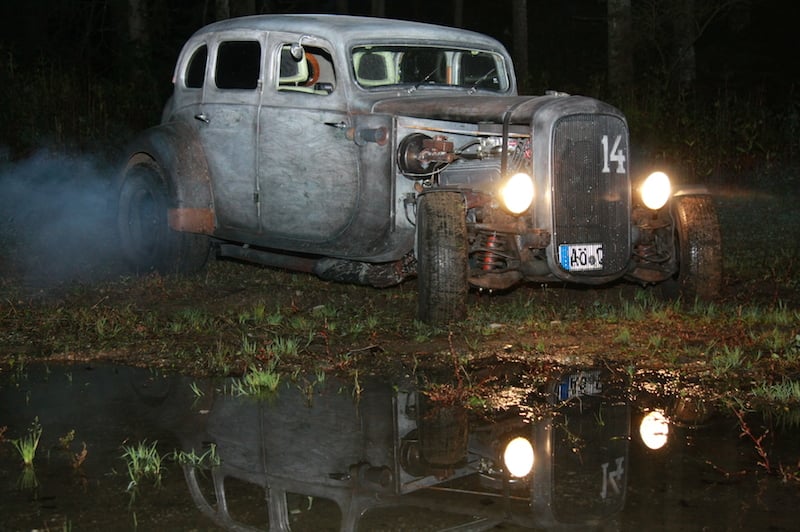
Finally, the puddle was a little bonus — it wasn’t planned at all — and so we changed the plans because of the nice reflection we were getting. This is another great point: we always try to strike a balance between “staying focused” and “being open-minded.” Not an easy task, especially when you try to arrive on scene well-prepared, only to get thrown a curve ball… but sometimes that curve ball is an opportunity, or in our case a surprise puddle.
Technical Difficulties
Our lighting setup was quite simple: a beauty dish as the main light and a single strobe behind the model. We filtered the main light with 1.5 CTO to match the fire and the other one with 1 CTO to get some colder light from behind. In the final image, it was nicely mixed with the light from the fire.
Our first plan was to use only the Yongnuo 560 flashes, but unfortunately one died after a few shots. So our main light was replaced by the Elinchrom Ranger Q (too bad really, it’s the only very expensive piece of gear used to capture this image). But flash is flash — never mind the brand. You probably wouldn’t be able to tell the difference between the Ranger and the Yongnuo anyhow.
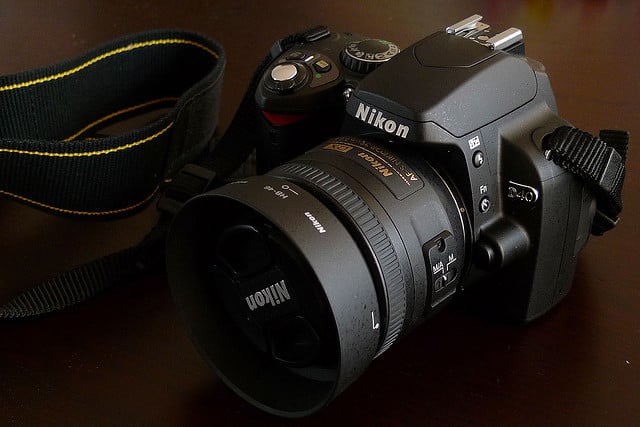
Our white balance was set to tungsten, and the rest was done in post. The camera was a Canon 550D and the lens was a Tamron 17-50mm — the cheapest stuff we have. Actually, the lens isn’t even ours, we asked our video guy Simon if he have some kind of Kit lens (“is it sharp?”… “I think so”… “ok, we’ll use it”).
The camera-settings we started with were f/8, ISO 100 and 1/500s, problem is, the fire was correctly exposed but everything else was dark. So we started to play around with the exposure times. In the end, the fire was a little bit overexposed… At this point it was clear that we would need different exposures for the different elements of the photograph.
There was a very cool long exposure for the smoke coming out of the car and a great short exposed image of the headlights with a little bit of super sharp smoke and lens flares. It gives some nice depth to the image — at least in our opinion.
Post Production
The Post Production was very straight forward: choose the images we like, do some basic RAW conversion, convert them to smart objects in Photoshop and paint some masks on them. The main advantage of the smart objects for us was the possibility to change the white balance afterwards, and because of all that light temperature mix we mentioned, this was very helpful.
Summary
What you have read here was our way of creating an awesome shot. Whether or not we’re using expensive gear, the process remains the same: we try to develop a story behind every part of the image. If we can’t answer the question “Why is this part of the photo here,” we further develop the storyline. Every single thing in an image has to follow the story.
Th same goes for the model: every model should get some background information about his or her role — ideally, the model can then live that role.
Of course, we didn’t invent that kind of workflow. J.R.R. Tolkien did it with Middle Earth. He imagined a world and characters, and he spend his whole life on that task. That’s why he could probably answer every single question: Lord of the Rings was just one story that might happened there.
Lord of the Rings is an example of the kind of depth of detail we strive for, and if you haven’t gotten it already, we are really in love with detail. We learned that with our Where’s Waldo project when we worked with Benjamin Von Wong on an image that took weeks of shooting and post-production. After that experience, and now this one, we’re no longer afraid to put a little bit more effort in our projects… or even a lot bit more.
About the author: Kamerakind is a collaboration between three people passionate about creating great photography: Sabine (make-up, styling, etc.), Ingo (film and photo) and Stefan (lighting and post-production). They are friends first, who made sure that they are always having fun even as they seek out the “perfect” shot. You can find more of their work on their website or 500px profile.
Image credits: Final image by Kamerakind, BTS images by Axel Effner and mechanical arm images by Stefan. All used with permission.