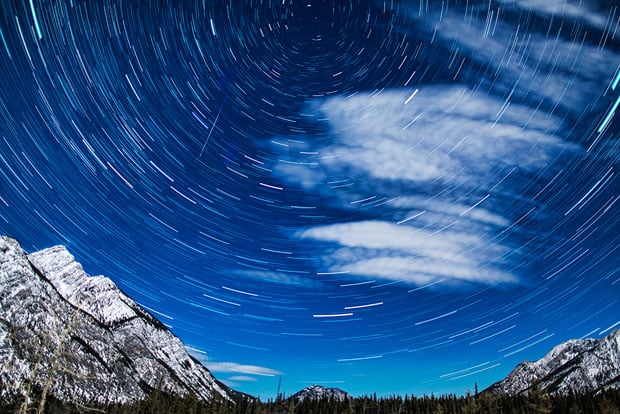
How to Create Dazzling Star Trail Photos, From Start to Finish
Some people have been asking for tips on how to do star trails. There seems to be a few misconceptions and a few different methods. Here’s a tutorial on my personal technique.
What you need:
- Camera (obviously)
- Remote shutter release (or duct tape… You’ll see)
- Tripod
- Clear skies
- Adobe Bridge (optional but highly recommended), and Photoshop
- Time (lots of it)
The Prep
Before we get into the method of actually shooting, there are a few things you need to take care of first, namely, finding stars, and finding a clear sky.
Firstly, you want to get as far away from light pollution as you can; luckily, some kind soul has taken the time to put together a REALLY great website just for this purpose and it can be found here. The map is pretty self explanatory; bright colors are bad, dark colors are good.
Once you find yourself a nice dark corner of the world, the next thing you need to be aware of are how clear the skies will be, this includes the current moon phase which you can find here. You want to choose a night with the least amount of moonlight, as this will make the stars appear much brighter.
Finally, once you know your location, you want to make sure you have a cloud free night otherwise you will be photographing cloud trails instead of star trails, once again, there is a tool for that! This website provides clear sky charts for many locations across North America that let you know where and when to find a cloud free sky. The chart may be a it daunting, but it is actually very simple, here is a quick example:
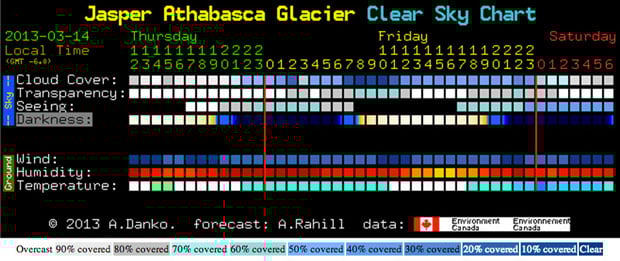
This shows the clear sky chart for the Athabasca Glacier in Jasper, Alberta and you can see by the legend there is essentially 90-100% cloud cover for the entire forecast period with the exception of a few hours on Friday morning moving towards lighter cloud cover Friday night. Seeing as how this is where I am planning to go on Friday – it is a bit of a gamble!
The Shooting
Now that all the planning has been taking care of, we can talk about shooting (don’t worry this is the easy part!).
First, you will want to firmly set up your tripod so that it wont move or get blown over by the wind. For star trails you want to shoot on manual mode so there is no change in exposure between photos with a 30-second exposure. The ISO speed and aperture will change depending on which lens you are shooting with.
Here is a list of settings you would need to use at several common apertures to get a 30 second exposure:
f/1.4 and ISO400 = 30s
f/2.8 and ISO1600 = 30s
f/4.0 and ISO3200 = 30s
f/5.6 and ISO6400 = 30s
It goes without saying (but I’m going to say it anyways) you really want to try to get your hands on the fastest lens you can (largest aperture, smallest “F” number). These are just a good base to start with, once you frame your shot and take a few test shots, you will probably need to play around with the ISO to get the proper exposure.
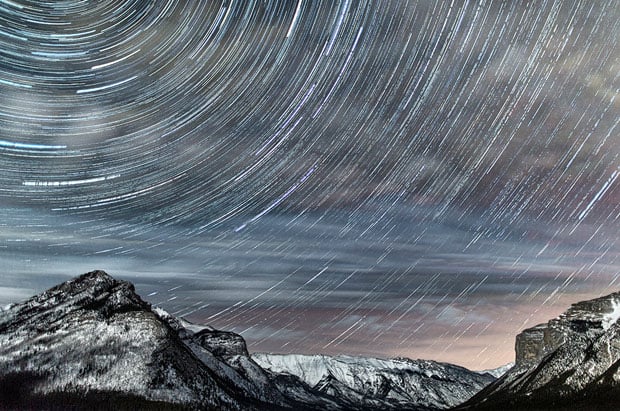
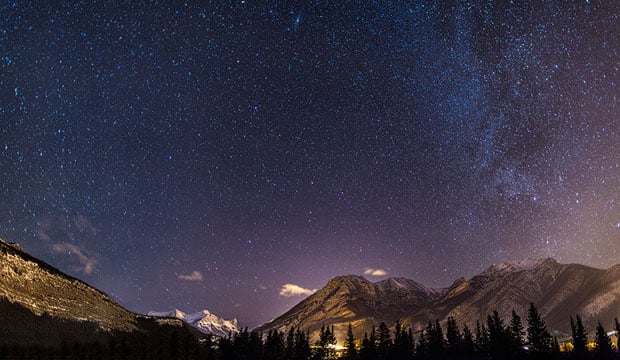
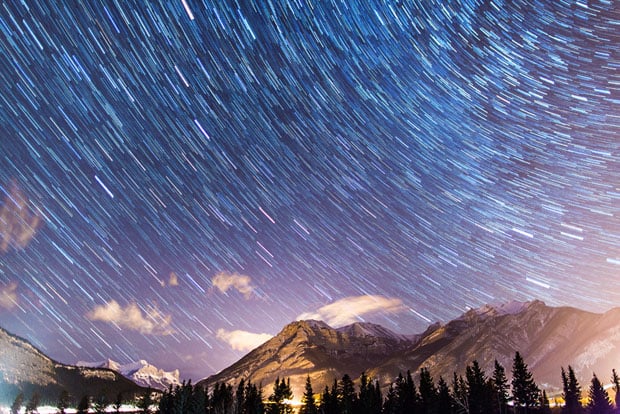
For example, this was taken at f/1.4 ISO400 30s and was the starting point for one of my star trails:
Once you have your shot framed and settings dialed in, it is time to break out the remote shutter control (or duct tape). First make sure that your camera is set to drive mode so it will take consecutive shots instead of a single frame, plug in the remote and let the camera take pictures on its own for 30 min to a few hours depending on how long you want the star trails to be.
If you are taking the ghetto route because you don’t have a remote (like I have many, many times) use the duct tape to tape down your shutter button, and let the camera take photos. You should end up with a minimum of 50 photos (25 minutes) to several hundred (hours).
The Editing
Now that you already have several hours of your life invested in making a single picture, the fruits of your labor are finally about to pay off! For this part of the tutorial, I’m going to be assuming a basic understanding of Adobe Bridge and Photoshop.
In Bridge:
Import all your photos into Adobe Bridge.
Open one photo into adobe RAW through Bridge and edit it to your liking.
Select all your photos, right click and select “Develop Settings > Previous Conversion” this will synchronize the editing across all your photos.
With all your photos selected, click: “Tools > Photoshop > Load files into Photoshop layers”. Depending on how many photos you have, this step can take quite awhile. Once they are loaded, we can move over to working in Photoshop (this is where the fun begins).
In Photoshop:
Bridge will have made you a nice massive file with many different layers containing all your photos.
Make sure none of the layers are visible except for the bottom layer by clicking the small eye icon on each layer.
Starting from the bottom layer, click on “Layer blending options” and select “Lighten” This will blend the layers together keeping only the lightest areas of the photo.
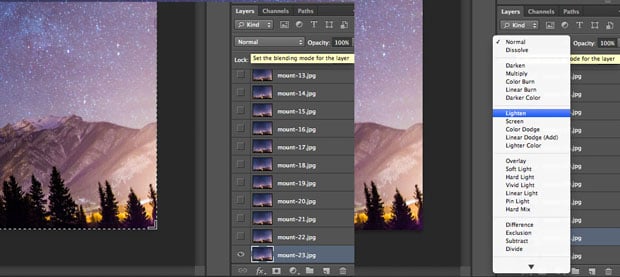
Continue selecting each layer and change the blending mode to “Lighten”. If you have trails from airplanes that you want to get rid of, you can use the brush tool, paint over them in black, and they will disappear! As you continue changing each layer to “Lighten, you will see trails start to appear.
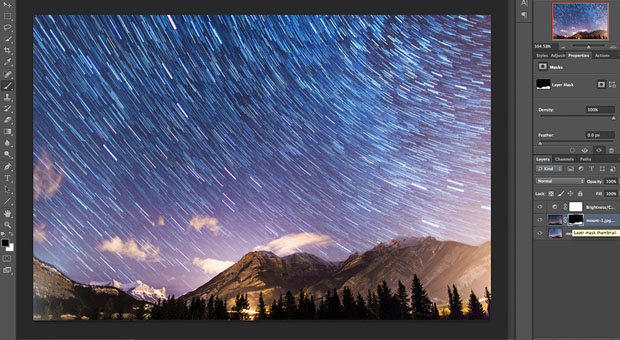
You can select all layers and change the blending mode for all of them at the same time, but if you do have any airplane trails you want to get rid of, it will be very hard to go back and find them. Once you have all the layers set to “Lighten”, you will almost be done, and have something like this:
This last step is completely optional, but I feel it adds a lot to the photo. As you went about setting each layer to lighten, you may have noticed some dark areas in your photo get lighter that you may not want, such as the mountains in the above photo, this step will mask out those areas to tone down the lighting where you don’t want it.
Select one of your layers and make a copy by pressing CTRL+J (or CMD+J if you are cool and use a Mac).
Select all the layers except the one you just created, right click on them and select “Merge layers” you will now have two layers, one with star trails and one “Normal Photo”.
Make sure the normal photo is the top layer, set blending mode back to “Normal” and create a layer mask ( Layer > Layer Mask > Reveal All).
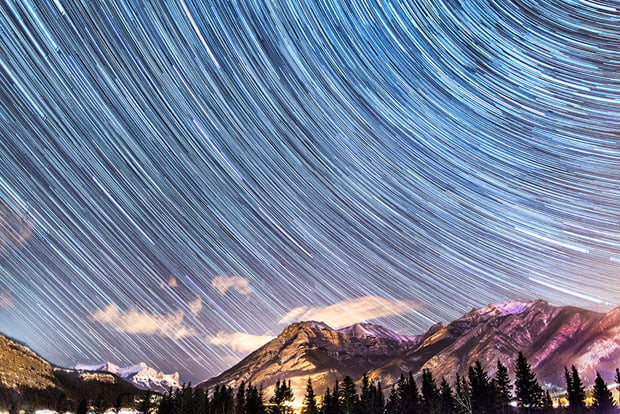
Using the Brush tool, paint over the sky area using black (make sure you have the mask layer selected, not the photo). This will block out the areas you paint over, leaving only the original exposure of the mountains.
You will be able to see the difference in the brightness of the mountains in the photo below:
Your photo is now done! You can flatten the image and save it in whatever format you like.
I know there are several ways you can do this, and a program that automates the process, but I really prefer the hands-on method of working layer by layer so you can make any adjustments as necessary along the way.