6 Types of Photos Every Photographer Should Know How to Make
While the popularity of some creative photography techniques rises and falls, there are some photo tricks that continue to stand the test of time. Here, we’ve hand-picked 6 classic pictures that you should know how to make – and explain how to do just that.
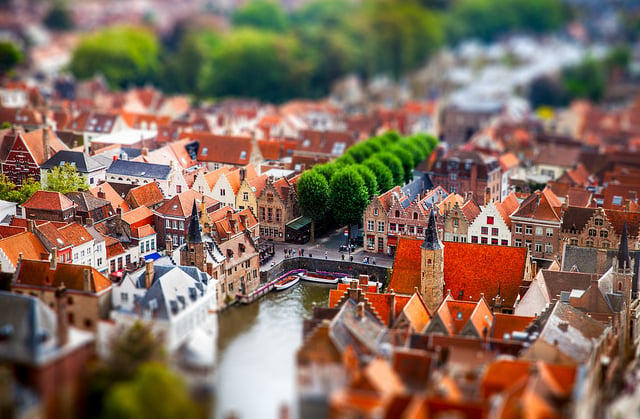
1. How to make a fake tilt and shift photo
Tilt-shift lenses are expensive. Brilliant, but expensive. Their moving elements enable photographers to correct perspective distortion in architecture photography and allow landscape photographers and studio photographers to extend the depth of field across a scene or an object in order to make more of it appear sharp.
However, there’s a seemingly insatiable appetite for using these lenses in the opposite manner for selective focus photography and filmmaking. Whether it’s creating a sharp portrait that’s surrounded by copious amounts of blur, or making a city or landscape look like a miniature model (the technique used for the opening credits to the BBC’s Sherlock), there’s plenty of creative mileage in a tilt-shift lens.
But as we said, man, they’re not cheap.
You can of course hire a tilt-shift lens, although it’s worth getting used to the manual features of your camera first. Tilt-shift lenses are manual focus only, but the magnification feature of your camera’s Live View mode makes this easy, enabling you to check the focus point is positioned precisely within the scene. Metering is also best handled manually before you adjust the tilt or shift controls of the lens, too.
Another alternative is to fake the tilt-shift miniature effect in Photoshop. This is a simple process of applying a gradient blur, and can produce a result that many viewers will be unable to discern from the real thing. It works best when the photo you want to add the tilt-shift effect to has been shot from a raised viewpoint on a bright day, as the angle and contrast make for a more authentic ‘toytown’ look.
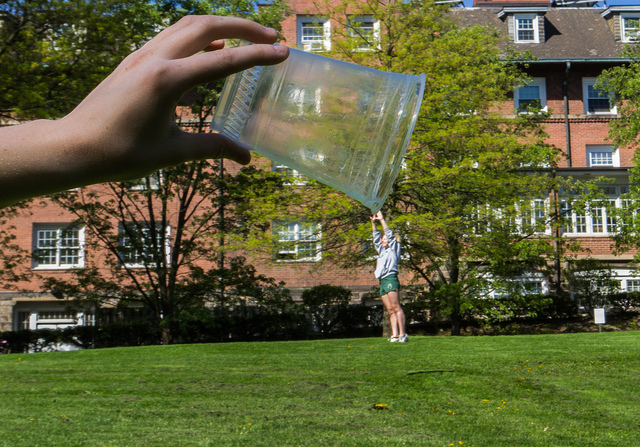
2. How to make a forced perspective photo
At first glance they look like snapshots, but the best forced perspective photographs are well-planned pictures that can be both creatively rewarding and generate plenty of shares and likes on social media, if you’re looking for that sort of thing.
The idea is simple: a subject (usually a person) is carefully positioned so that they appear to be merging or interacting with an object in the background – or vice versa – to create an optical illusion. The classic holiday snap of someone appearing to hold up the Leaning Tower of Pisa was just the beginning; now it’s all bokeh bubble blowing and ‘man eats car’.
Technically, there’s not a lot to it. It’s more about spotting the opportunities and having your camera prepped to make the most of them (think reasonably small aperture and fast shutter speed to freeze movement). In terms of lens choice, a wide-angle lens will exaggerate the distance between the foreground and the background. Objects close to the camera will look much bigger than those in the distance – a useful trick if you want to make someone in the foreground appear to be holding someone in the background in the palm of their hand.
A longer focal length will compress a scene and make the elements appear closer together, a good technique for making objects appear on the same plane.
Working in Aperture Priority, you’ll need to use an aperture that provides enough depth of field to ensure there’s enough sharpness from the foreground to the background. You may need to increase the ISO to ensure a fast enough shutter speed for sharp results. Making sure the objects that are being combined are being lit similarly also produces a more convincing effect.
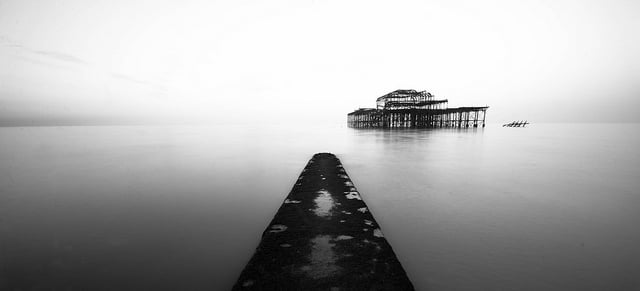
3. How to make a long exposure landscape photo
The long exposure landscape photo has become a modern classic. Exposures typically last anywhere from 30 seconds to 5 minutes, with the result being that moving objects are rendered as smooth blurs – and can even vanish completely. Stormy seas can be rendered as silky as milk while locations bustling with tourists appear eerily empty.
To achieve such epic exposures in daylight requires the use of a strong Neutral Density filter. These range from around 3 stops to 10 stops in strength, with the higher-rated ND filters blocking progressively more light. For example, a scene requiring an exposure of 1/6 second at f/16 without a filter would need an exposure of approximately 2min 50sec at f/16 with a 10-stop ND filter.
In addition to a strong ND filter, you’ll need a tripod, a lockable remote release, a way of calculating the length of the exposure (there are plenty of smartphone photo apps that can do this for you) and something to block the viewfinder eyepiece with. Some cameras have a built-in viewfinder blind, while others come with an accessory that slips over the eyepiece in place of the rubber surround.
You need to block the viewfinder for very long exposures even if you’re using the camera in Live View mode. if you don’t, light leakage can occur and you’ll end up with odd-looking glow marks on the final image.
As a final touch, many photographers convert long exposure landscapes to black and white and add a square crop for that ‘fine-art’ look.
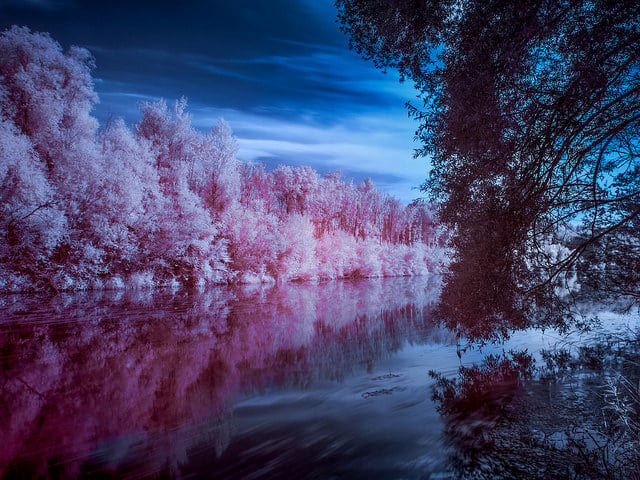
4. How to make a digital infrared photo
Infrared photography can add a ghostly appearance to images shot on bright, sunny days. As a result it’s an effect that’s particularly suited to photos that feature Gothic architecture, castles, abandon buildings and ancient monuments. But it’s a technique that’s just at home with portraits and wildlife photography.
The majority of digital camera sensors include an infrared blocking filter for standard photography, and this needs to be removed in order to be able to take infrared pictures. Converting a camera to infrared like this means that you won’t be able to use it for regular full colour photography, so you’ll need to adapt a spare camera.
Not all of us happen to have an old digital SLR knocking around or the spare cash to convert it into an infrared camera. But there is an alternative: using an infrared filter. This screws onto the front of the lens and blocks all light bar infrared. IR filters are very dark though, which means long exposure times – they’re useless for taking infrared photos of moving subjects. You won’t be able to see anything through the viewfinder either, so it’s best to compose and manually focus before adding the filter. You’ll also need to spend a little time converting the image later.
If you don’t want to buy a filter, you can always learn how to add an infrared effect in Photoshop. You can try this technique with any image, although if you take a photo with a fake infrared look in mind you’re more likely to end up with a successful result.
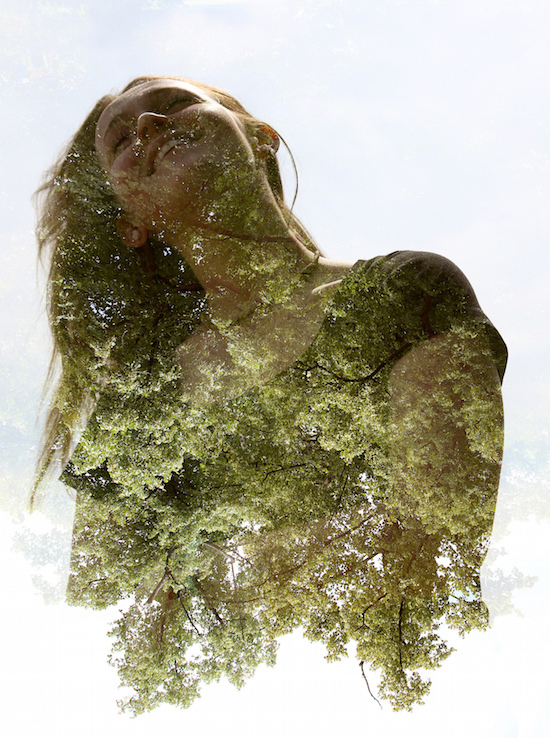
5. How to make a double exposure portrait photo
Combining one photo with another isn’t a new technique: it’s been around since the late 19th century.
One of the most popular forms of double exposure photography is the combination of a portrait with a natural pattern. A strong texture tends to work best, whether it’s foliage, tree branches shot against a white sky or cracked earth.
Some DSLRs have a multiple exposure mode that enables you combine images in-camera. You can produce some quite striking images without resorting to Photoshop manipulation. Don’t believe us? Check out the in-camera double exposures from Christoffer Relander.
For a clean silhouette, you’ll need a white backdrop – getting low and photographing your portrait-sitter against a bright, cloudy sky is ideal. Do the same with the image you’ll be combining it with. Working in Live View mode is best, as you will be able to display the first image on the rear screen while you align the second. The two frames will then be automatically merged, with the texture being visible in the darker areas of the first image.
Not all cameras can take multiple exposures, in which case you’ll need to combine the photos in image editing software. Making a double exposure portrait in Photoshop is a simple process and one which provides an endless opportunity to fine-tune the blend between the portrait image and the texture.
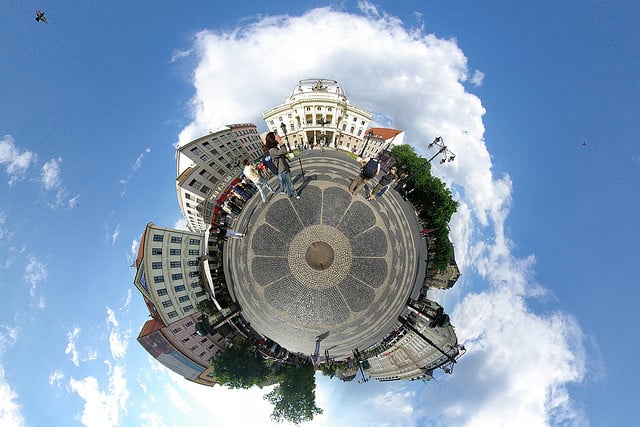
6. How to make a 360 degree polar panorama
Polar panoramas are fun takes on the traditional panoramic ‘strip’. The principle is the same – take a sequence of images that you then stitch together in software – it’s just that you create a circular ‘world’ image at the final stage of the process.
As with other types of panoramic photography, you need a methodical approach to taking the individual frames. Take test shots of the brightest and darkest parts of the scene and work out the base exposure from these results. Use manual mode to set the aperture and shutter speed, and set the white balance and focus manually too, as this will ensure consistency across the sequence of pictures.
Make sure the tripod and head are level and, when you move the camera, allow for approximately 1/3 overlap between each frame. Shooting enough frames to cover a 360 degree image will mean your final panorama ‘globe’ won’t look stretched or have an obvious join.
Use panorama software such as Photoshop’s Photomerge option to stitch and blend the frames together. The next stage involves flipping the panorama photo vertically and resizing it to create a square image. To do this, use Image > Image Size in Photoshop. Make sure the ‘Constrain aspect ratio’ link box is unchecked and then change the width and height to the same value.
The final step is to use Filter > Distort > Polar Coordinates, selecting Rectangular to Polar in the dialog box that appears.
About the author: Jeff Meyer is the editor of PhotoVenture, a photography blog for everything post-capture — improving photos, image management, sharing and more. This article originally appeared here.
Image credits: Mini Brujas by Andrés Nieto Porras, Forced Perspective by Kenzie Saunders, To the Pier by Dom Crossley, Infrared Dream by zeitfaenger.at, Double exposure by Brian Tomlinson and Slovak National Theatre by Alexandre Duret-Lutz.