What is Chromatic Aberration? How to Deal with Color Fringing
If you’ve ever noticed an unsightly colored fringe or halo on objects in your photographs, you’ve seen chromatic aberration. It’s a common problem in photography and can detract from an otherwise good image. Fortunately, there are ways to minimize or even eliminate it, both before you hit the shutter button and after when editing your picture.
Table of Contents
What is Chromatic Aberration?
Chromatic aberration is a color distortion that occurs when a lens fails to focus all colors of light onto the same point, creating an undesirable outline of color at the edges of subjects.
The word “chroma” means color and an “aberration” is something that deviates from the normal way, so “chromatic aberration” means there’s something wrong with the color. Specifically, you will notice it as areas of fuzzy fringes of blue-yellow, red-green, or magenta-purple on objects in your picture.

It’s visible in high-contrast areas where the dark and bright parts meet, such as along the edge of a building against the sky. You’ll see it mostly toward the periphery of a photo, but it can also show up in the center.
What Causes Chromatic Aberration?
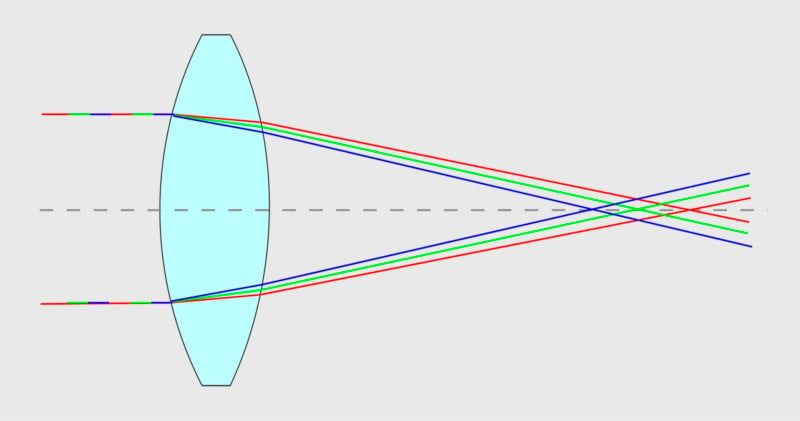
Light travels in waves. Each wave is a color and has its own shape. When light hits the lens, the lens is supposed to focus the waves on a single point on the focal plane. It’s easier said than done, however, because the waves don’t move through the glass uniformly. Consequently, some waves are focused in front of or behind the focal plane, while others are focused at different points on the focal plane. The result is chromatic aberration.
Lens manufacturers try to solve the problem by designing their lenses with multiple elements and low-dispersion glass. However, no lens is perfect and all lenses have some amount of chromatic aberration. In addition to the lens design, the focal length and aperture also affect how well the light waves are focused.
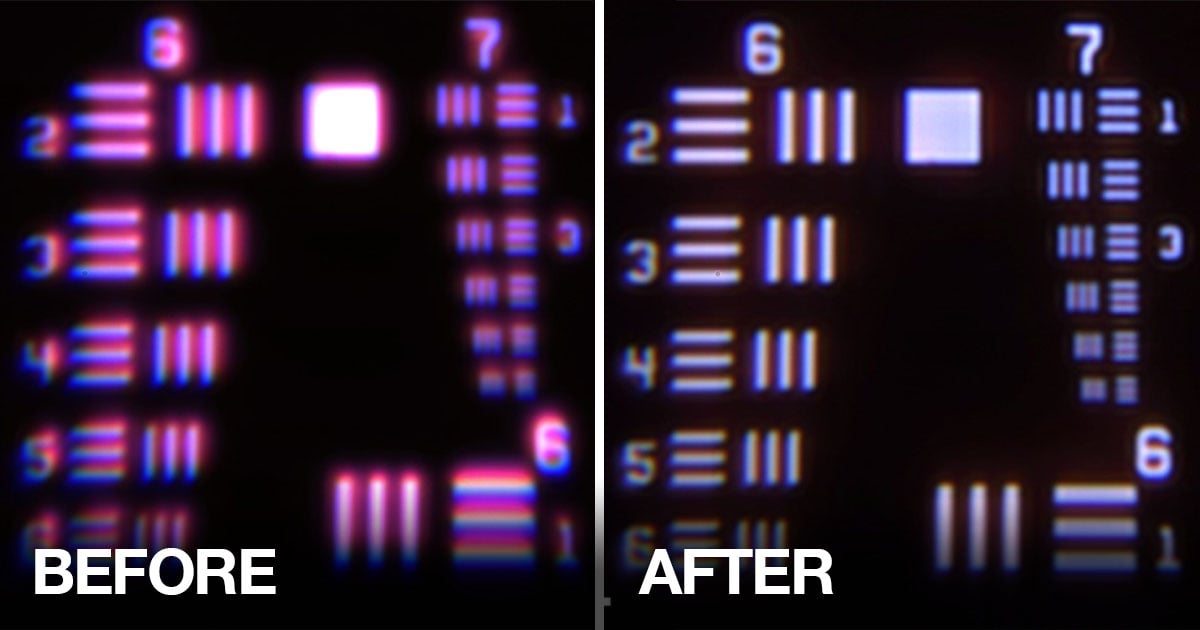
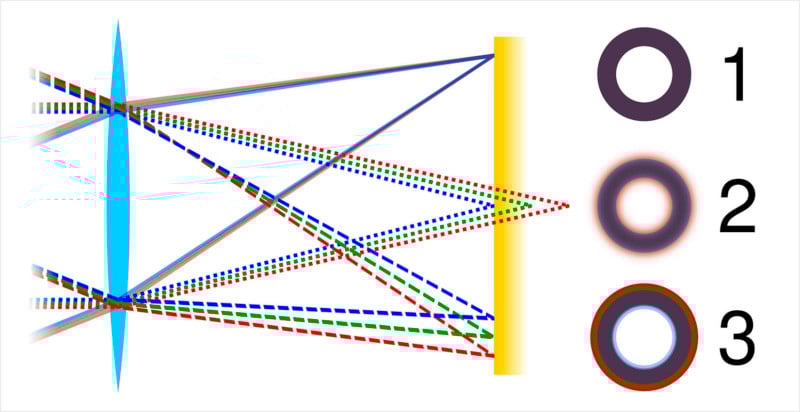
There are two types of chromatic aberration: longitudinal and lateral.
Longitudinal (or axial) chromatic aberration occurs when the individual waves are focused at different distances from the lens. Most common when shooting wide open, this type of chromatic aberration can show up in any high-contrast areas of your image. You can try to minimize or eliminate it by using a higher f-stop and also in Lightroom and Photoshop (the procedure is described below).
Lateral (or transverse) chromatic aberration happens when the different light waves all hit the focal plane, but at different points. It appears as color fringing in areas of the corners with high contrast. The only way to eliminate or reduce lateral chromatic aberration is in post-processing.
Dealing with Chromatic Aberration
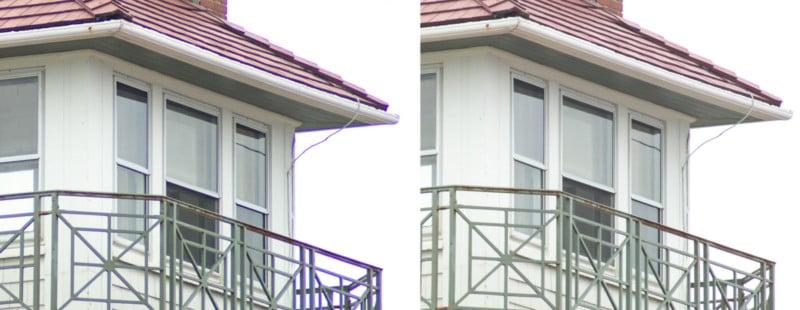
First thing is to find out if chromatic aberration is a real problem for you. All lenses have some degree of chromatic aberration, but it’s not always severe enough to cause a problem. To test a lens, find a subject with lots of contrast. For example, photograph tree branches or the roof of a building against a bright sky. Magnify the image and zoom in on details to look for chromatic aberration. As mentioned earlier, it shows up in areas of high contrast and occurs mostly toward the edges of the frame, but can also appear in the middle
Chromatic aberration is strongest when the lens is wide open. So if you’re photographing a high-contrast scene, a higher f-stop could make a difference. If you’re shooting the test image described above, do one shot wide open at your lowest f-stop and another at your highest f-stop. See if there’s a difference.
The focal length of your lens can affect chromatic aberration, too. Wide-angle lenses are more prone to chromatic aberration than longer lenses. If your wide-angle lens displays a lot of chromatic aberration, then shoot at a longer focal length. If you need a wide field of view, but your wide-angle lens has a lot of chromatic aberration, you could try shooting a panoramic with a longer focal length and then stitching the images together, or just move back if possible. Obviously, neither option is always practical or satisfactory. Fortunately, it’s pretty easy to eliminate chromatic aberration, or at least greatly reduce it, in Lightroom or Photoshop.
How to Remove Chromatic Aberration in Lightroom
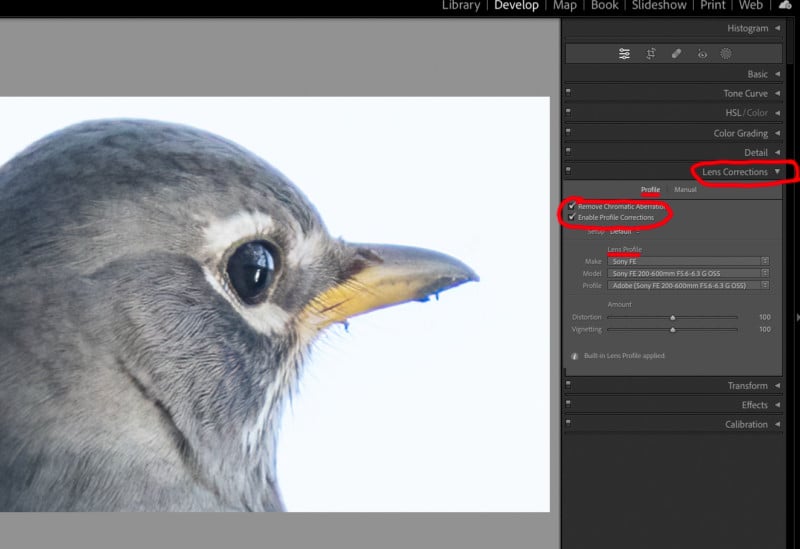
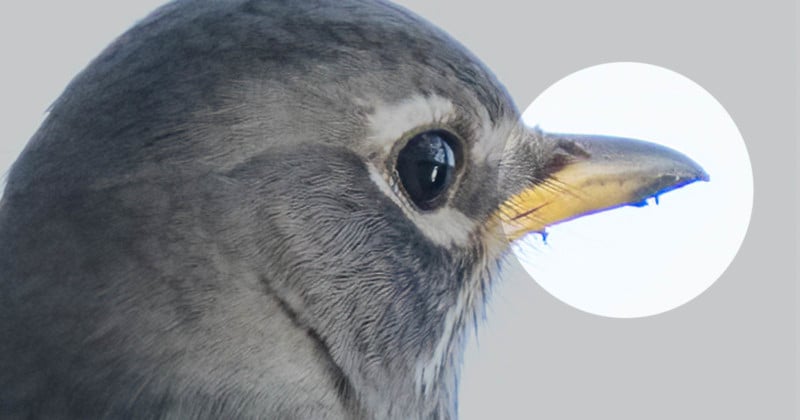
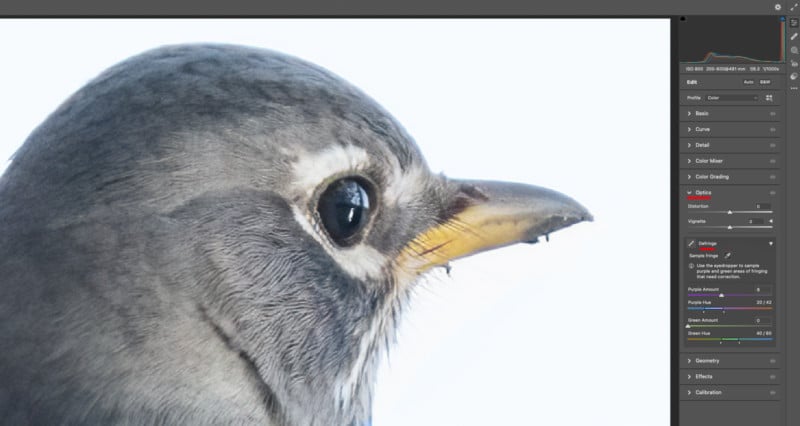
Zooming in on this picture of the bird reveals a lot of chromatic aberration under the beak.
To remove the color fringing in Lightroom, go to the Develop module and scroll down to the Lens Corrections panel. Click on “Profile” and then check “Remove Chromatic Aberration.” It’s a good idea to leave this box checked all the time so you don’t have to think about it every time you open a picture.
Most times the checkbox will remove some, if not all, of the chromatic aberration, Sometimes, however, like in this image, it doesn’t do much so you have to do a little more work. If that’s the case, leave “Remove Chromatic Aberration” checked, and then click on “Manual” instead of “Profile” and the “Defringe” options will open.
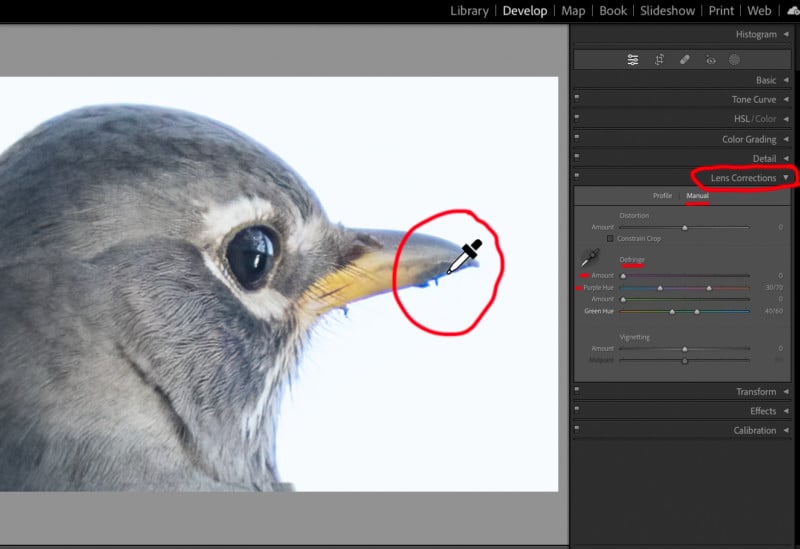
Click on the eyedropper next to the word “Defringe” and then drag it over to the picture and click on the color fringe you want to remove. Lightroom will then automatically adjust the sliders to remove the unwanted color. Sometimes it may not completely remove the color, so you’ll have to tweak things by manually adjusting the sliders a bit.
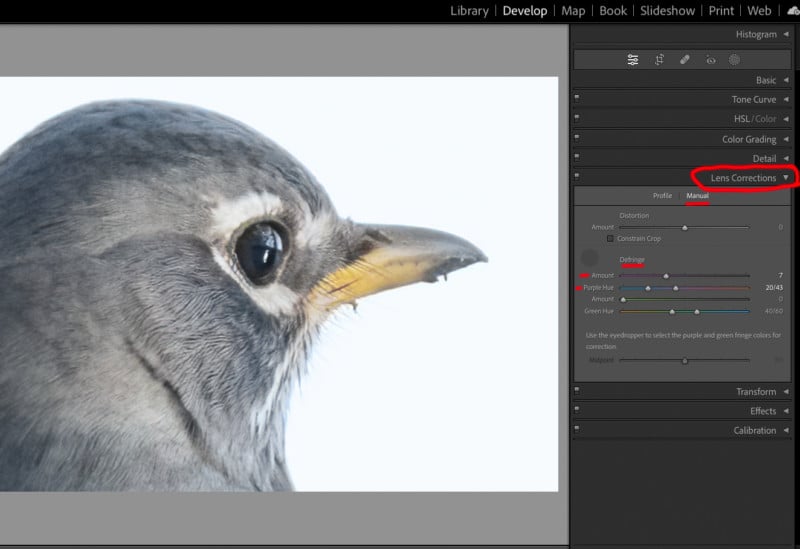
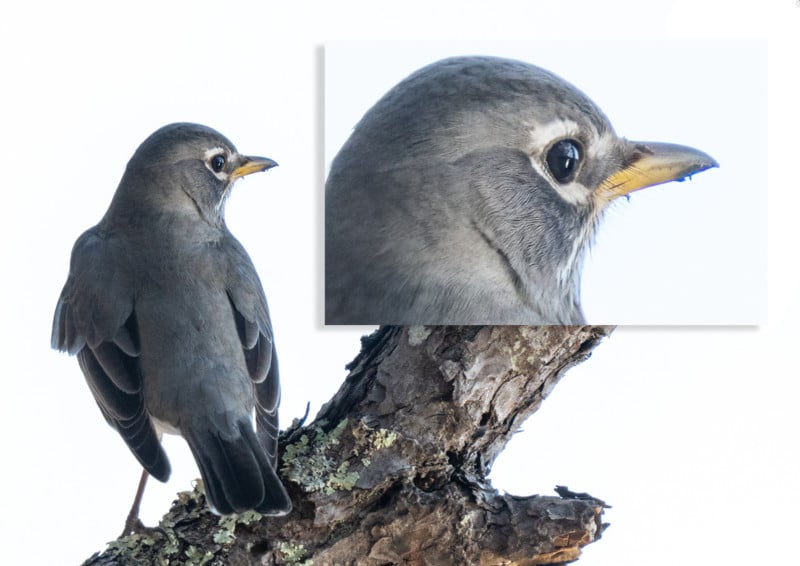
The chromatic aberration was removed after using the eyedropper. Notice how the position of the sliders in this image changed after the eyedropper was used versus the position of the sliders in the first image with chromatic aberration.
How to Remove Chromatic Aberration in Photoshop
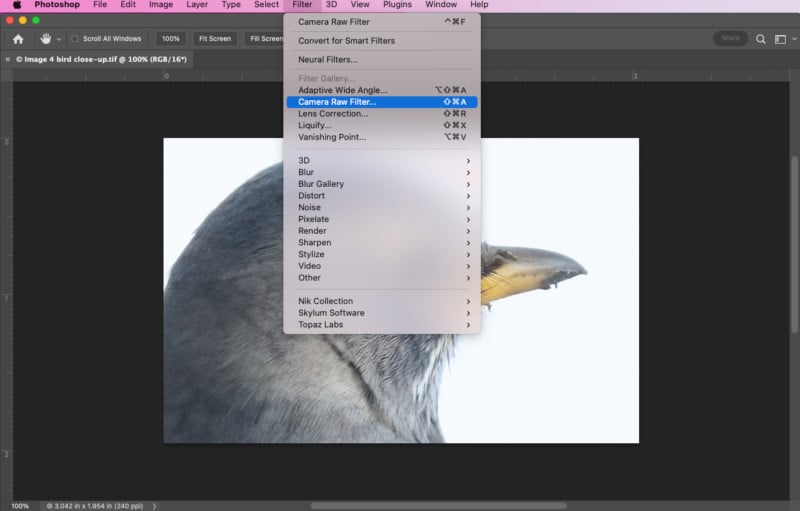
In Photoshop, the easiest way to remove chromatic aberration is to use Adobe Camera Raw. With the picture open in Photoshop, go to “Filter” in the menu bar at the top of the screen and select “Camera Raw Filter” or press Shift + Cmd + A on a Mac or Shift + Ctrl + A on a PC.
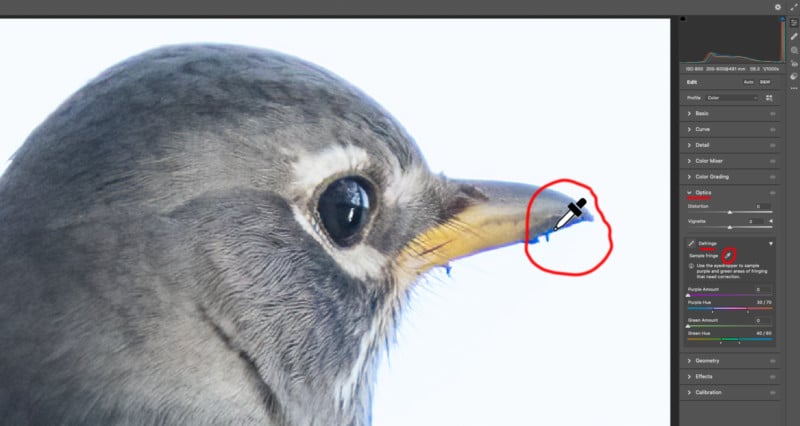
Open the “Optics” panel and then click on “Defringe.” Select the eyedropper and drag it over to the picture and click on the color fringe. Camera Raw will then adjust the sliders to remove the chromatic aberration. If it doesn’t completely remove the color fringe, move the sliders around to improve the results.
The chromatic aberration was removed after using the eyedropper. Notice how the position of the sliders in this image changed after the eyedropper was used versus the position of the sliders in the first image with chromatic aberration.
Chromatic aberration is a fact of life for photographers, but you don’t have to live with it if you know what it is and deal with it before you capture the image and afterward when editing.
About the author: John Tunney is a fine-art photographer and instructor living on Cape Cod in Massachusetts. You can find his work on his website and on Instagram.
Image credits: All photos, unless otherwise noted, by John Tunney.