How to Whiten Teeth in Photoshop

Let’s face it, not everyone who ends up in front of your camera is going to have amazing white teeth like the model in the photo above. There are going to be times when you have a client whose teeth might be stained.
The point is that it is very possible you will get requests to whiten teeth as part of your final edits to an image. As with many things in Photoshop, there are many different ways to approach a task and in this article, I’m going to go over three different ways you can whiten teeth in Photoshop. The first two are pretty quick and easy, but the third one offers more fine control at the cost of a little more time. Check all of them out to see what’s right for you and your specific needs.
Table of Contents
A note about images used in this article: Before I get started, I want to point out that the images I’m using are headshot photos I’ve captured over the past several years. I will be hiding a portion of the image to “protect the innocent” as the subjects in question would likely prefer not to have everyone taking such a close look at their pearly, or not so pearly, whites.
Method #1: Using the Camera Raw Filter
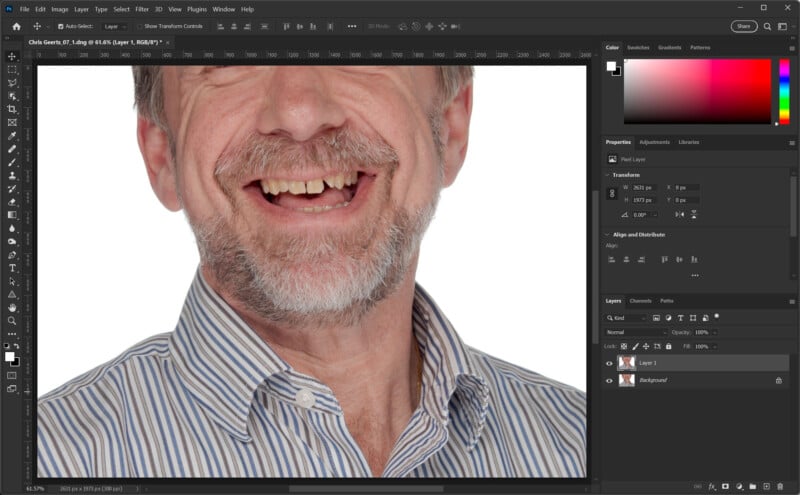
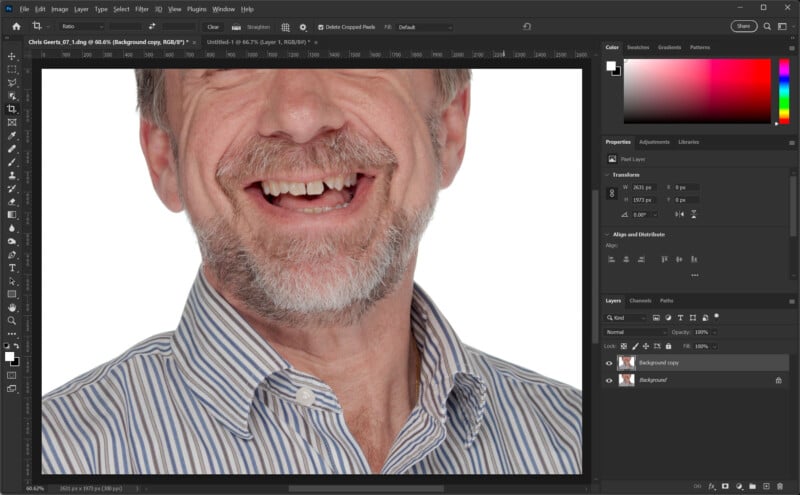
By using the Camera Raw Filter in Photoshop, one can use the automated selection tools and the color/light/contrast adjustments to whiten teeth. To start with, let’s go ahead and duplicate the background layer by pressing CTRL+J on Windows (CMD+J on Mac) with that layer selected as shown in Figure 1.
With the duplicate layer selected, go to Filter>Camera Raw Filter from the main menu as shown in Figure 2.

This will bring up the Camera Raw interface. In recent versions of Camera Raw and Lightroom, new masking options have been added that leverage AI selections. Open the masking tools by selecting Masking in the upper right corner or pressing M on the keyboard.
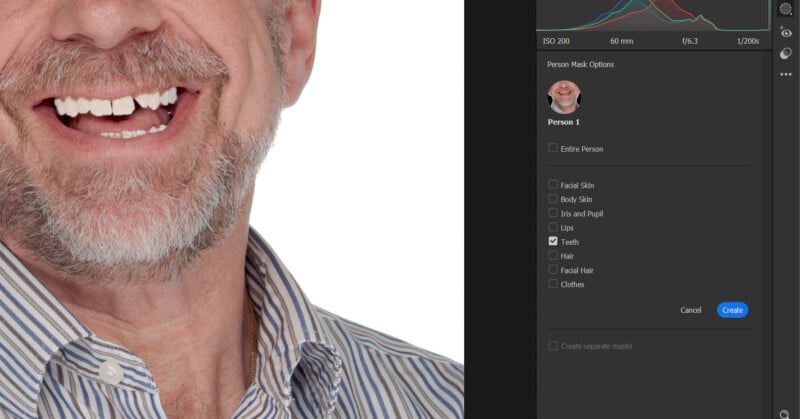
Once the panel opens, the filter should automatically start searching for people in the image as shown in the yellow box in Figure 3. Choose the Person from the options (if there is more than one) and this will bring up a set of options for creating masks of all or specific areas of the person. This includes things like Facial Skin, Body Skin, Lips, and of course Teeth.
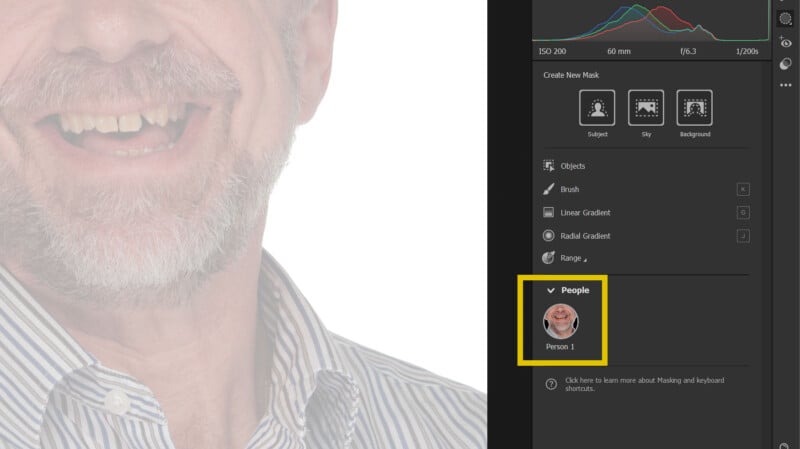
Click on the box next to Teeth to create a mask that “should” find the teeth visible on the person that was selected as shown by the bright mask over the teeth in Figure 4. I say “should” because while this auto-masking tends to work very well in practice, it is not going to get it right one hundred percent of the time.
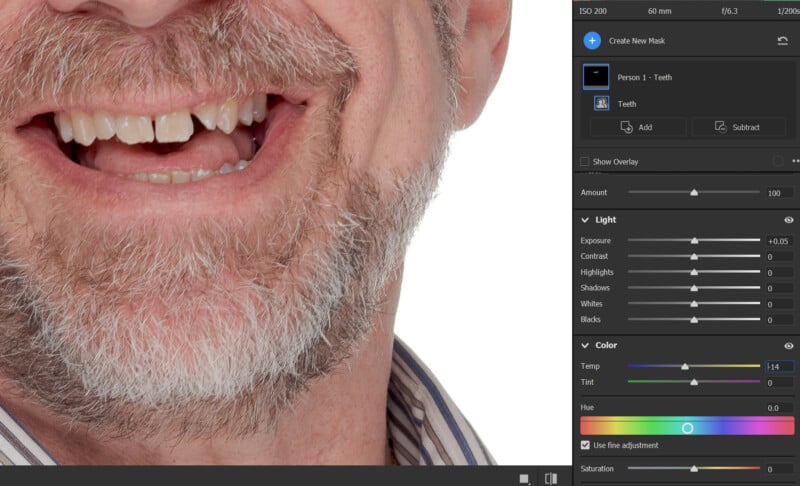
With the Teeth option selected, click on the Create button to create the mask. Now you can use the Light and Color tools to “whiten and brighten”. I would suggest using very small increments to the blue/yellow Temp adjustment to lower the amount of yellow present in the teeth. The amount used will vary from image to image, and using small changes will help keep you from going too far with your adjustment.
If you prefer, you can use the Saturation adjustment to reduce the yellow stains on teeth. Like using the Temp adjustment, I would suggest being careful as it is very easy to go too far. You’ll notice the correction I’ve made (Figure 5) does not make the teeth pure white as that wouldn’t look natural. The best edits and retouches are the ones where you don’t see where anything was done.
After adjusting for the yellow cast, it is usually good to give the teeth a small bump up using the Exposure adjustment. Often just +.05 is enough as it can become obvious you’ve been doing some “dental” work if you go much brighter. Figure 5 shows the Temp and Exposure adjustments applied in the Camera Raw filter.
Once you are finished making your adjustments, which should take a lot less time to perform than it did to read this, click OK to return to Photoshop. With the “adjusted” teeth layer above the original, you can turn the visibility on and off to see the difference. You could also adjust the opacity of the edited layer if you find the adjustment is too noticeable. Figure 6 shows the return to Photoshop with the Camera Raw filter applied to the duplicate layer that was created.
Note: If you feel that there may be a need to redo this adjustment based on the client’s needs or desire to have options, you should make the duplicated layer a Smart Object which will allow you to go back and readjust as needed.

Method #2: Adjustment Layer
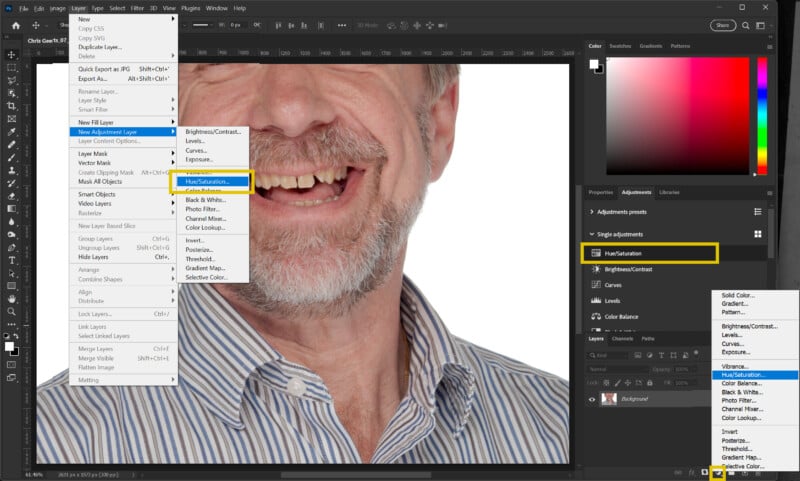
Using an Adjustment Layer is an option that doesn’t require one to create a duplicate layer or jump into the Camera Raw Filter. In this case, you can simply create a Hue/Saturation Adjustment layer by selecting it from the Adjustments panel, from the Add Adjustment layer button at the bottom of the Layers Palette, or by going to Layer>New Adjustment Layer from the main menu. You can see all three options in Figure 7
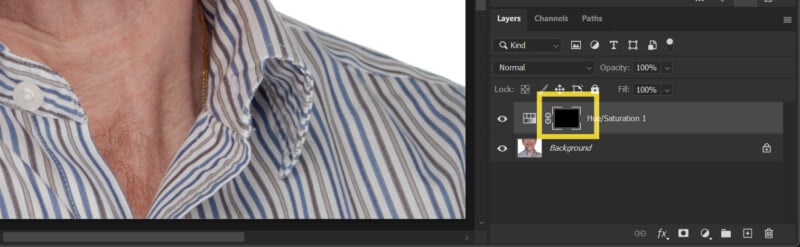
Select the Mask that is associated with the new adjustment layer and then click CRTL+I (CMD+I on Mac) to invert the mask, making it black as shown in figure 8.
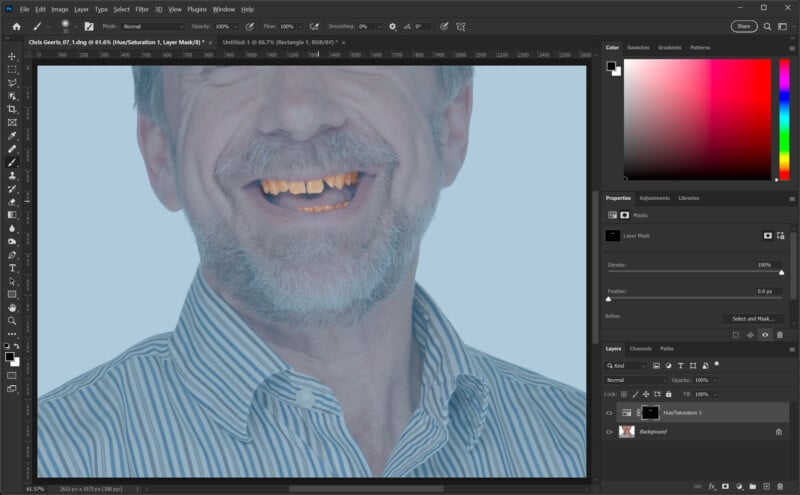
Next, use the Brush tool and paint with white over the teeth in the image where you want to adjust the whiteness. If you want, you can press the “\” key to see the mask overlay, which helps you visualize the masked area. You can see this effect in Figure 9, where I have changed the mask overlay to a light blue, as I find the default red a bit harsh on the eyes.
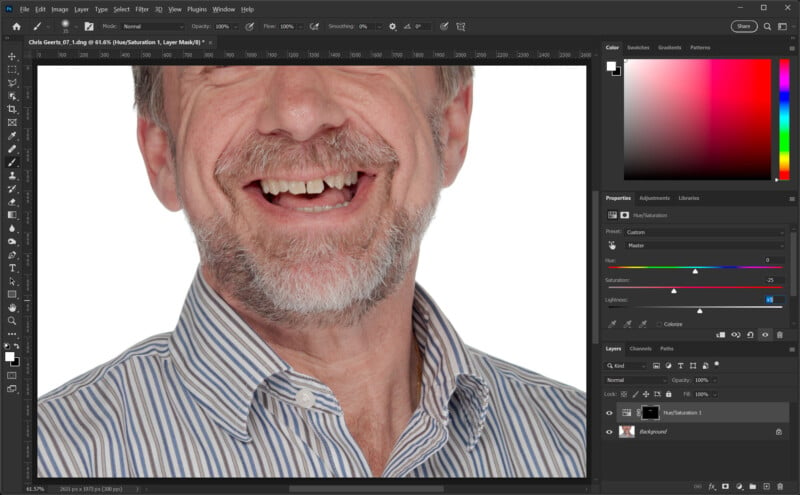
Once you have the teeth masked, press “\” again to remove the overlay. Then, select the Adjustment layer icon in the Layers palette to get the controls for Hue/Saturation. From here you can start lowering the Saturation until you get the desired effect. I also add a little bit to the Lightness — in this case, I added +5 to it.
Sometimes you might need to tweak the Hue a few points up or down, but I didn’t feel it helped in this image in Figure 10. Of course, your taste and that of your client may vary. One of the advantages of the Adjustment layer is you can always return to your PSD file and adjust again without any image quality loss.
An alternative to using the Hue/Saturation Adjustment layer is to use the Color Balance Adjustment layer. Either can deliver good results, so it really comes down to which one works best for you and your experience with Photoshop’s tools.
Method #3: Sponge and Dodge Tools
The previous two methods are certainly good options, and in many cases, they can provide results that make you and your client happy. However, using the Sponge and Dodge tools give you more control over this type of touch-up, and they allow you to target specific teeth or areas on a tooth that may need more attention than others.
This is the method I have been using for many years and I think the extra time required for this method, which isn’t that much, is worth the potential results. Another benefit is that this method works in versions of Photoshop going back over two decades, as it doesn’t require newer features like adjustment layers or the AI masking in Camera Raw.
Note: This method also “translates” well for use in other image editors like GIMP or Affinity Photo which have similar tools available.
To start, I suggest duplicating the background layer and doing this work on the new layer. After selecting the new layer, select the Sponge tool by pressing the “O” key or selecting it from the Photoshop tools. Since the Sponge tool is part of the toolset that starts with the Dodge tool, you may need to hold SHIFT while pressing the “O” key to cycle to the Sponge tool. If selecting it from the toolbox, click and hold on the icon until you see the alternate tool options, and then select the Sponge tool.
Next, Zoom into the image until you have a close-up view of the teeth. Of note at this point, is that this can be done with a mouse, but using a graphics tablet with a pen will speed things up, and will provide more control here as well as for Method 2.
From the Tool Options, select Desaturate from the pull-down list and set the flow to 3%. If you have a version of Photoshop that has the Vibrance option, you can leave that selected. Using the tool with a soft tip set to around 20% Hardness, start “brushing” on the teeth to whiten them. You can see the results from this step in Figure 11.

You’ll find it’ll take multiple passes over the same area to start making a visible difference, but this “slow build” will greatly help you control the whitening without going overboard. It also allows you to give more attention to areas that need more whitening from tooth to tooth, or even different areas of the same tooth.
Once you have reduced the yellowing to where you feel it looks natural, the teeth may look a little dim. If so, select the Dodge tool by cycling the tool using SHIFT+”O” or by hold/selecting the Sponge icon in the toolbox.
In the tool options, set the Range to Midtones from the pull-down list and set Exposure to 3%. As with the Sponge tool, start “brushing” the teeth to give them a little bit of brightening as you can see in Figure 12. You’ll find this effect is more noticeable sooner than the Sponge tool, so be careful not to overdo it.

Note: The values of 3% I use for these two tools above are where I’ve found it works best for me and the way I work with my images, graphics pen settings, etc. You may find you need to adjust these numbers a little to fit the way you work. With that said, I have found that once you go above 5% on either of these settings, it gets a bit tough to keep the effect from growing too fast.
Spots and Spaces
Using the Sponge and Dodge tools is also a very good choice when you are only needing to whiten certain areas of teeth that otherwise look fine. In the image in Figure 13, this person has a spot on one tooth that needs to be cleaned up.
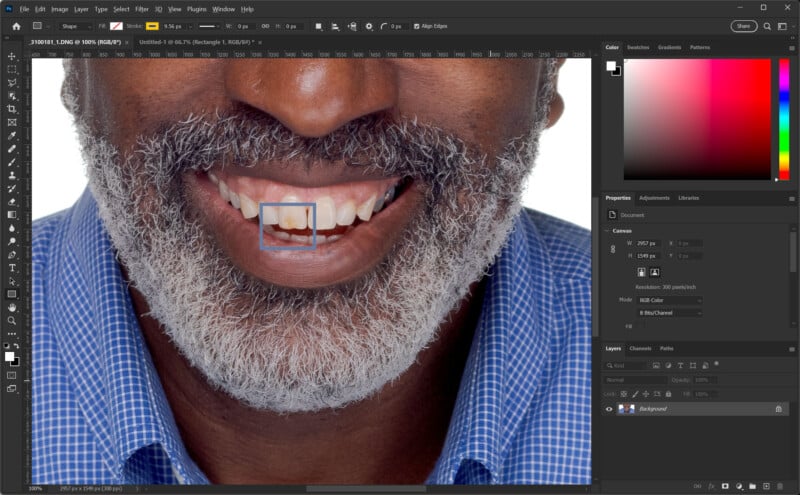
Using the Sponge and Dodge tools here allows you to work on the spot and slowly make it match the surrounding area. This takes only a few seconds and tends to look more natural than cloning or “healing” it out, in my opinion. Figure 14 shows the results of about 20 seconds of work.

Summary
Hopefully one of these methods is something that fits into your workflow when needed. As stated earlier, there are likely a dozen other ways to go about whitening teeth. The ones presented here are what I have found worked best for me, with the Sponge and Dodge tools being my go-to method.
The Sponge and Dodge tools require more time, but for situations where you have to deal with different levels of discoloration from tooth to tooth or even where you have a spot on one tooth, like in Figure 13, this method will be worth the extra seconds or minute it takes to implement it.
I’ll be the first to admit that even with my many years of working in Photoshop, I don’t know every possible way to tackle every editing situation. If you have a method of your own or have thoughts on what I’ve presented here, please share in the comments.
Image credits: Photographs by Brandon Jackson