How to Remove a Background in Photoshop
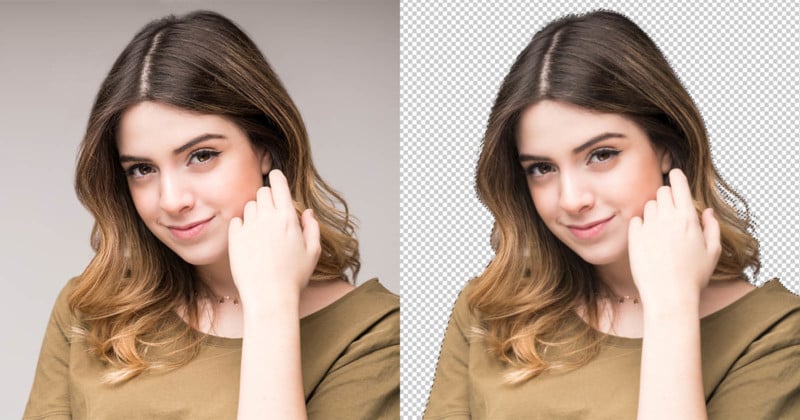
Using Photoshop to remove the background in an image so that you can replace it is one of the most frequent things for which it was used, and might still be. The actual placing of a new image for a background is relatively easy. The heavy lifting comes from making a good selection of your subject as this will be used to remove the unwanted background for replacement.
Note: It may be helpful for you to have Photoshop open while reading this article so you can see the tools and options in more detail than might be easily seen in the screenshots.
Table of Contents
Step 1. Tools for Selecting the Background
Making an accurate selection is key to separating the subject from the background in order to replace that background. As is often the case with Photoshop, certain tools might work better than others depending on the content of the image. In fact, it often makes sense to use more than one of the selection tools to complete and refine a selection for background replacement.
Since version 1.0 of Photoshop, there have been multiple selection tools available such as the Lasso and Magic Wand tools. Fast forward to version 23 released in late 2021 and we have several more tools which include the new Select Subject function which can do an amazing job and picking the subject out of an image.
I say “work smarter, not harder” whenever possible so I encourage using a combination of the smart tools like Select Subject or the Quick Selection tool to create an initial selection and then use other tools as needed to refine the selection. I’m going to start with a high-level look at
the selection tools I use in Photoshop and from there we’ll look at how to use them together.
Select Subject
The Select Subject function, as you might have guessed, does its best to determine what the image subject is and will then create a selection around the edges of that subject. This is one of my favorite ways to start a selection as it usually does a good job of choosing the right subject.
To use Select Subject, select either the Quick Selection or Magic Wand tool in your Tools panel and then click Select Subject in the options bar.
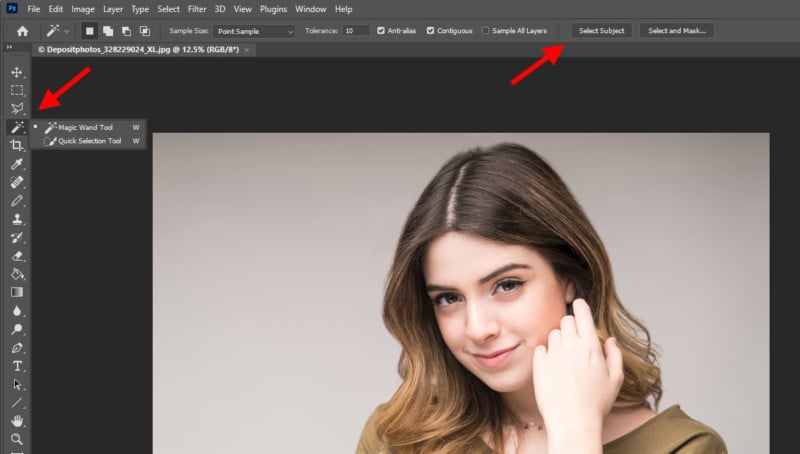
Alternatively, you can also go directly through the menu bar via Select>Subject.
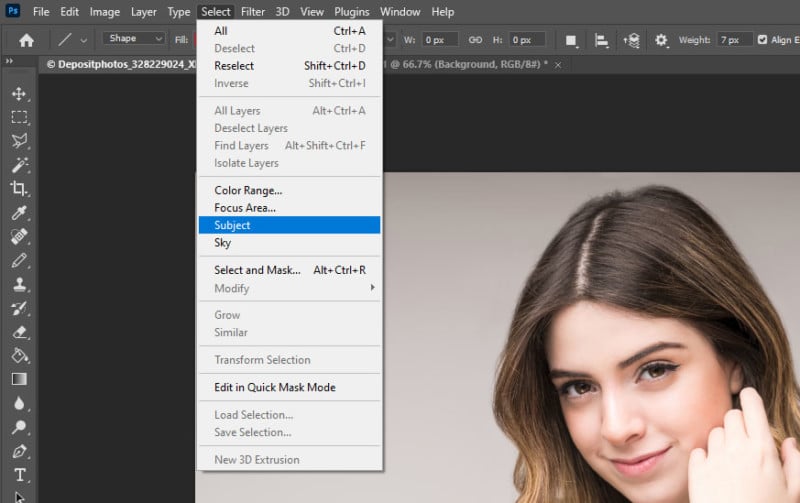
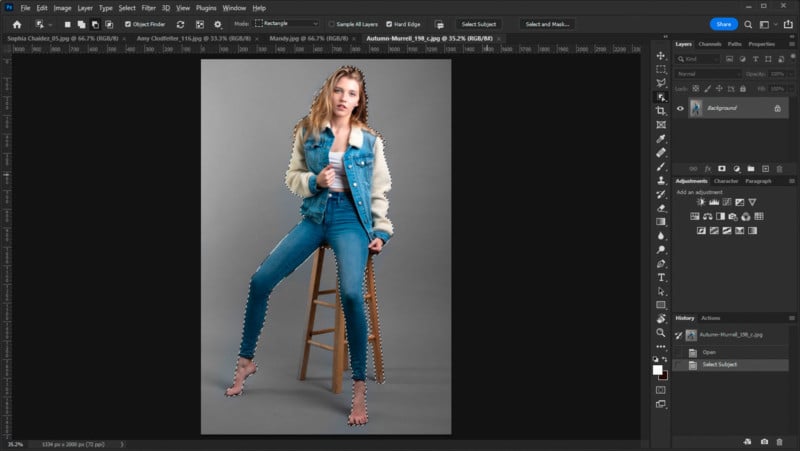
Figure 1 shows how Select Subject has done a good job of selecting Autumn from the background but it also included one of the stool legs that will need to be cut from the selection.
Magic Wand
The Magic Wand selects areas of color similar to the spot “clicked” in the image. There are multiple options in this tool including how small or large of a color sample to take, how much tolerance, or similarity there needs to be in the colors in order to be added to the selection, and whether or not to select a contiguous area or any areas of similar color in the image.
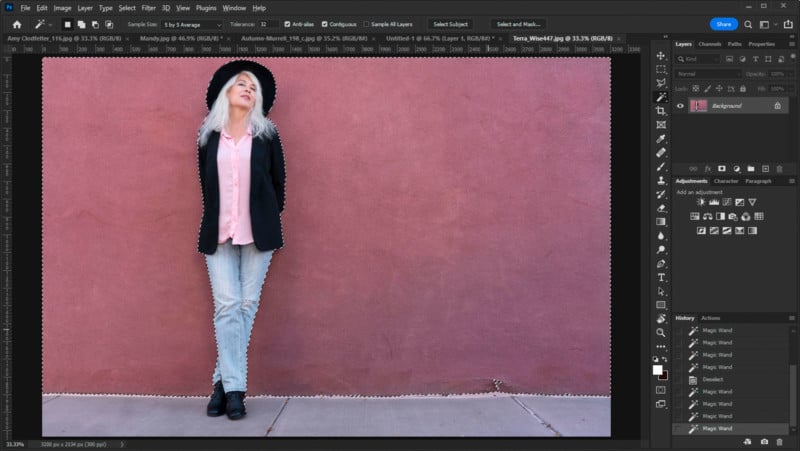
The pink wall in Figure 2 was selected using three clicks of the Magic Wand tool. By holding the Shift key while performing additional clicks in the areas similar but not yet selected in the first click, you can add more similar areas.
Quick Select
Using Quick Select has been around for a few years now and as opposed to a fully automated selection, one “guides” the selection by moving the cursor near the edge of the area you want to select. The tool can be adjusted like the Brush tool in that it can be resized and its edge can be softened/hardened. It can also be used to select on a specific layer or all layers adding to its versatility.
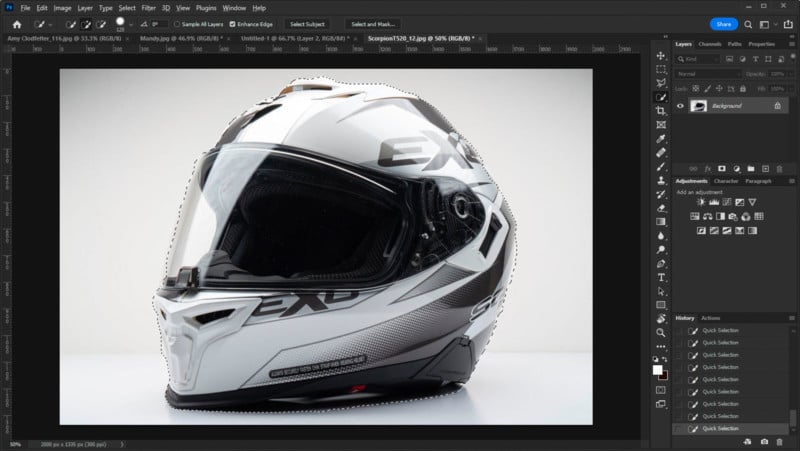
Figure 3 was tricky as the gray tones of the helmet wanted to “bleed” into the background. Using the Quick Select tool this selection took about a full minute. This required brushing around the edges and then using the Alt key in Windows (or Option on Mac) to subtract the selection from areas of “bleed”.
Object Selection
Object Selection appears to be built on the same AI technology as the Select Subject function. You can access Object Selection from the main application toolbar or from the toolbar in the Select And Mask workspace. If you don’t see Object Selection in your main toolbar, go to Edit>Toolbar and make sure you have the tool added.
By moving the cursor onto different items in an image, the Object Selection tool will “shade” what it believes to be the entirety of the object. Clicking at that point will create a selection based on that shaded object and this works even if the object in question is visually divided by something in the image.
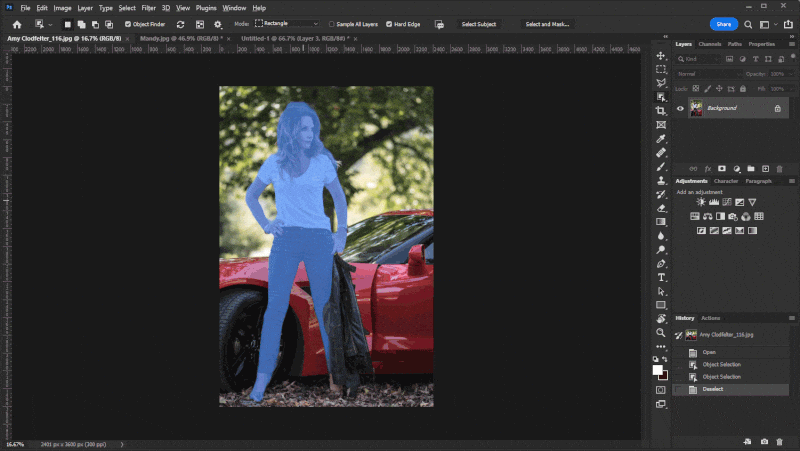
In Figure 4, Amy is standing in front of the Corvette and is holding her jacket in her left hand. Using the Object select tool, I can choose to make a selection around her, the car, or even the jacket.
Lasso Tools
The Lasso tools take you away from the automatic selection tools (mostly) and put the control of the selection in your hand. The primary Lasso tool draws a selection based on your mouse movements while clicking and dragging. The Polygon variant of the Lasso tool draws a straight line between the points where you click in the image and is a bit faster (for me) than just the Primary Lasso tool.
The Magnetic Lasso adds an auto “assist” where the tool looks for edges near the cursor based on contrast and color and “snaps” the selection to that spot. Somewhere around 15 years ago this was my favorite selection tool and was a huge time saver. It’s still useful but I rarely use it myself these days.
The Lasso tools are an excellent choice for refining an initial selection made with one of the automatic tools. Of course there’s nothing stopping you from creating your initial selection with the Lasso tool either.
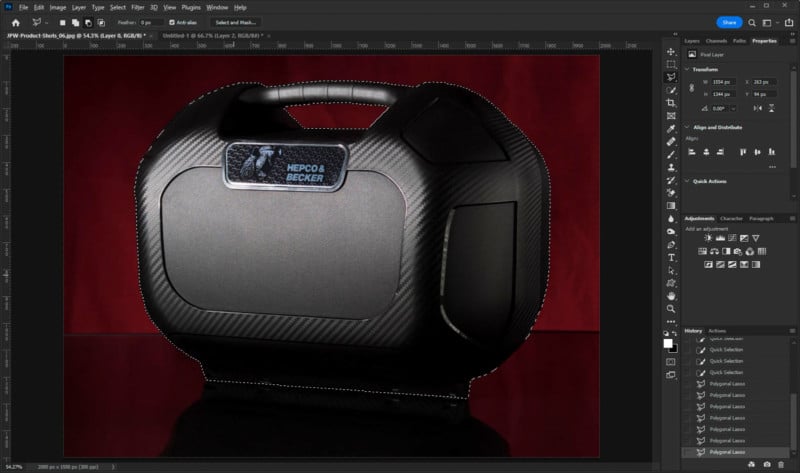
Figure 5 shows where I used the Lasso and Polygon Lasso tools to select the case in the image. Since the lower area is very dark and contains a reflection of the case, the automatic tools couldn’t figure that out and included the reflection of the case as part of the selection.
I should point out that if you plan on using and refining selection in your work I can’t stress how much better it can be to use a graphics tablet such as a Wacom or Xencelabs device for performing edits and making selections. I’ve seen people do amazing things with just a mouse but for most people, a pen-based input will be a huge time saver.
Pen Tool
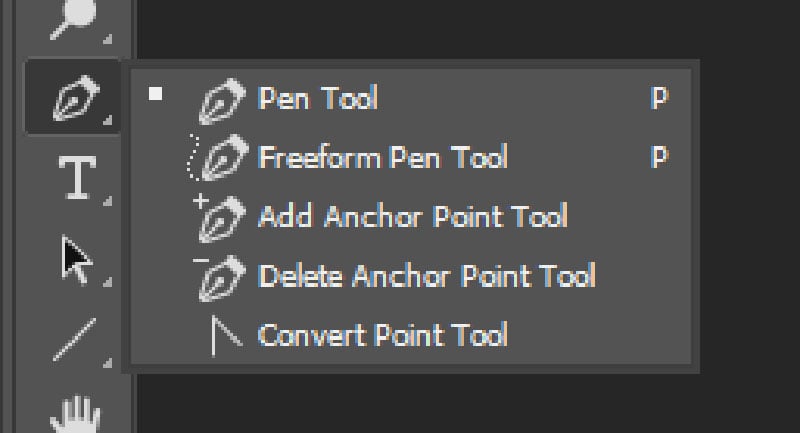
Like the Lasso tool, the Pen Tool can be used to draw out a path around an object. Unlike the Lasso Tool, the path of the Pen Tool is vector-based, not pixel-based. This means it can be resized without aliasing. It can also be modified using the various vector-based tools in Photoshop.
The Pen Tool is probably the most powerful tool for creating complex shapes and it offers a wide variety of options to create a path that can be converted to a selection. This versatility and power of the Pen Tool means it can take time to master. If you plan on doing a lot of compositing, it’s worth taking the time to get to know this tool.
Figure 6 shows creating a shape using the Pen Tool which is then converted into a Vector Mask which is a little different than the regular layer mask.
A Vector mask works like a regular Layer Mask (sometimes referred to as a Pixel Mask) but it can be modified using the point selection and other vector-based tools. The small squares along the blue line can each be selected and moved to refine and resize the vector mask. These control points can also be deleted or more can be added if needed.
A Note on Vector Masks
Vector masks may sound like a better tool than a regular pixel-based mask and in some ways they are. Product images are well suited for Vector Mask usage as the edges of the item are typically going to be well defined. Vector Masks work well to “punch out” an object’s shape in the background for product packaging. Overall I feel that artists who work with the vector tools in Photoshop and/or Adobe Illustrator are going to head for the Vector Mask option where photographers and other users who tend to think in pixels will grasp the idea of pixel-based masks more easily.
Step 2. Refining Your Selection and Mask
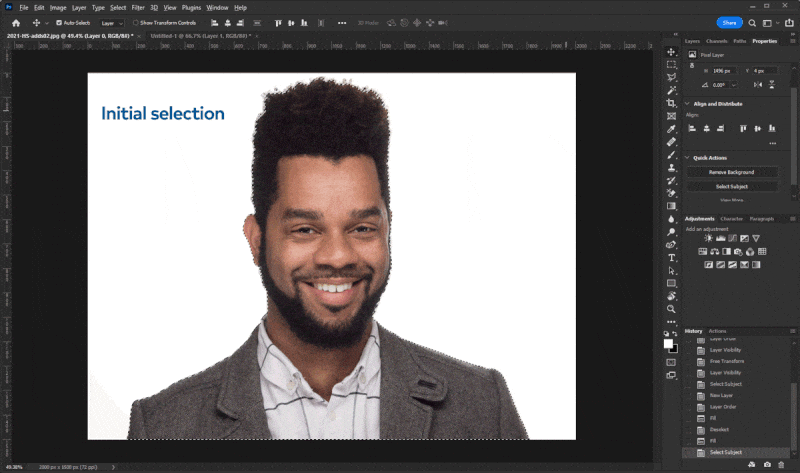
Once you have an initial selection created of your subject you’ll likely need to do some refinement to catch places where the selection tool didn’t catch an area of the subject. In Figure 7 you can see how the bright reflection on the right arm of Amir’s glasses blends into the white background and there’s a little of that on the left arm too.
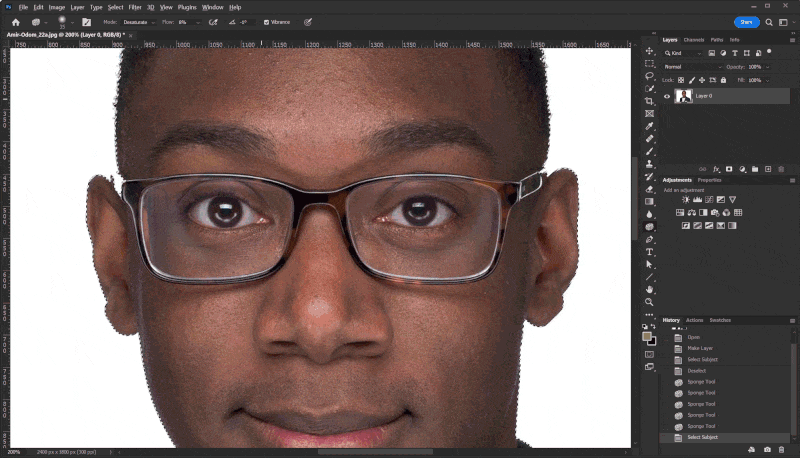
In this case, using one of the manual tools like the Lasso can fill out the rest of where the glasses’ arm should be so it doesn’t get filled with the new background. By using the Lasso tool and holding down the Shift key, you can add to the existing selection. This can also work in the opposite direction where holding the Alt key in Windows (or Option on Mac) will subtract from the selection. This add/subtract function works with other selection tools like Quick Select and the Magic Wand.
After getting your selection set you can go to the Layers palette and click on the Add Layer Mask button to create a mask that reveals the area within the selection and hides the background. If you made your selection based on the background instead of the subject you can click the Add Layer Mask button while holding the Alt key in Windows (or Option on Mac) and will invert the way the mask is created. Even if you select the wrong one you can select the mask next to the layer in the palette and press Ctrl+I (or Command+I on Mac) to invert the mask. From here you can start the refinement of the mask.
In order to make the most of your refinement, you should place a new layer below the initial layer. You can fill this with black, white, or your new background image, to help you better see where the mask edge might need work. Now you can use the Brush or other drawing tools to paint in black or white to hide or reveal areas of the mask as needed. It’s a good idea to have both a black and white layer underneath so you can alternatively swap back and forth to visualize areas needing to be cleaned up.
With all that said, in newer versions of Photoshop, Adobe added a workspace designed specifically for refining selections and creating masks. This is the aptly named Select and Mask workspace.
Select and Mask Workspace
When entering the Select and Mask workspace (Figure 8) you are presented with an interface loaded with specific selection tools as well as various options to help visualize and refine your selection. It will help to have a background layer of black, white, or the new background image already in place before clicking the Select and Mask button if you want to use this to visualize your mask. This space includes several of the tools I’ve mentioned and these are located in the upper-right corner.
One addition that is found in this area is the Refine Edge tool which can be “brushed over areas such as small strands of hair to help clean up these spots which are often the most troublesome to get cleaned up. In fact, masking around hair is such an issue that this workspace has a button at the top of the interface called Refine Hair that attempts to globally refine selections involving hair in one click. It does a good job but often still can be further refined using the Refine Edge tool in specific spots.
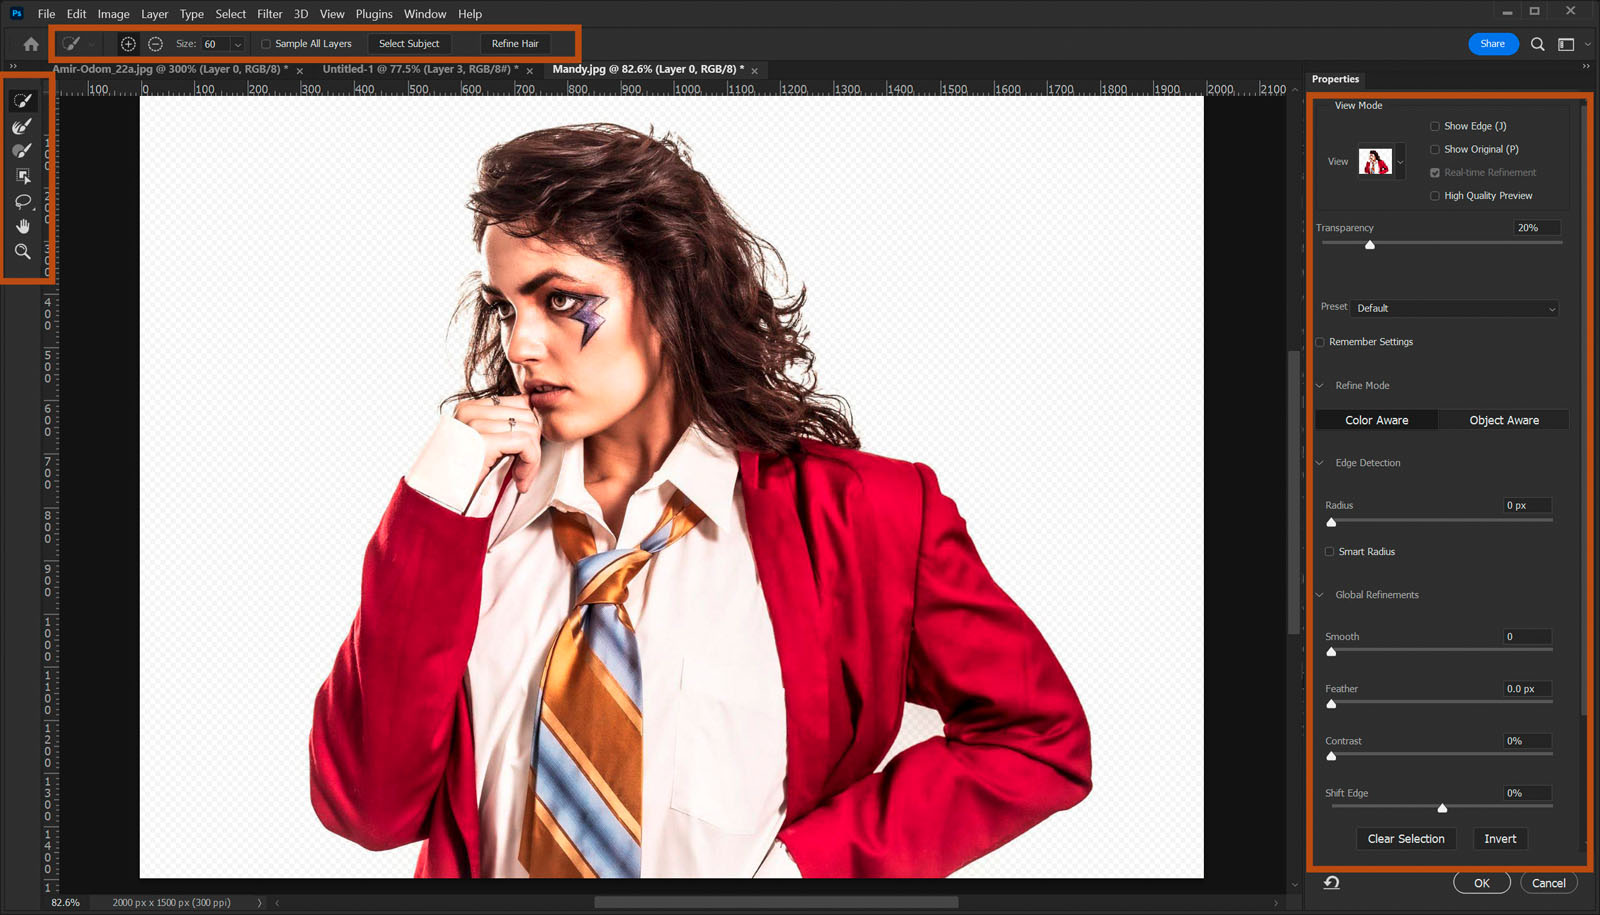
On the right side of the interface, there are several controls for globally modifying the selection such as smoothing the edges of the selection as we as feathering and shifting the edges in order to tighten or loosen the overall selection area.
While the Select and Mask workspace is helpful, it may still require some manual refinement of the final mask output it creates. This is why I wanted to cover some of the manual techniques before talking about this workspace. Also, it’s not possible, as far as I know, to swap the underlying layer such as switching between black or white or even the new background image while in the Select and Mask workspace.
Step 3. Matching Tones and Sharpness
Once you have your masking complete and have it placed over the new image to become the background you’ll be ready for the final step. Depending on the new background image, you need to make adjustments to make sure both images come together to make a believable composite.
In the case where you are swapping out a background from a studio headshot, there might be little to no change needed. It is still important to look out for small details though. For instance, in Figure 9, I have replaced the white background with a gray “concrete” wall background.
To replace the background as shown in Figure 9 I started with the Select Subject option and then opened the Select and Mask workspace. From there I could spot the lighter areas where the hair meets the background. I used the Refine Hair button to let it clean up some of the areas where the background was bleeding through. Then once out of the Select and Mask workspace, I zoomed in tight and used a very small brush to touch up the mask along Chris’s beard.
Then I dropped in the new background layer underneath the subject layer. There I could see some areas along his left shoulder that were too light from the brightness of the white background brightening the fabric. Here I used the Burn tool to darken the edges for a more natural look. Finally, I blurred the background a little bit and darkened it to arrive at the final image.
Back to the Boot
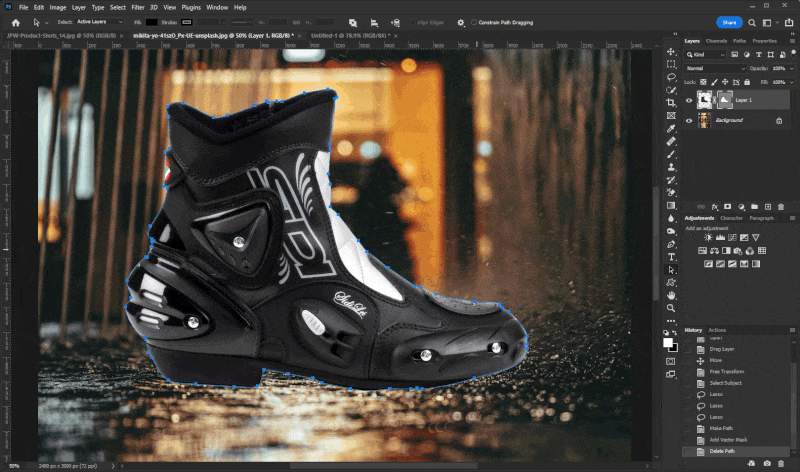
While doing a background replacement on a headshot is relatively quick and easy, there are going to be images that require much more time. In figure 10, I returned to the boot image I used in Figure 6 showing the Vector Mask being used. The initial swap of the background was pretty clean but it was obvious that it was just a studio photo dropped into another image. In order to make this more believable, I took some extra steps.
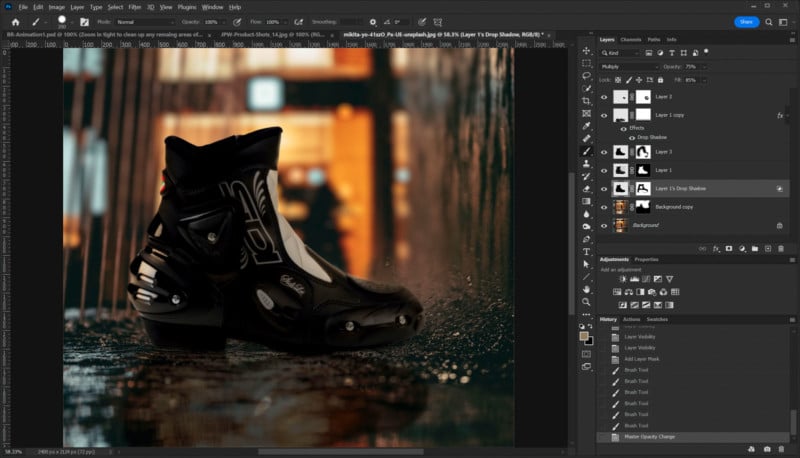
First I selected the boot layer and used the Transform tool to give it a more correct perspective for this shot. Then I created a subtle drop shadow for that layer and converted it to a regular layer so I could keep only the parts of the shadow I wanted.
I then duplicated the boot layer and adjusted the color temperature to warm it up. This layer was then hidden with a layer mask and I brushed in the areas I wanted to show warmer light. I also duplicated the boot layer again and flipped it vertically. I then placed it beneath the original boot layer, lowered the opacity, and applied a gradient to the mask to create a faint reflection on the wet ground.
At this point, I darkened the areas of the boot towards its center a bit so it didn’t look so evenly lit and then made a selection of some of the debris in the air in front of the boot. I created a new layer from that and placed it over and on the toe box of the boot and blended it to appear “in front” of the boot itself.
This image took me about 20 minutes and I’m certain that users who do more compositing could do a better job but my hope is that this illustrates the various steps to creating a believable background replacement.
If You’ve Done It Once, You’ve Done It Once
It’s important to understand there really isn’t a one-size-fits-all approach to making good selections for background removal. Some of the automated tools work better with some images than others. Selecting a car within a parking garage will be very different from selecting a person in a headshot or even selecting a cityscape to replace the sky.
In many cases, you will find yourself having to zoom in very tight on some images to get that mask just right using the brush or other tools. Over time you’ll start to learn what works best for your specific needs but don’t be afraid to try a different approach when an image is giving you trouble.
Tools I Don’t Recommend
Finally, there are a couple of tools I do not recommend when it comes to removing and replacing a background in Photoshop.
Remove Background
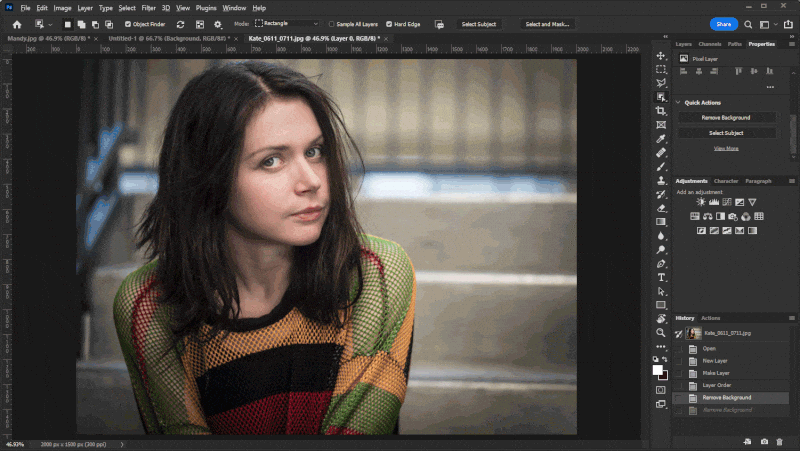
At first glance, this seemingly harmless button looks like it could be the answer to many of the steps I’ve outlined up till now. However, I wanted you to see some other options before presenting this one for fear you may stop reading at that point. Also, this is not really a “selection tool” as there is no opportunity to refine the selection before the background pixels are deleted.
In the properties panel, in addition to the Select Subject button is a Remove Background button. This employs the same technology as the Select Subject function but in this case, it inverts the selection and then deletes all the pixels from what it determines is the background.
Figure 11 demonstrates how this option can do a very good job of dropping out the background around Kate, but keep in mind that this is a one-shot deal. There is no chance to refine or edit the selection step. As such I don’t recommend this tool for good quality selections but sometimes it might do “good enough” for personal projects.
Background Eraser / Magic Eraser

Much like the Remove Background tool, the Background Eraser and Magic Eraser sound like great ideas but I don’t recommend them. The reason is that these tools delete pixels and those pixels can only be recovered by undoing your steps. By using selections and creating masks, you can always return to the masks and make additional edits and further refinements assuming that you don’t flatten the .psd file before saving.
Conclusion
Congratulations on making it to the end of this lengthy article on removing and replacing backgrounds in Photoshop. There’s a lot here and there’s even more that could be added but I feel the information provided will give you a good start. From here it’s up to you to explore the tools and options described.
I don’t expect you to be an expert on background replacement after reading this one article. My hope is that I’ve given you the tools to learn what works and what doesn’t and how to find approaches that work best for you, your workflow, and the particular images with which you’ll be working.
Image credits: Header portrait from Depositphotos