How to Cull and Edit Wedding Photos Quickly
Time is money. That’s nothing we don’t already know but it’s probably the reason you’re interested and wondering how to cull and edit a wedding quickly. Maybe you’re overwhelmed with work during the wedding season or your clients are bugging you for a faster turnaround.
How to Cull and Edit a Wedding Quickly
I’m going to walk through a 4 step process with some tricks and tips along the way to improve your editing speed without sacrificing quality.
Step 2: Cull
Step 3: Reduce
Step 4: Edit
Step 1. Get It Right in Camera
If there is one singular thing that you can do to decrease the time you spend editing your photos it’s to get the photos right the first time. Sure, our editing software can fix something that’s underexposed or improperly framed but that doesn’t mean it should. Your goal could be to take the photo correctly the first time so that you don’t have to edit it.
What if you had to show your unedited photos to the world? I’m not talking about every photo you shot but specifically the photos you deliver. How different are they unedited from the final version?
Another way that your shooting style can impact your culling is how patient you are while shooting. If you shoot haphazardly all over the place it can be really hard to cull your photos and remove duplicates. Conversely, if you stick with a shot until you nail it, then when you go back and cull you can quickly find the best shot of a cluster.
This brings us to culling which means reducing or controlling the size of something. There are different schools of thought regarding how many photos you deliver to your client. I believe it’s important to deliver your strongest images that cover everything important without miscellaneous duplicates.
You don’t want your client overwhelmed with decisions when they’re trying to decide which photos to print or put in their album.
Step 2. Culling Your Wedding Photography Images
Therefore, the first step to editing a wedding quickly is culling your images down from thousands to hundreds. This is hard. This is especially hard if we’re married to our work.
Culling is a challenge because you’re making thousands of decisions and you have to make them quickly or else it will take forever. The inclination is to be attached to every photo because of the intention you had when you took it. Instead, the goal is to focus on how the actual photo turned out.
Culling Mindset
The first step is to have a target image count, that will help you learn to be brutal with your cuts. If you can only select 1 out of 10 you’re going to be less attached to that mediocre photo. This might take some practice but once you do it a few times you’ll get better at it.
Next, you need to attune your mindset to the fact that your client will be focused on the photos you deliver, not the ones you don’t. You should therefore release and let go of the mediocre images and focus instead on the strong ones. If you get through the cull and come up short you can always go back and grab more but chances are you wont.
Another mindset hack is to think about the client and what you know about their preferences. If they love candids your image set might be more candid heavy, versus if they love details it might be more detail heavy. In general, avoid similar and duplicate photos as it’s your job to deliver the best images.
And lastly, you may need to reassure yourself that you did great. Looking at all your bad photos can be disheartening and you might start grasping at some mediocre ones because you’re worried you won’t have any good ones. Avoid this pitfall, only select the best photos and you can always go back and grab more (but I bet you won’t have to.)
Culling Process
When it comes to the process you’ll want to have a system for how you indicate which photos you’re selecting. I cull quickly in Photo Mechanic and then edit in Lightroom. I use star ratings to select photos in Photo Mechanic and then read that metadata into Lightroom.
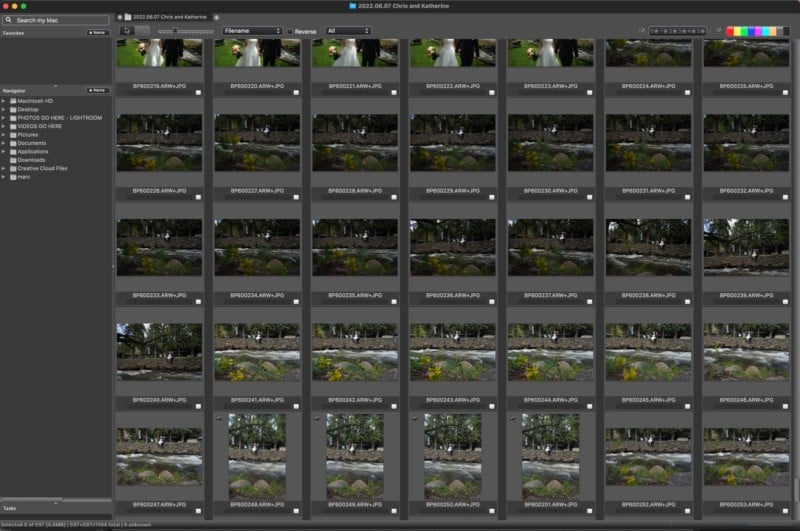
First, decide in what order you want to cull the photos. Some people like going from front to back in the order they shot the photos while others like going back to front in hopes they’ll see their stronger images first. Another strategy is to cull by lens, which is a method I highly recommend and one that works well for me especially since I shoot with my husband and am culling all the images at once.
Another effective strategy is to cull from a grid view especially if you have image clusters from shooting through the moment in a photojournalistic style. You might look at the grid of several frames of the same moment and select the best. Remember culling is a quick and dirty instinctual initial run-through and you can always grab a different version of a photo later if you notice a small detail amiss.
If I can’t tell what image is best very quickly I typically will just quickly star a few versions of a shot knowing that it will be faster to reduce it in my next run-through. This brings us to reducing photos. Close Photo Mechanic, open Lightroom, update the metadata, and then get up from your chair for a stretch snack or bathroom break.
Step 3. Reduce Your Images to the Best of the Best
Now is the moment of truth. Filter your images for the star rating you used and see how close you are to your target image count. The first few times you do this you might be way off but as I’ve gotten more ruthless with my cull I’ve gotten more accurate.
If your image count is far off your target it might be because you weren’t picky enough or there are some circumstances where you might have more images than usual such as a huge bridal party or a lot of family picture combinations or more details than usual. Feel free to take that into account.
Process for Reducing
Now it’s time to reduce your images to a manageable image count. This is where I personally love filtering by lens. I start with the lens with the smallest image count and then celebrate checking that lens off my list and so forth gaining momentum. I also use the grid view to quickly find areas that I know need to be reduced such as when I grabbed duplicates because I couldn’t tell which one was best.
After I’ve gotten rid of duplicates by lens I’ll switch back to the whole collection and look at the various sections of the day. If I’m heavy on first dance pictures I’ll look at all the first dance pictures and pick the best several. Then I’ll do the same for any other sections of the day until I’m close to my target image count.
If you work with a second shooter and haven’t already combined images in your cull you’ll definitely want to do it by this point so you can ensure a balanced image gallery.
Time for another stretch break as you render the previews of your selected image collection. I know the time delay waiting for software is frustrating but honestly you should get up from your computer anyway and rendering hundreds is faster than thousands if you didn’t use Photo Mechanic initially.
Step 4. Editing Your Wedding Images with Prioritization
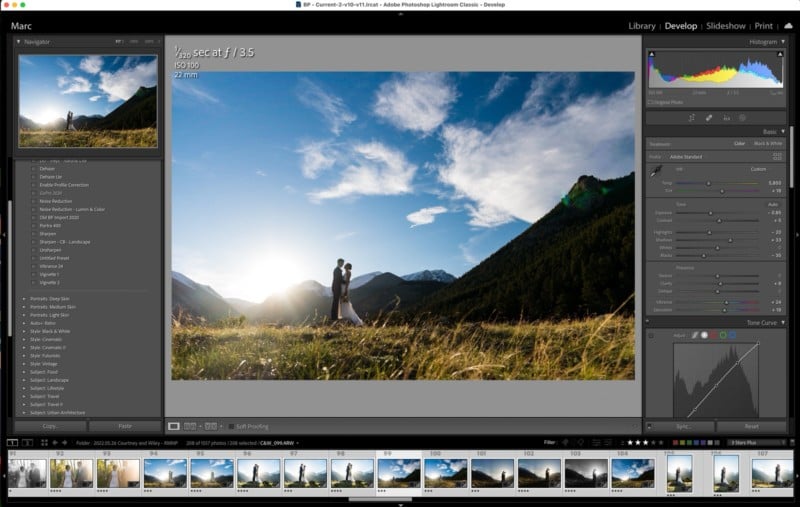
Now it’s time for the editing. If you create a basic preset for your files you can batch apply that to the entire image set for an instant improvement that is in line with your style. As a bonus hack, you can even do that before loading the previews!
To give you an idea, our basic preset applies a quick tone curve for medium contrast and simple slider adjustments such as a slight increase in exposure based on our tendency to shoot a little dark on our mirrorless cameras. Other sliders bring up the shadows and saturation and you can also apply a lens correction profile.
Now, if you’ve done a good job shooting the images correctly in camera with proper framing and lighting, then editing should be fairly quick. Again, you can decide what order you want to edit in either by lens or by section of the day, or straight through. Again, editing by lens works great for us based on how we shoot but that might be irrelevant for you if you shoot with one zoom lens and no second shooter.
As I mentioned before, we use a snowball method in order to increase our motivation by knocking out one lens worth of photos at a time.
Sometimes certain sections of the day will require more editing based on the lighting conditions or if there was a super cluttered background, for example. If that happens you’ll get slowed down in those sections fixing the exposure etc.
Prioritizing Your Edits
The final thing to do is filter your images to the highlights. When I cull and reduce, I use 2 stars for initially selected but eliminated while reducing, 3 stars for selects, 4 stars for ones that look pretty great, and 5 stars for ones I love. Then in editing, we can filter to the 4 and 5 stars and select the best images for the blog, album, and highlights section of the client’s gallery.
These are the images we spend more time on because they’re the ones that will end up printed and shared.
Conclusion
The key to culling and editing a wedding quickly comes down to having a system and then implementing that system unemotionally. If you’re following a system you’re less likely to get attached to too many photos or bogged down with perfection. Cull quickly and spend the majority of your time on a select few top images.
A few other tips to speed up your process are as follows:
- Import and back up right after the shoot so that your images are ready to cull the next day.
- Turn off distractions such as email, phone, or Netflix. You might be able to listen to music or a podcast but only if it helps you focus on the task at hand.
- Write a to-do list of the shoots you have to edit on a whiteboard with checkboxes for cull, reduce, edit, deliver, or anything else in your workflow. It’s satisfying, rewarding, and motivating to check things off a list.