How to Convert HEIC to JPG
Photographers have to deal with a variety of image types and new file formats appear from time to time, usually offering benefits that, while helpful, might not be immediately obvious. This can lead to frustration and hours lost when simply trying to complete a project. That’s particularly true when a new camera or device saves images that can’t be opened or edited in the normal workflow.
While HEIC offers significant storage space savings, working with the files can be tricky. The good news is that HEIC files can be easily converted to JPG for viewing and editing in your favorite apps.
Here is a guide that will help make sense of it all, along with information that can prevent this from being an ongoing problem, as well as resources to convert HEIC to JPEG for an immediate solution to handling a folder full of HEIC photos that can’t be used.
Table of Contents
What is HEIC Format?
HEIC is an acronym for High-Efficiency Image Container. As a ‘container’ format, it can hold a single image or a sequence of images, similar to the way a GIF can be a still image or an animation. Apple supports the capture and editing of HEIC format photos as do many other smartphone and camera manufacturers, including Samsung, Canon, and Sony.
The image format is called High Efficiency Image File Format (HEIF) and it’s based on High Efficiency Video Coding (HEVC). HEVC is also known as H.265 or MPEG-H Part 2. All of these acronyms sound confusing but the only thing that the end-user needs to know is the file type. If a file’s extension is HEIC or HEIF, that’s a high-efficiency image. If it’s HEVC that’s a high-efficiency video file.
While HEIC is still a compressed image format, it stores 10 bits of data for each pixel and the results are generally much better than those of older lossy formats.
What is JPEG Format?
JPEG is a much older and more pervasive image format that is largely responsible for many of the images seen on the internet and social media. While it isn’t the most efficient way to store photos any longer, it was a revolutionary advance in picture quality for the early internet, and that’s why it works just about everywhere.
JPEG is an acronym for Joint Photographic Experts Group, becoming a standard as a result of discussions among a committee by the same name. Like many image formats, there are several variations and JPEG has become more efficient over the years but can’t match the quality of newer formats.
JPEG compresses both luminance and color, creating blocks that are sometimes visible as artifacts as well as blurring in some parts of a photo. Several image quality options are available to reduce this problem but the tradeoff is larger file sizes. When seeking the absolute best quality, another file format is needed.
Which Format is Better, HEIC or JPEG?
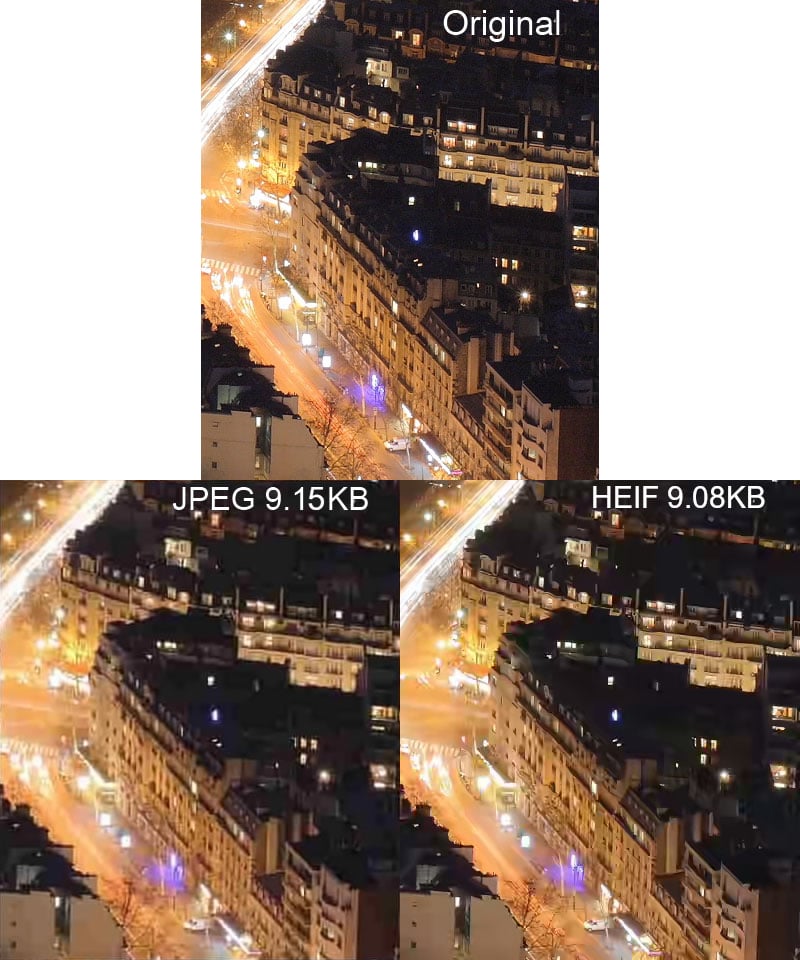
HEIC is the newer system and with technology, newer often implies better. In this case, that holds true. HEIC has the ability to compress data further while reducing the impact on the original quality of the image. The file size is cut by almost half and it’s generally accepted that an image that’s compressed as an HEIC file will be closer to the original uncompressed photograph than a JPEG compressed file that has the same file size.
In every case, HEIC wins in terms of image quality and efficiency. While HEIC stores 10 bits of color and brightness information per pixel, JPEG can handle only 8 bits.
There are other considerations, however, which is why both HEIC and JPEG are often offered in hardware solutions. The only real flaw with HEIC is that it’s newer and therefore has less software support. That means there could be times when an HEIC image file needs to be converted to JPEG in order to be used everywhere.
Where Can I Use HEIC?
HEIC images can be used throughout Apple’s product line, including the iPhone, iPad, Apple Watch, Mac, and MacBook computers.
Windows does not come with support for HEIC but it can be added with Microsoft’s free HEIF Image Extensions download for Windows 10 or higher. The HEVC Video Extensions package must be installed as well since it is used to encode and decode HEIC images. Microsoft charges 99 cents for this software. After installation, Windows will be able to read and write image files encoded in HEIF format and with HEIC and HEIF file extensions.
On Linux, an HEIF library (libheif) can be installed to enable compatibility.
Phones and tablets running Android 10 or higher include support for HEIC also. While most operating systems are compatible with high-efficiency images or can be easily updated to support this format, a problem could arise when attempting to upload a photo in HEIC to social media or open it in an app that isn’t compatible with this image type.
Doesn’t the iPhone Auto-Convert to JPEG?
In some cases, the iPhone will convert HEIC photos into JPEG format automatically, as needed. Since HEIC is more efficient, it makes sense to use this format on a smartphone with limited storage and in iCloud where it costs more to store larger files.
When iOS recognizes that the photos will be used elsewhere, it converts them before transferring. More specifically, using AirDrop, Messages, or Apple Mail could trigger the conversion to JPEG, depending on whether the receiving device supports the newer media format.
How to Convert HEIC to JPEG on Mac, Windows, and Linux
If a large library of HEIC format photos has been transferred to an incompatible system or if the operating system can read the file but an app or website cannot, the only solution is to convert them all to the much more compatible JPEG format, despite the increase in file size. There are probably hundreds of ways to achieve this but a few stand out as having the lowest cost and being the most convenient.
Mac
Since Apple accepts HEIC as standard, using a Mac computer greatly simplifies the process. Individual photos can be opened in the Preview app and saved as a JPEG file. Once an HEIC photo is opened, simply select File>Export, select JPEG in the Format option, and hit Save.
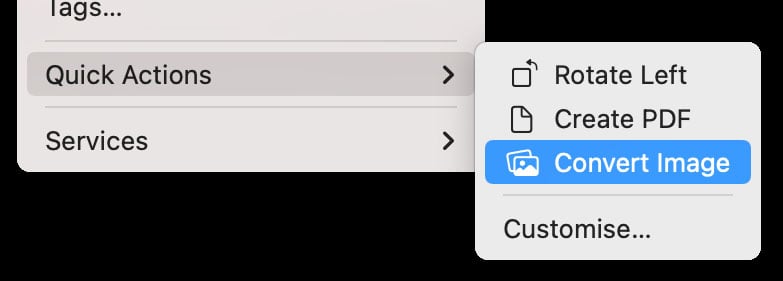
Starting with macOS Monterey, you can also right-click on an HEIC file and go to Quick Actions>Convert Image. In the window that pops up, make sure JPEG is selected as the Format and then click Convert to JPEG.
Windows
If Windows has HEIF Image Extensions installed, the Photos app can be used to save HEIC images in JPEG format.
These solutions are low-cost and easy when handling a small number of photos but aren’t really ideal if dozens of images need to be converted since they all have to be opened first. Instead, it’s best to install a utility that can batch process a folder full of photos without ongoing effort from the user.
For a more robust solution, it’s hard to go wrong with iMazing’s free HEIC Converter. The app is available for Windows and Mac, providing a very simple and straightforward method of converting a large number of files from HEIC to JPEG format with minimal hassle.
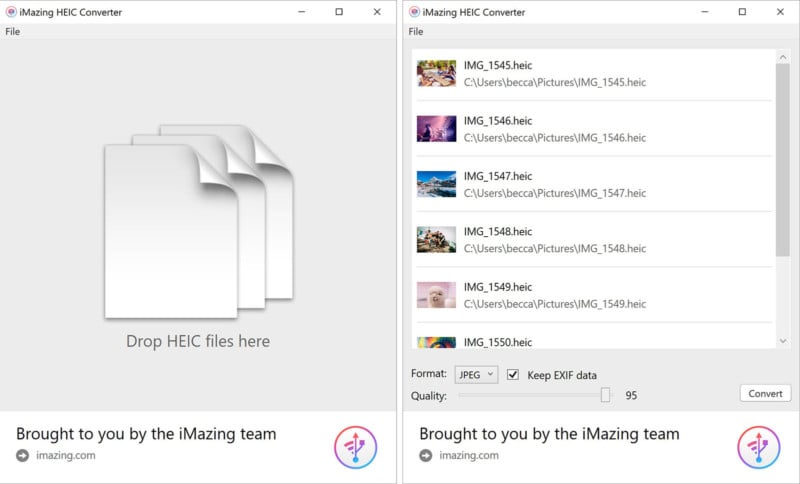
The process is quite easy with a drag-and-drop interface to provide the list of HEIC files, a slider to adjust image quality from the default 95, and a Convert button that opens a file picker to choose where the converted images are saved. There are no ads or subscription fees so if this solves the need, look no further.
Linux
For Linux users, the heif-convert utility allows batch conversion from the terminal, as explained by UbuntuHandbook. To install it, open terminal and run the command: sudo apt install libheif-examples.
How to Change Your iPhone’s Image Format from HEIC to JPEG
If it’s known in advance that the JPEG image format will be needed and compatibility is more important to you than storage, the easiest solution is to simply tell the iPhone to use that format when storing a photo. This is quite simple to do in the Settings app by scrolling down, tapping the Camera tab, then Formats, and selecting Most Compatible rather than High Efficiency.

Afterward, all photos will be captured in JPEG format, unless shooting RAW or ProRAW images. Live Photos will appear the same on the iPhone, however, the new format is apparent after transferring to another device. The iPhone will send a folder containing a JPEG file and an H.264 video file (the motion portion of the LivePhoto) in an Apple MOV container. Live Photo, RAW, and ProRAW can all be switched off in the Camera app if only the JPEG is wanted.
Conclusion
HEIC can sometimes feel like a troublesome format, however, it provides significant benefits over JPEG. Image quality is improved with fewer artifacts even after editing. The file size is also reduced, an important detail when storing a large number of photos.
The original purpose for JPEG was to save images more efficiently in order to make them easier to store and share online. Now HEIC is here to improve that efficiency even further and with Apple championing the format and other major players offering support as well, the need to work with HEIC will likely continue for many years.
The good news is that operating system support is relatively easy to ensure and conversion tools are free. It’s even possible to choose which format is saved in the iPhone to avoid the issue altogether. In the end, accepting the change and making HEIC an acceptable part of the workflow is probably best.