Night Photography Techniques From 15 Years in the Field
I still can’t believe it: 15 years of being addicted to capturing the night sky. Did you know this addiction all started with my first bear encounter?
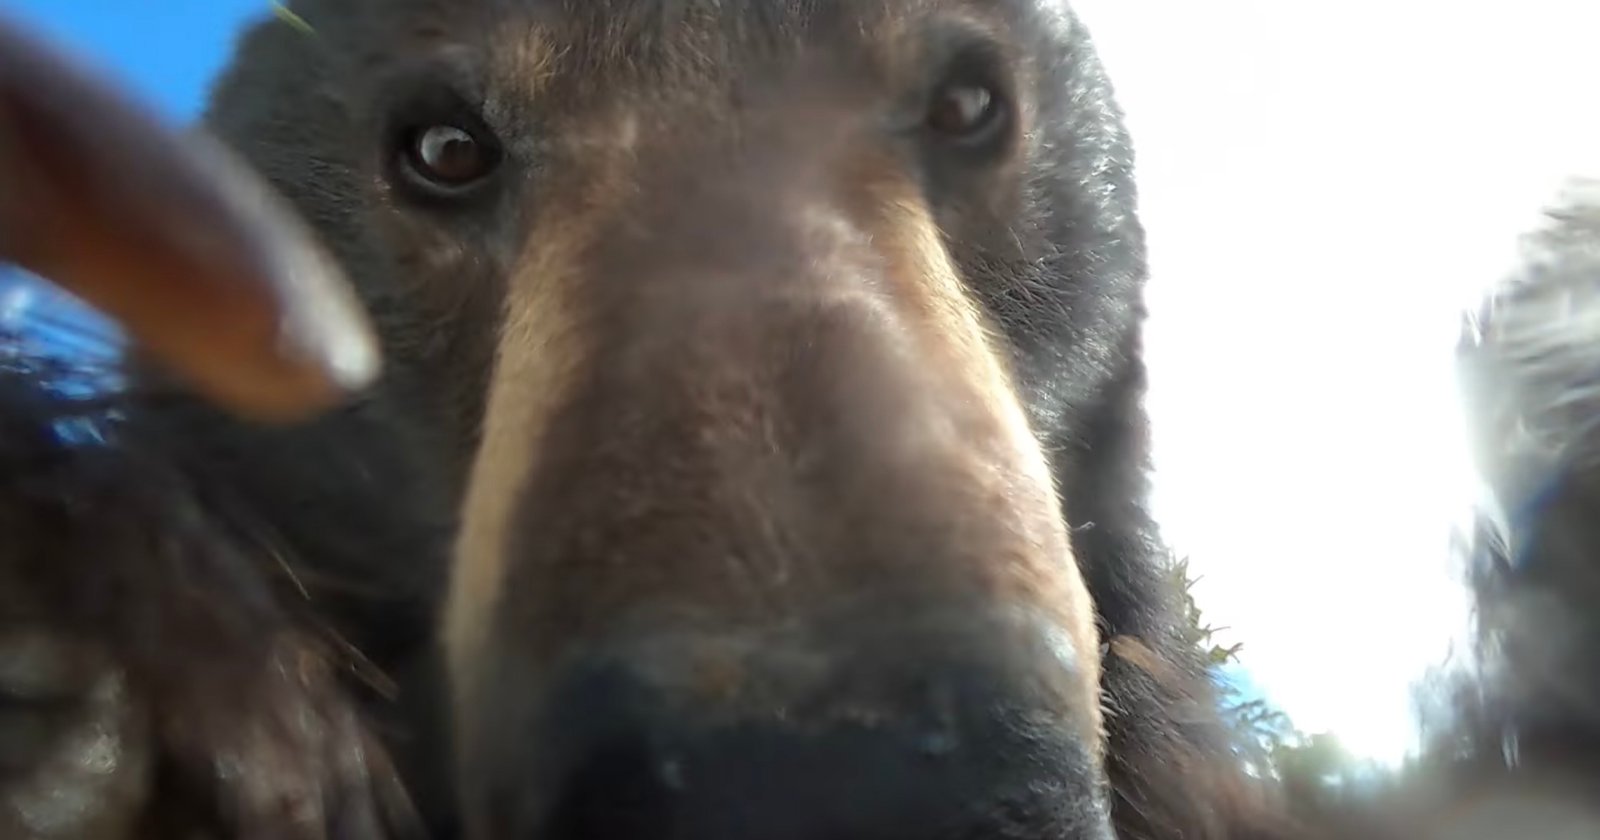
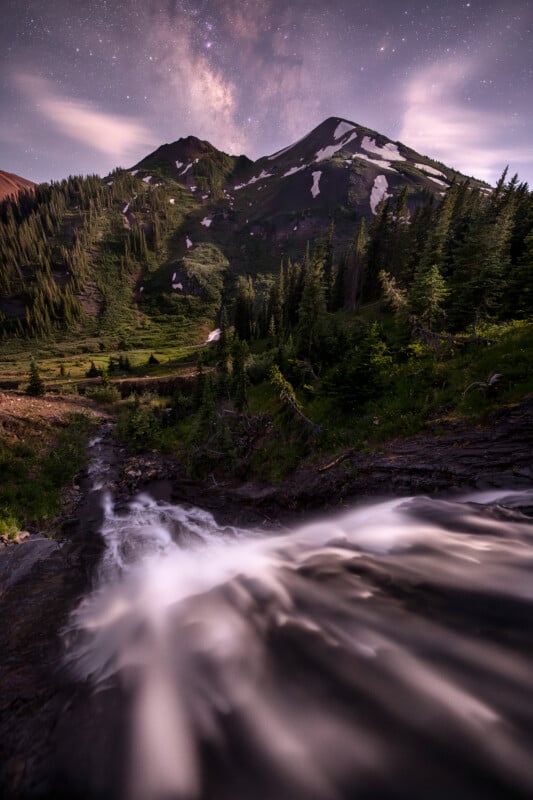
Back in 2010, while hiking the Pacific Crest Trail, a bear came into my camp and rubbed his nose against my tent. The moment I felt him brush my rain fly, I yelled out my famous “bear yell,” and it bolted out of camp. I got out of my tent to have a look around, and there it was: the Milky Way was crashing into the mountains, fully illuminated by moonlight. It was the single most beautiful sight these eyes had ever experienced… at least back then.
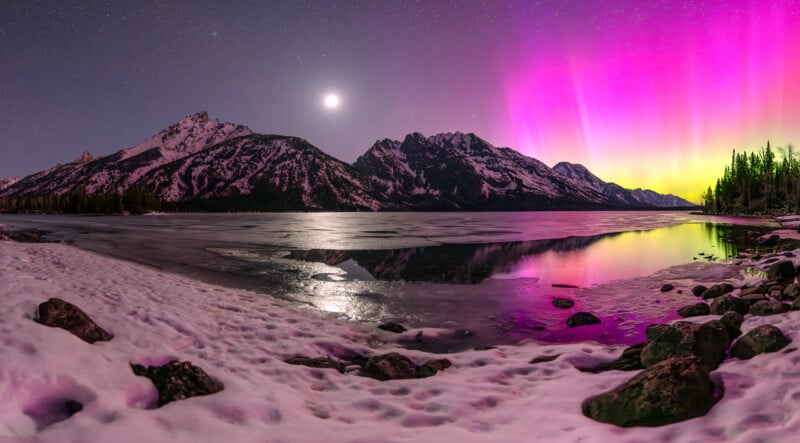
After 15 years of keeping this addiction going strong, I’ve been incredibly fortunate to experience even more magical nights. One experience I’ll never forget was witnessing the Aurora Borealis over the jagged peaks in Grand Teton National Park. I tried to put this experience into words last year “Photographing the Aurora Borealis in Grand Teton National Park,” but writing about a life-changing event is difficult to put into words.
In honor of my addiction, I’ve spent some time writing about the photography techniques that have helped me become a better photographer, the challenges I’ve overcome in night photography, and how my work has evolved over the past 15 years.
At a Glance
There’s a moment that happens out there, somewhere between the last traces of twilight and the first real appearance of the galactic center, when the landscape goes quiet and everything you thought you knew about photography gets tested. I’ve spent over a decade chasing that moment. Some nights, it rewards me. Other nights, it humbles me. What I’ve learned along the way is that night photography isn’t really about the sky at all. It’s about what you do with the time, the preparation, and the light that’s given to you.
Early in my career, I thought the technical side was the secret. Faster lens, higher ISO, darker skies. If I just kept taking an endless amount of images, the ‘keepers’ would come. It took years to realize the camera was the easy part. The hardest part was learning to see in the dark, planning for something I couldn’t fully visualize, and to let the landscape speak as loudly as the night sky. What follows below are the techniques I come back to again and again. Some are technical. Some are philosophical. Some are ramblings. However, all of them have helped me get to where I am today, still addicted to the night, and still chasing the night sky.
Planning Your Shot
It sounds easy… This idea of night photography… you wander into the dark, point your camera at the stars, and the magic unfolds with every press of the shutter. The reality is, almost every image you see me publish, including the images in this article, started on a computer screen days or weeks or sometimes years before I ever setup my camera. In this digital age, we have an endless amount of planning tools at our fingertips. Some of my favorite planning apps are TPE + TPE-3D, Google Earth Pro on Desktop, PeakFinder, and Photopills. Used together, I know the exact second the moon will crest over a ridgeline, how the Milky Way will align with a distant peak, and what the moonlight will be doing to the foreground when it all comes together.
One tool I’ve added to my arsenal that deserves its own mention is GAIA GPS. This app turns your phone into a handheld GPS device. My old Garmin Oregon 450t and my inReach Mini have done nothing but collect dust since I started using GAIA on my iPhone 16 Pro. Offline downloads of topographic maps, route planning, and tracking are all built in. If you’re hiking into remote locations without service, it’s the single most useful planning and safety app I have.
Planning is the difference between hoping for a good image and showing up knowing one is waiting for you. For more on how I prepare and stay safe when shooting in remote locations, have a look at my safety tips for night photography.
Best Camera Settings for Night Photography
Know how to adjust your camera’s settings before the moment comes to you. Without moonlight, 20 seconds at f/2.8 and ISO 6400 is a good starting point with a wide-angle lens. Get familiar with your lens before it gets dark. Determine which dial adjusts focus, which adjusts focal length, and find/confirm your infinity focus.
Learn to change your settings in the dark, without a headlamp, and without a touchscreen. Practice in a dark room at home. Fumble with the buttons until muscle memory takes over. You’ll have an easier time out there when you don’t have to break out a flashlight to adjust your ISO.
What ISO is best for night photography?
What ISO is best for night photography?
ISO 6400 is my starting point for the Milky Way without moonlight. Without getting too technical, some modern cameras handle higher ISO without producing too much noise, but 6400 remains a reliable baseline across most updated camera brands. Under moonlight, I’ll drop down to ISO 1600 or lower depending on the phase. The goal is always to collect enough light to keep detail in the shadows, without pushing noise past the point of recovery.
What shutter speed should I use for stars?
What shutter speed should I use for stars?
The most common rule is the 500 rule (500 divided by your focal length), but I don’t obsess over it. On a 14mm lens, 20 to 25 seconds is my standard. On longer focal lengths, shorter is better. But as I’ll get to below, a little movement in your stars is rarely the problem people think it is.
Learn How to Focus Your Lens at Night
Focusing at night is not easy. This is the single biggest challenge in night photography. Why? Because autofocus will fail you. There’s no way around it… at least not yet.
The technique I still teach to get around this is using Live View. Activate it on your camera, zoom in to at least 100%, and shift your view to the brightest star, planet, or distant light you can find. Manually adjust the focus ring until that point of light is at its sharpest/smallest. Take a test shot at your normal ‘night sky’ settings, ISO 6400, f/2.8, 20 seconds, then zoom into the image in your camera’s image review. Don’t go past 100%. Anything more than 100% looks blurry anyway.
This process will take a few tries to get it dialed in, but with DSLR lenses, once you have determined the best spot on the focus ring, you’re done. That’s it! Remember that spot and trust it going forward. If you have a 24-70mm f/2.8, the focus will change the more you change your focal length.
One thing worth noting: mirrorless lenses complicate this process. Most mirrorless lenses don’t have a physical infinity mark, so setting the focus ring to infinity doesn’t actually mean you’re focused on ‘true infinity.’ Micro adjustments are always required and if you turn the camera off, in some cases, you may have to repeat the process. Plan for this and don’t rush it.
After you get this method dialed-in, now try it without a headlamp. Trust me, this will save you hours of frustration and your night vision.
Learn How to Compose at Night
Composing in darkness is a challenge, especially if a moonrise is happening. Ideally, I arrive at a scene before it gets dark, establish my composition, and wait for the moment to unfold. Realistically, it never happens that way. 95% of the time, I’m using my camera to ‘see in the dark’ and fine-tune my composition. This process can take a lot of patience and time.
Stop using 30 second exposures to test your composition. Crank the ISO to something absurd, 25600 is a great starting point, and use image review on your camera to get an idea of your scene. After cranking this up, you should only need 5-10 seconds of exposure to give you an idea of your composition. This single technique changed the game for me. If you’re shooting with a newer camera body, take advantage of ‘night mode’ if your camera has it. It makes composing at night significantly faster and easier. When you think you’re getting close to that perfect composition, increase your exposure time and make sure you’re happy with the results before committing to longer exposures or a focus stack.
If neither of those options work, light it up! Pull out the headlamp and light up your foreground so you can see what you’re working with. You may only need a second or 2 of exposure time with this method. You may also find that light-painting helps balance the scene and take you on a different approach.
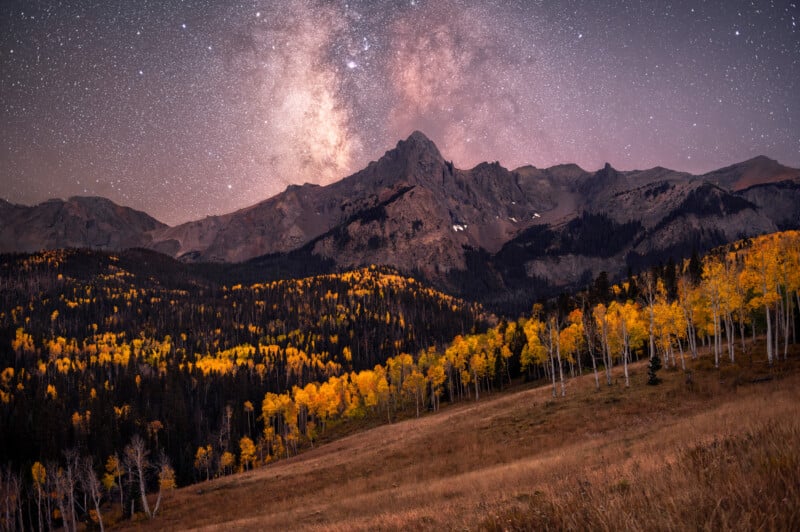
Prioritize the Landscape
There’s a harmonious union that takes place every night, a bond between Earth and the cosmos. Capturing this union has led to the most meaningful experiences of my career in the field. When I look back at my work, I realize it had very little to do with the sky or the Milky Way. I don’t know exactly when this shift took place, but at some point, the landscape became my primary focus. Without it, what would there be? The sky is still present in my work, but it became secondary. This single change transformed my images more than any new lens or camera body ever did.
Stop Worrying About Star Trails
Time and time again I see photographers obsessing over a tiny amount of trailing in their stars. One of my students calls them hotdogs :). I used to shoot 36 second exposures on my Nikon D700. The trails were obvious, but it didn’t matter. Even blown up on a five foot wide print, the trails/hotdogs still didn’t matter. The eye is drawn to the power of the composition, not to a hint of movement in the corner of the frame. Trust me: Let it go. Instead, focus those efforts on your composition. Where are your leading lines? Is there balance of earth and sky? Start dissecting every corner to help balance the image. Aim for 2/3 foreground and only 1/3 sky. I promise, this will challenge you, but it will be the most rewarding.
Embrace the Intervalometer
Or as my students like to call it after their 3rd night out in a row: The Inter-va-bluh-bluh-bluh. This little device has made grown photographers cry. The concept is so basic it’s almost foreign. Adjusting the buttons in the dark is a pain. Remembering which category you’re in is a pain. Keeping the darn light on the minature screen is a pain. Everything about it is a pain. My blood pressure increase just thinking about it… And yet, it’s one of the most underestimated tools in night photography.
An intervalometer breaks you free from the 30 second exposure limit most cameras are stuck with. It lets you shoot longer exposures for the foreground and for whatever length you want for the sky. It allows interval timing for single-frame, star trail composites, and allows for capturing images for time-lapse videos. I’ve even used the delay feature to start a time-lapse an hour or two before a moonrise and let the camera run all night while I was asleep in my tent. If you’re serious about night photography, learn this device. It will change what’s possible for you.
Keep an Eye on the Shadows
I’m not a fan of checking the histogram at night, unless there’s moonlight involved. But I see photographers underexposing their images constantly. Most of the time, it’s because they’re trying to achieve those perfect, trail-free stars. I understand the instinct. The problem is that the shadows in your foreground tell a very different story. In fact, 99% of the time I see this being done, the images aren’t useable once opened in post-processing.
A lot of my work involves longer exposures for the foreground and shorter exposures for the stars. Back in the day, we called these ‘composites.’ That term gets pretty abused now with people blending a Yosemite Falls foreground taken at high-noon, paired with a Milky Way from New Zealand. However, the composite method has helped me get around one of the biggest challenges in night photography.
My goal has always been to bring back and share what I experienced. Witnessing faint, distant starlight that took millions of years to reach my eyes sweep across a distant landscape has fed my soul for years. When you photograph and only expose for the stars, the landscape generally disappears. There’s no way for the viewer to experience the darker side of what it was like to be standing there in that moment. Light painting can help reveal the foreground, but that method has become more and more unnatural to me. Longer foreground exposures, even when darkened in post processing, reveal what my eyes experienced in the field better than any light painting method I have attempted.
Just remember: shadows without data cannot be recovered. If the information isn’t captured, you won’t be able to bring the foreground back in post.
Photograph with Moonlight
I’m pretty sure I’m the first night photographer who decided to schedule all of my personal shooting, opposite the new moon phase. After teaching workshops for 15 years, my students always wanted the new moon time slots (no moonlight). They wanted to experience the Milky Way under pristine, dark skies, which forced me to shoot with a strong amount of moonlight.
After a few years of consistently photographing with moonlight, I began noticing how my images and experiences with moonlight dramatically shifted. I was so inspired, in 2016 I wrote, “Moonlight will always be your best light painter.”
Today, 10 years later, I would go as far as saying, “Moonlight will force you to become a better night photographer.” Moonlight holds no secrets. It reveals what would otherwise be lost in the shadows. It forces you to connect with every element within your frame. The small details that shape the flow and movement of an image, no longer become lost in the darkness. Every object, every decision, every bit of your identity as an artist comes through and is experienced by the viewer.
Moonlight also changes how you plan. You start paying closer attention to lunar phases, illumination percentages, and exact rise and set times. A waxing crescent behaves nothing like a waning gibbous. A moon behind you reveals, whereas, a moon in front of you silhouettes.
Moonlight also rewards patience. The best light often happens in a narrow window, sometimes only a few minutes. Trust me, those moments are worth waiting for. Get to your location early, get your comp dialed-in, let the light come to you, and just keep shooting. Once you learn to work with it, you’ll stop seeing the moon as your enemy and start seeing it as an opportunity.
For a deeper dive into working with moonlight, I wrote an article on Photographing the Milky Way with Moonlight that expands on this more.
Essential Gear for Night Photography
You don’t need the most expensive camera to make great night images. You do need reliable tools that work in cold, dark, unpredictable conditions. For a full gear breakdown with camera and lens recommendations for Nikon, Canon, and Sony, see my best equipment for night photography guide.
A few pieces of gear I consider non-negotiable:
A sturdy tripod: Cheap tripods will ruin your night and possibly more. Wind, uneven terrain, and long exposures require stability. I use RRS. Expensive, but worth every penny for quality.
An intervalometer: Covered above. Get one that fits your camera’s port. I prefer the Shutterboss II for the silicone cord that doesn’t break in cold weather.
A reliable headlamp: I HIGHLY recommend the Nitecore UT27 Pro. I know this will sound like a paid ad, but I promise it’s not. I bought mine years ago and have been really happy with it. 2x rechargeable, USB-C batteries com with it, warm and white LED options with 3 output settings, a red light for preserving night vision, and it still accepts AAA batteries if you need them in a pinch. The best part has been never buying AAA batteries. The cost savings along have been awesome. Couple improvements I would like to see are brightness settings for the red light (it’s a little too bright) and a stretchier, elastic headband.
Extra camera batteries: The cold drains batteries fast. I always carry two to three spares and keep them in an inside pocket against my body for heat or in the sleeping bag when camping. I only buy authentic batteries, never 3rd party.
Warm layers: It will always be colder than you think it’s going to be. Even when the historic heatwave of March 2026 hit during our Death Valley night photography workshops, it still got cold at night once the breeze kicked in.
Foam Pad or chair: Standing out there for hours at a time, combined with the cold and whatever else Mother Nature is throwing at you, being able to sit and look up makes the experience even more enjoyable. Check out my Equipment List for 3 options.
Common Mistakes to Avoid
Chasing perfection in your stars: Obsessing over trail-free, pinpoint stars can lead to underexposed foregrounds and noisy images that won’t be useable.
Forgetting to check focus after switching lenses or recomposing: Every lens is different. Always check your focus. Always!
Bumping the tripod: It happens to everyone. Use the intervalometer or shutter release. Resist pressing the shutter on the camera once you’ve composed. This will help avoid tiny vibrations on the camera.
Fogged front elements: During freezing cold, humid nights, or shooting close to a river, the front of your lens can fog up. A lens heater solves it, but in the backcountry, wrap your rain jacket around your camera. Trust me, it makes a huge difference. If you have them available, single use handwarmers are fantastic too. More below.
Dead batteries in the cold
Cold kills batteries. Always pack spares and keep them warm.
Forgetting to bring food and water: You’re not going to make your best images when you’re hungry, hangry, thirsty, or tired. A night shoot is just like a hike. Venture out prepared.
Dealing with the Cold, Condensation, & Freeze
Night photography means cold nights more often than not. Beyond personal layers, there’s equipment to think about. When you move a cold camera into a warm space, condensation can form inside the body and the lens. The fix is simple: seal the camera in a plastic bag before bringing it indoors. Let it warm up slowly inside the bag. Depending on the temps, I may wrap the camera in a t-shirt/cloth before sealing up the plastic bag to help absorb the moisture.
Handwarmers
When shooting in cold, humid conditions, I always keep rubberbands and handwarmers in my bag to prevent fog/ice crystals on the front element. I use the small handwarmers for cool nights with high humidity, and the larger ‘hand and body’ sized warmers for freezing conditions. Make sure to preheat the warmers in your pocket BEFORE putting them on your lens.
Raincovers
Go the extra mile and wrap your camera in a raincover. Raincovers never leave my bag. I use the plastic, medium to large rain covers. Even though they’re plastic, these can be used a number of times. They help keep your equipment dry during a storm, keep the heat from a handwarmer in the lens, and also keep the dust out when shooting in dusty conditions, especially in slot canyons or sand dunes.
FAQ
Do I need a full-frame camera for night photography?
No. A crop sensor camera will capture the Milky Way if it has decent high-ISO performance. Full-frame gives you a wider field of view at the same focal length. The major advantage to full-frame is cleaner, high-ISO results.
Do I need a tripod for night photography?
Yes. Long exposures require absolute stability. Handheld night photography isn’t possible with the shutter speeds required to capture the night sky… yet.
Can you do night photography without moonlight?
Absolutely. A new moon gives you the darkest skies for the Milky Way. A crescent or quarter moon gives you the best of both worlds. A full moon is bright enough that fainter stars disappear, but the landscape can look almost identical to daylight.
What’s the best time of year for Milky Way photography?
In the Northern Hemisphere, the core of the Milky Way is visible from roughly March through October. Peak viewing is June through August, when the core is high in the sky after dark. It’s a great time for panoramas too.
How do I focus at night if my autofocus fails?
Use Live View, zoom in to 100 to 200 percent on a bright star or distant light, and manually adjust your focus ring until the light is at its smallest point. Take a test shot and review at 100 percent to confirm.
Night photography rewards those who come prepared and have the patience to push through the technical hurdles it throws at you. None of these techniques alone will transform your work. Together, they’ll change how you see, shoot, and experience the night.
If you want to learn these techniques in the field, I teach night photography workshops under some of the darkest skies in the Western US. Details and upcoming dates are here.