Understanding Apple ProRAW
![]()
My name is Ben Sandofsky, and I’m the co-founder and developer of Lux Optics. We make Halide, the most popular RAW camera for iPhone, so when Apple revealed their new ProRAW image format, we were beyond excited.
Many developers in our shoes would freak out, thinking Apple wants to gobble up their customers. We were just confused.
Apple builds products for the broadest possible audience, and RAW is a tool for photo-nerds. These powerful files take skill to edit and come with significant tradeoffs. Why would Apple cram a complicated feature into an app meant for everyone?
As we dug deeper into ProRAW, we realized it wasn’t just about making RAW more powerful. It’s about making RAW approachable. ProRAW could very well change how everyone shoots and edits photos, beginners and experts alike.
To understand what makes it so special, the first half of this post explains how a digital camera develops a photo. Then we go on to explain the strengths and weaknesses of traditional RAWs. Finally, we dive into what’s unique about ProRAW, how it changes the game, and its few remaining drawbacks.
Grab a coffee, because this is a long read.
A Short Tour Through a Digital Camera
Imagine you’re looking at this scene through your camera.
![]()
When you tap the camera button on your camera, light passes through a series of optics and lands on a digital sensor where it is captured.
![]()
We’re going to talk through the three important steps that take place as your camera converts sensor values into a picture.
Step 1: Demosaic
Your digital sensor absorbs light and turns it into numbers. The more light it sees, the higher the number.
![]()
I used black and white for a reason — digital sensors are totally colorblind. In 1976, a clever engineer at Kodak found a solution: put a grid of color filters over the sensor, so every pixel sees either red, green, or blue.
![]()
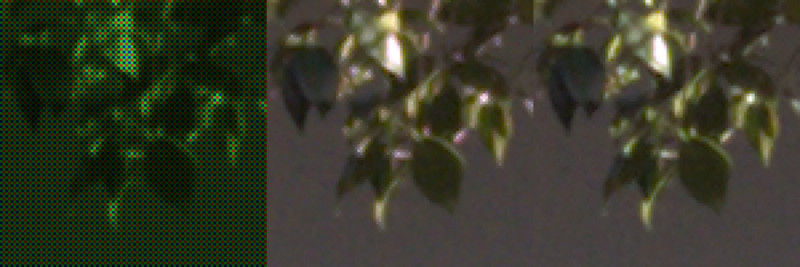
This mosaic pattern is called a Bayer pattern, named after its inventor, Bruce Bayer. With a color filter in place, our sensor now sees a grid of alternating colors. Let’s zoom in on the leaves of the tree, and see what the sensor sees.
![]()
Each pixel is either red, green, or blue. We figure out the real colors by going over every pixel, looking at its neighbors, and guessing its two missing colors. This crucial step is known as “demosaicing,” or “debayering.”
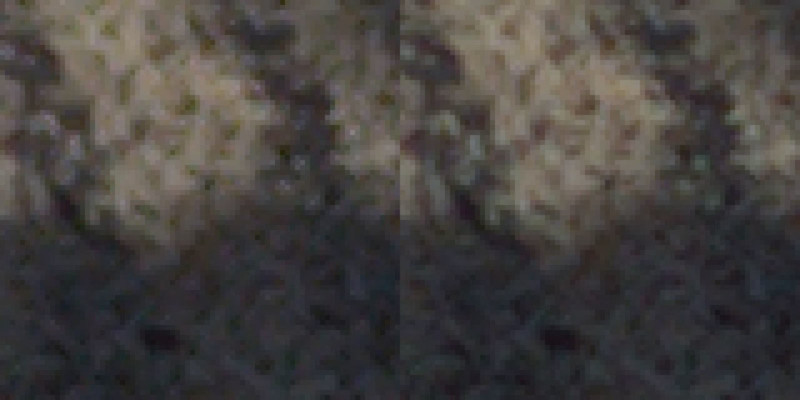
It’s a tricky problem. Compare a simple algorithm to a higher quality one, and you’ll spot problems like purple fringes.
Look at the pebbles in the shot. The fast algorithm is a little more “pixely.”
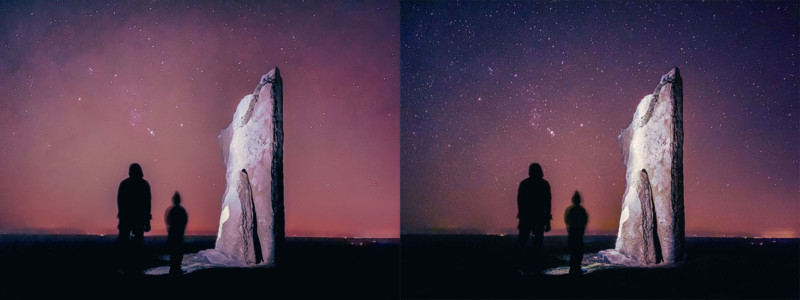
There are quite a few popular demosaic algorithms to choose from, each with strengths and weaknesses. The perfect algorithm depends on the type of sensor, your camera settings, and even the subject matter. For example, if you’re shooting the night sky, some algorithms produce better results on stars.
After demosaic, we end up with…
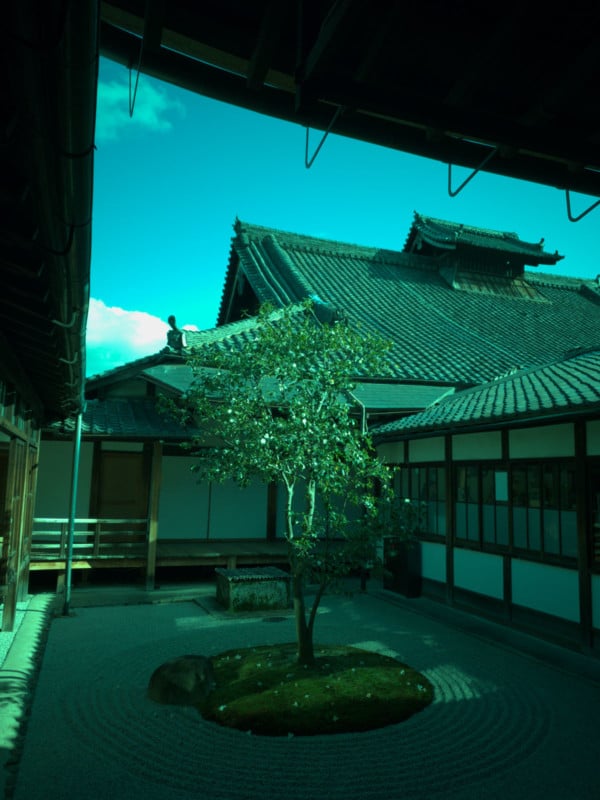
That’s not great. As you can see, the color and exposure are off.
There’s nothing wrong with your camera. Quite the opposite: your camera captures way more information than your screen can display. We have to take those sensor readings, which measure the light from your scene, and transform them into pixel values that light up your display.
Step 2: Transform from Scene to Display
Let’s start with color. The following chart represents all the colors a human can see, and the triangle in the middle covers what most screens can display.
![]()
When your camera captures colors outside the triangle, we have to push and pull those invalid colors to fit inside.
One detail makes this especially tricky: deciding which white is “true” white. If you’ve ever shopped for light bulbs, you know every white light in the real world has a slight yellow or blue tint. Our brains adjust our perception of white, based on hints in our surroundings. It’s called color constancy, and it’s why this yellow/blue dress optical illusion fools people.
I find this image incredible. The dresses are the exact same colours but I see a blue/dark-grey dress on the left and a light-blue/yellow dress on the right. The context of the background and adjacent dress apparently forces the visual system into one or the other interpretation. pic.twitter.com/TUKTZu7eZ9
— Jamie Portsmouth (@jamportz) October 23, 2019
Modern cameras are very good at figuring out the white point in most situations. So we pick our white point, run the math, and end up with a perfectly white-balanced image.
![]()
That looks pretty close to what we saw, but the awning in the top of the frame is under-exposed.
![]()
Let’s turn up the exposure to bring out detail…
![]()
… but unfortunately, now the rest of the image is too bright.
The technical name for this problem is “dynamic range.” It’s the range of light you can capture or display at one time, measured from the brightest bright to the darkest shadow. You’ll frequently hear this range measured in “stops.”
Ever see terms like ‘HDR’ or ‘XDR’ being thrown around? The “DR” in “HDR” stands for Dynamic Range. People make quite a fuss about it. This is an especially difficult problem in technology because the human eye is incredibly good.
It’s easily the most powerful camera in the world, as it can see up to 30 stops of dynamic range. Most screens can display 8 stops. Digital cameras capture up to 15 stops. When we try to display all this information on a screen with a lower dynamic range, it’s going to look wrong, sometimes in unexpected ways.
Notice the sky has a weird patch of cyan, caused by one of the color channels clipping.
![]()
The solution to our dynamic range problem is a little more complicated than bringing up shadows and turning down highlights everywhere. That would make the whole image feel flat.
Instead, you want to darken and lighten small areas of the image. Fifty years ago, photographers took hours to tweak their negatives using a process called “dodging and burning.”
Today it’s called “local tone mapping.”
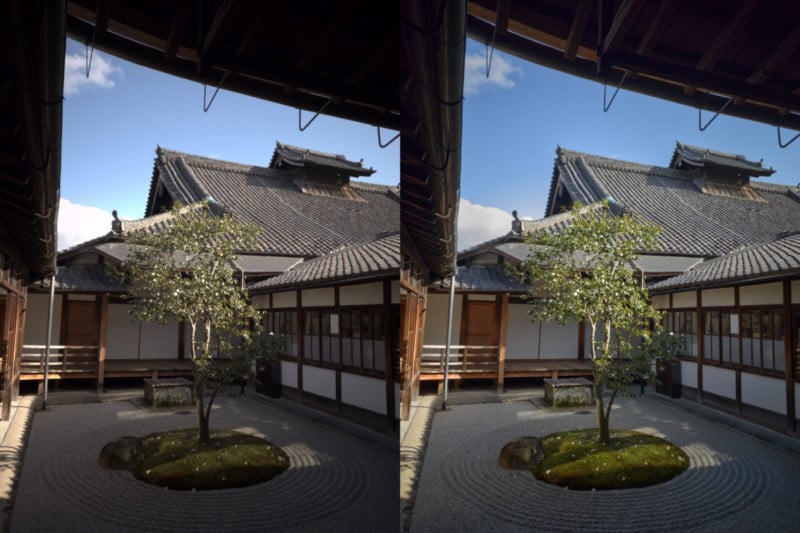
With that, our image looks great.
Let’s go ahead email it to our friends… oh, oops it’s 100 megabytes. The image still contains all that data we can’t see. Luckily, we don’t need all of that data now that we’re done editing.
Step 3: Optimize
In computer graphics, if you use more bits, your math gets more accurate. While editing, we needed to use 64-bits per pixel to get nice results. Once we’re done editing we can cut it down to 32-bits — halving our file size — and nobody can tell the difference.
Next, we can throw out most of our color information. This cuts it in half again.
Finally, we can apply something called ‘lossy compression’ — the kind you find in JPEGs. We end up with an image that’s only 1.6MB to share with our friends.
![]()
Phew. Take a breath, and let all that sink in. When you’re ready, we can finally answer…
What is RAW? Why is it Magic?
We just developed a photo. Every step in development is destructive, meaning we lose information. For example, in Step 2, once you shift colors around to fit into that triangle, you can never figure out the original, real-world colors.
So what happens when mistakes are made? Let’s go back to California’s recent wildfires that turned the sky orange. I took a photo with a color chart at the time, figuring it would come in handy someday.
In real life, it looked like this:
![]()
The built-in camera app was confused by that orange sky and tried to make everything neutral — because that’s what the world usually looks like. People were confused to find their cameras refused to take an image of the world as they saw it.
![]()
A lot of folks used manual settings to override their camera’s automatic white balancing, but let’s say you didn’t. I’ll take that incorrect JPEG into an image editor like Lightroom and try to match it back to the original…
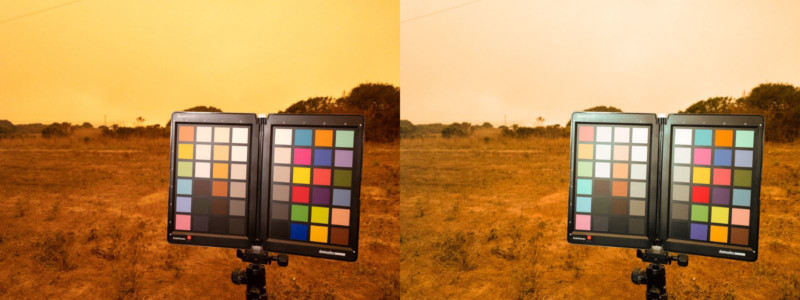
Hmm. Notice that how it’s messed up some colors, shifting blue to purple.
![]()
Trying to un-process a processed image like a JPEG is like trying to un-bake a cake. When your camera produces JPEGs, you’d better love the choices it made, because there’s no going back.
Now imagine if instead of saving a JPEG, your camera saved the original sensor values. Now you can make totally different processing decisions yourself, like white balance. You get the raw data.
Welcome to RAW files.
We at Halide have written about RAW a lot. We love it. Shooting RAW gives you magical powers. With a few knobs, you can rescue photos that you thought were lost to poor exposure.
So far, we’ve only talked about mistakes, but RAWs also give you the freedom to experiment with radically different choices for artistic effect, letting you develop the photo so it looks how you experienced it.
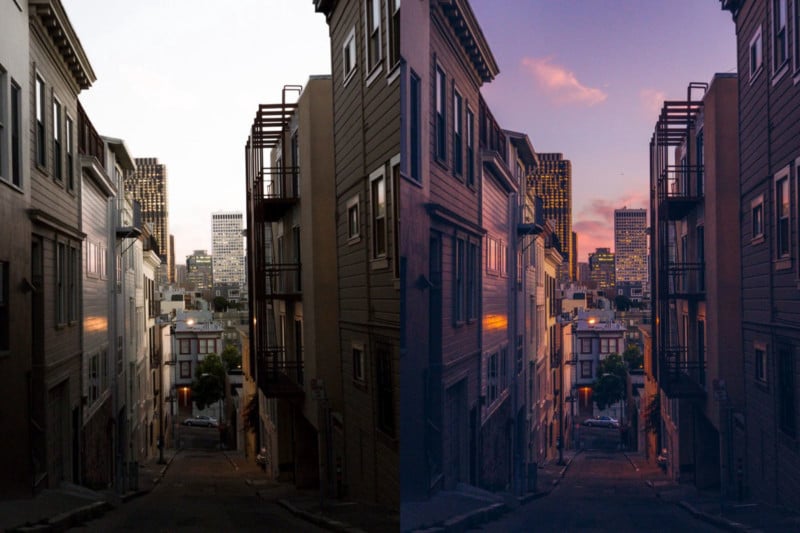
Remember old film cameras? Their photos also had to be developed from a negative. RAW data is usually stored in the DNG file format, which stands for Digital Negative. Some camera makers have their own formats, but those companies are jerks.
DNG is an open standard, so anyone can build software that reads and writes DNGs. Best of all, the file format continues to evolve, as we’ll see shortly.
First, we have some bad news.
RAWs are Great Until They Aren’t
We make a RAW camera app, so of course we’re fans of RAW. That also means we get plenty of support emails about it. By far, the most common question is, “Why do my RAWs look worse than the built-in camera app?”
iPhone cameras got a lot better over time. At first, these were leaps in hardware: better and bigger sensors and lenses allowed sharper shots. Eventually, though, the processors got faster and the cameras couldn’t get larger. The camera got smarter.
iPhones take many photos and combine them into one shot, picking detail in the shadows from one photo, the right exposure on your dog’s face from another, and a few other ones for extra detail. This is merged into the final result in milliseconds without requiring any effort on your behalf. It’s very clever stuff, with cool names like Smart HDR and Deep Fusion.
On the other hand, iPhone RAW files are still just one image. Which means they look quite… different.
![]()
If you’re coming from the built-in iPhone camera app, switching over to manual processing is like switching from a car with automatic transmission to a stick-shift.
There’s a steep learning curve, and that’s why we built something called “Instant RAW” into our latest Mark II update, so you don’t have to spend an afternoon in an image editor tweaking your shot to get a nice result.
![]()
But even with Instant RAW or editing, sometimes RAWs still look different than what comes out of the built-in camera app, and it has nothing to do with your skills. RAWs lacks that critical piece of the puzzle: Apple’s smarts. Computational photography like Smart HDR and Deep Fusion.
Even if Apple handed these algorithms to third-party apps, they work on bursts of photos, fusing together the best parts of each image. iPhone RAWs are 12MB each. If you want to reproduce the results of Apple’s camera using one of these algorithms, you’re looking at ten times the storage needed per photo.
Oh, and there’s one more problem: neither the front-facing camera nor ultra-wide camera can shoot RAW.
ProRAW elegantly solves all of these problems and more. You can finally reproduce the results of the first-party camera while retaining most of the editing latitude from traditional RAWs.
Enter ProRAW
Technically, there’s no such thing as a ProRAW file. ProRAW images are regular DNG files that take advantage of some little known features in the specification and introduce a few new ones.
Remember how DNG is an open file format? Apple worked with Adobe to introduce a few new tags. DNG released the 1.6 specification, with details about these tags, the very day ProRAW went into public beta tests.
This may be surprising to some: ProRAW is not a proprietary or closed format. Credit where it is due: Apple deserves kudos for bringing their improvements to the DNG standard. When you shoot with ProRAW, there’s absolutely nothing locking your photos into the Apple ecosystem.
Let’s dive into what makes ProRAW files different than RAWs of days past…
Demosaic is Already Done
ProRAWs store pixel values after the demosaic step. It’s like they took the output Step 1, from earlier, and stored those values. We’ll talk about why they’re doing this in a bit.
![]()
It’s just important to understand that these demosaiced color values still represent the scene, not your display. They contain all the original dynamic range. They contain all the out-of-range colors. They retain all the flexibility of working with a “true” RAW. They just skip step one.
In theory, you lose flexibility in choosing specific demosaic algorithms. In practice, most expert photographers don’t bother.
It’s also quite possible that iOS can do a better job demosaicing your images than any third-party RAW editor. Apple’s greatest strength is its unity of hardware and software, so they know exactly the sensor you’re using, and how it behaves with different ISO settings. In theory, they could even apply image recognition as part of the process; if iOS detects a night sky, it could automatically pick a star-friendly demosaic algorithm.
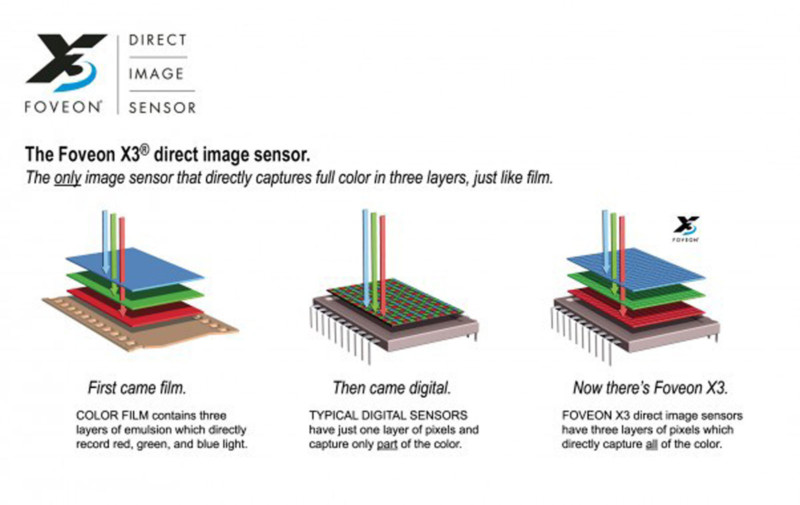
This sly move also gives Apple greater control over the image sensors they use in the future. Earlier, I said most cameras use a Bayer pattern. Some camera manufacturers use different patterns, which require different algorithms. Fujifilm invented the X-Trans sensor that creates sharper images, with more film-like grain. There’s even a Foveon digital sensor that stacks color filters on top of each other.
Apple is now a company that designs its own silicon, and it’s very good at it. Cameras are a huge driving factor in phone purchases. It seems inevitable for Apple to innovate in the realm of sensors. Taking over the demosaic step would smooth such a transition. Hypothetically speaking, they could swap out their current Bayer sensors with an “Apple C1,” and so long as it saves in ProRAW, it would work from day one in every pro photography process and app like Lightroom without having to wait for Adobe to write a new demosaic algorithm.
We got a taste for these benefits with the surprise reveal that ProRAW is available on all four cameras.
Previously, you could not shoot RAW with the front-facing or ultra-wide cameras. Apple is vague on the technical limitations but indicated that even if third-party developers had access to the RAW data, they wouldn’t know what to do with it. With ProRAW, they can handle the annoying bits and leave apps like editors to deal with what they’re better at: editing.
Bridging the Algorithm Gap
So now we have the data, but what about the local tone mapping and other computational photography goodies? Apple could open up their algorithms to third-party apps, but that isn’t as useful as you think. For starters, you’d need a save a ton of RAW files. We’d be back at that 100-megabyte file.
I also think there are reasonable questions about producing consistent results down the road as these algorithms evolve. It would be surprising to return to a photo a year from now to find Apple’s AI produces different results.
Instead, ProRAW stores results of computational photography right inside the RAW. This is another reason they need to store demosaiced data, as these algorithms operate on color, not RAW data. Once you demosaic, there’s no going back. I mean, what would you even call that, remosaic?
Smart HDR does this in the least destructive way. Apple worked with Adobe to introduce a new type of tag into the DNG standard, called a “Profile Gain Table Map.” This data gives your editor everything it needs to know to tone map your photo image and end up with results identical to the first party camera. Because it’s separate data, you can turn down its strength, or turn it off completely.
That’s what we do in Halide when you’re looking at a ProRAW image with Instant RAW disabled.
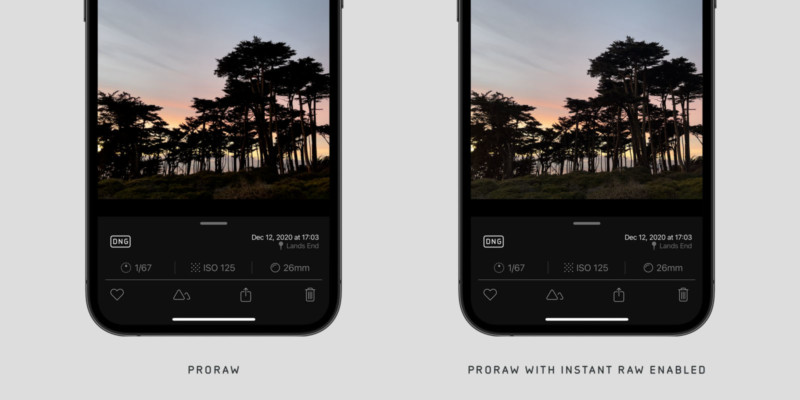
Even if you opt-out of local tone mapping, you now have the underlying HDR data to work with in an editor, and the results are…
Shadow recovery on a ProRAW shot taken with the latest Halide beta.
This is just… wow. pic.twitter.com/ti03Js2C5n
— Halide (@halidecamera) December 13, 2020
Deep Fusion is a different story. While it’s popularly known as “Sweater Mode,” the more technical objective is “noise reduction in low-light.” Unlike those Gain Table Maps, there’s no elegant way to separate its effects from the final image. If you don’t want Deep Fusion, your only option is to opt-out of the process at the time of capture.
We’re fans of natural noise. Prior to Deep Fusion, the iPhone JPEGs were notorious for their “watercolor effects.” In this image I took a few years ago, notice faces get smeared into nothing.
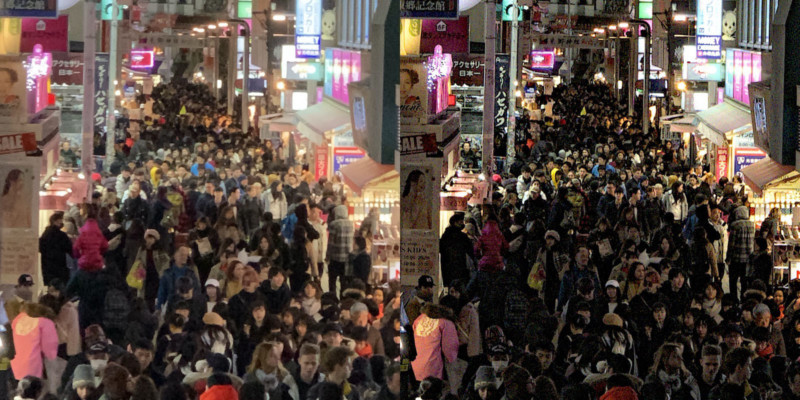
Deep Fusion produces very different results. Instead of just smearing an image, it combines several results together to sort of “average out” the results. It looks way, way more natural.
If you’re not a fan of Deep Fusion, there’s an API to opt-out. We expose this in Halide under Capture Settings. As I was writing this article, I realized this toggle makes it easy to run an experiment…
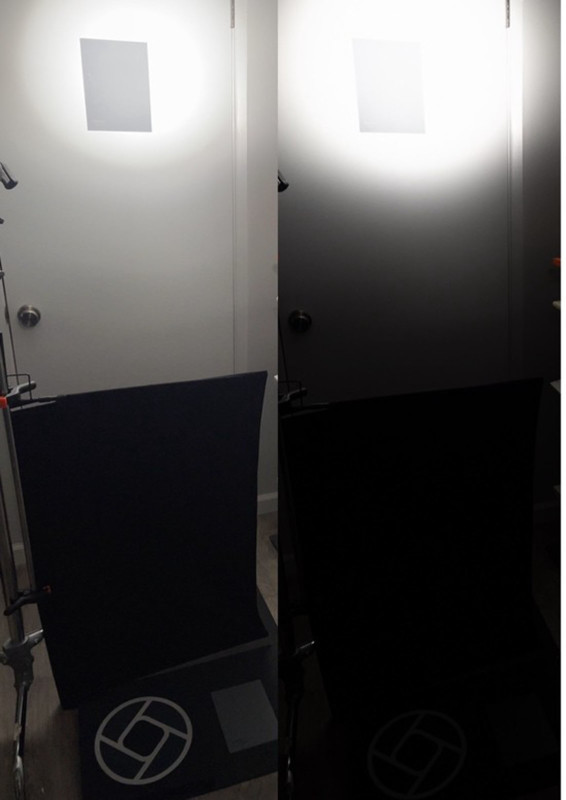
I used a spotlight to create a high-dynamic-range scene in my office.
![]()
I spot metered the two grey cards and measured a difference of 8.3 stops. I then exposed the shot using the top grey card and took three photos:
1) Native Halide RAW
2) ProRAW, with smart processing disabled
3) ProRAW with smart processing enabled
I took these into Lightroom and boosted the shadows. Let’s zoom in on the test pattern image.
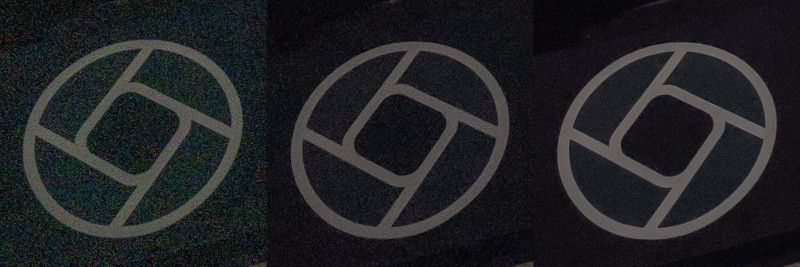
If you wonder what camera settings I used to capture this, the answer is a bit complicated. When you enable these algorithms, the iPhone ignores manual exposure settings. After all, Deep Fusion takes multiple exposures with a variety of settings. While the metadata embedded in the final image reported an ISO of 40, it’s unlikely all photos in the burst had that setting.
As you can see, by disabling this Smart Processing in Halide, we can still skip a lot of the noise reduction in our ProRAW files if we so choose.
Synthetic tests like this are all fine and good, but what about the real world?
Sebastiaan spent the last few weeks testing ProRAW in the field with the Halide beta. He found the dynamic range in ProRAW pretty mind-blowing in the day-to-day editing process:
![]()
Semantic Maps Included
ProRAW has one more surprise up its sleeve. A few years ago, Apple began using neural networks to detect interesting parts of an image, such as eyes and hair.
Apple uses this to, say, add sharpening to only clouds in the sky. Sharping faces would be quite unflattering.
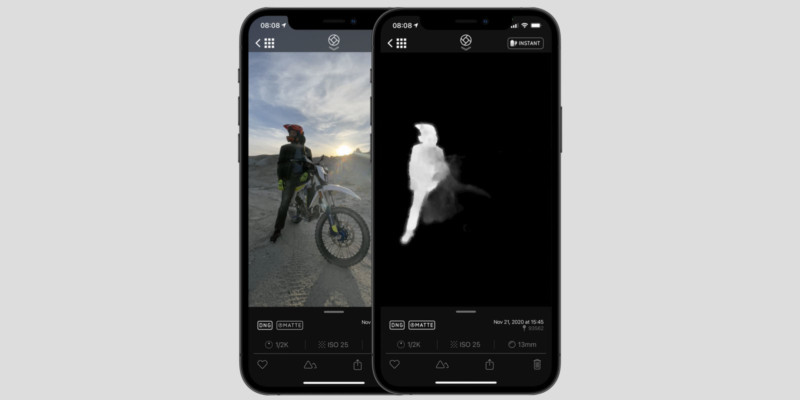
ProRAW files contain these maps! Both semantic maps used on faces and Portrait Effect Mattes that power the background blur in Portrait mode.
Flexibility in File Size
By storing the demosaiced values, ProRAWs can also tackle unwieldy file sizes in a few interesting ways. That’s really important because when you shoot ProRAW with the first-party camera app, each file is around 25MB — and can get even heavier than that. That’s an order of magnitude or more than a regular photo. It adds up quickly.
First, we can fiddle with bit-depth. By default, ProRAW uses 12-bit data, which can be overkill. JPEGs are only 8-bits per color channel, so going 10-bit means 4x the precision in editing. While the first-party camera app doesn’t present this option, it’s there in the API. we’ve added it to Halide and seen files drop as low as 8MB. In practice, you can get most of the ProRAW benefits at half the file size.
If you want to further reduce the file size, ProRAW offers lossy compression that can drop these files down to as little as 1MB, but not so fast. These compression APIs currently drop the bit depth to 8-bits. In our opinion, that too great of a tradeoff, as it leaves you with a file that’s only marginally better than a JPEG. We’re certain ProRAW compression will confuse users, so we’ve held off on compression support for the time being. Fortunately, Apple’s camera team has been iterating on ProRAW very fast, so we hope 10-bit compression is on the horizon.
Finally, it turns out that every ProRAW file can also contain the fully-processed JPEG version. This is a fallback image for apps that don’t recognize RAWs— which is most apps. Even Instagram. The first-party camera doesn’t offer this, which means you cannot share ProRAW shots taken with it to apps that do not support RAW images. We’ve added the option in Halide.
If you’re planning to edit the image, it makes sense to opt-out of these 4MB images. Your RAW editing app will ignore it and ultimately produce a new JPEG for your Instagrams.
Batteries Included
The most underrated improvement in iOS 14.3 is that the native Photos app now supports RAW editing. This is huge because it abstracts away all the complexity of higher-end apps. No fiddling with “black point” and “color profiles.” Casual users who only know how to edit photos in the built-in apps don’t have to do anything different. It just works.
This is critical because we can expect it to take some time for third-party photo editors to adopt this new metadata. Until then, ProRAWs will not look like system JPEGs. Compare the results viewed inside Lightroom CC and Photos.app.
It looks wrong because Lightroom doesn’t yet detect the local tone mapping metadata. However, given Adobe participated in designing these tags, we can expect an update in the near future.
As for other iOS editors, Apple has updated its RAW processing frameworks to support these new tags. For the most part, it “just works,” so you’ll find ProRAWs display properly inside Halide’s photo gallery. You can toggle tone mapping on and off with the Instant RAW button.
That said, not all metadata is exposed by Apple’s frameworks. They don’t even tell you whether the DNG is a native RAW or ProRAW. We’re certain this is just a matter of running out of time. They launched this two weeks before Christmas, so this is clearly a feature that was coming down to the wire.
To get around this, we built our own proprietary DNG parser we call Dingus.
![]()
Dingus lets us interrogate low-level tags within DNGs, which aren’t yet exposed by Apple. We’re using this to expose the bit depth and type of RAW in our metadata reviewer, but it’s also been useful for poking and prodding at ProRAW internals.
Is ProRAW Perfect?
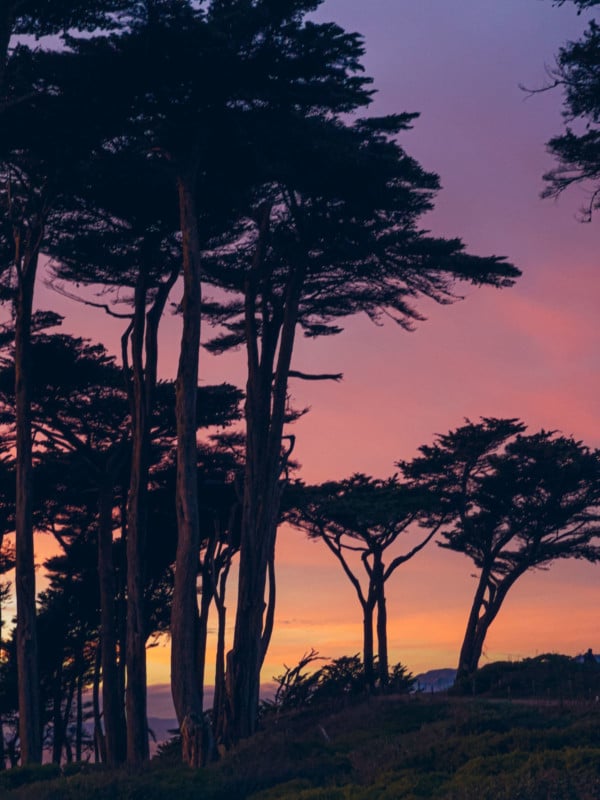
ProRAW is a leap forward for everyone, but it will be especially impactful for beginning photographers.
![]()
![]()
If you know nothing about RAW, but want more flexibility in editing, shoot ProRAW. For true professionals, the decision is a bit more nuanced. Sometimes you’ll want to switch back to regular RAW.
First, ProRAW is only available on “Pro” level iPhones. Despite the usual conspiracy theories, Apple isn’t just flipping a bit in software to force you to spend more.
![]()
In the past, these algorithms did their math with lower bit depths, because their output was just low bit depth JPEGs. Outputting images in a higher bit depth requires twice the memory. Apple’s Pro iPhones have way more memory than non-Pro models, and ProRAW needs all of that. It’s that simple.
Once you get RAW in your hands, the first thing you’ll notice is capture speed. A traditional RAW capture takes as little as 50 milliseconds. ProRAW takes between two and three seconds to finish processing.
The built-in iPhone camera does a great job hiding this, apparently processing each photo in the background in a queue. However, we’ve found the shutter stalls after firing three shots in quick succession.
ProRAW isn’t coming to burst mode anytime soon. This makes things difficult if you’re covering sports, have small children who refuse to stand still, or you’re a portrait photographer who takes hundreds of photos in a single session. There’s a chance you might miss that perfect shot.
In Halide, we decided to take a conservative approach at launch, and only let you capture one photo at a time. We’re a week away from the App Store shutting down for Christmas, so this is the worst possible time to contend with memory crashes. But we expect to speed things up soon.
The next issue we’ve found is sharpness and noise reduction. No multi-photo fusion is perfect. If you want the sharpest images with natural noise, and you’re not planning to boost your shadows through the roof, you might find “native” RAW is still the way to go.
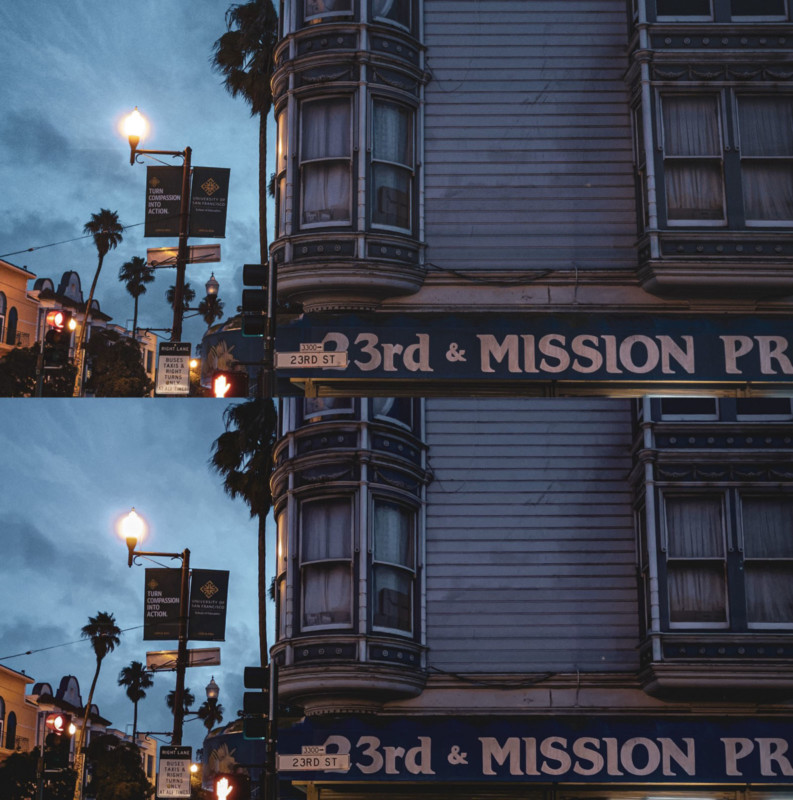
In the field, we often found that in some conditions you can still get more detail in a shot with that quick-and-noisy regular RAW file.
Then there’s file size. A 12-bit ProRAW is 25MB, while a 12-bit native RAW is only around 12MB. This is almost certainly why the “RAW” button in the first party camera app defaults to off, and returns to off if you leave and return to the app. A casual photographer might leave it on all the time and eat up their iCloud storage in an afternoon.
Finally, there’s compatibility. Without something like Halide’s ProRAW+ setting, apps have to be updated to support DNG files. Sharing your ProRAW shot to Instagram doesn’t work:
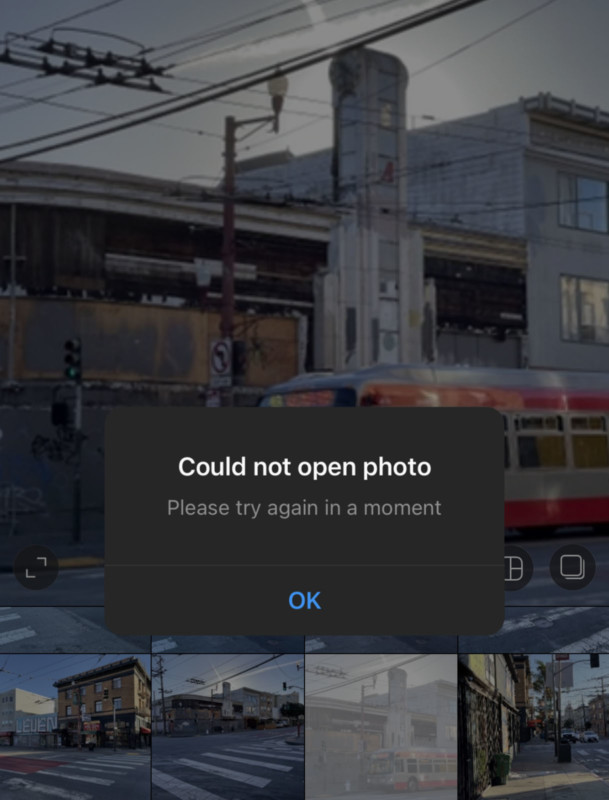
And while Apple has done an amazing job supporting ProRAW development within its own ecosystem — just hop over to Apple’s Photos app, tap the “Edit” button, and you can edit a ProRAW the same way you edit a JPEG file — the DNG spec was only updated a month ago, so there’s no telling how long it will take for your favorite third-party RAW editors to adopt the new tags.
If you already know how to develop RAW files, and you aren’t shooting in a scenario where computational photography shines, you may find native RAWs give you more bang for your bytes.
Introducing ProRAW for Halide
We’re excited to announce Halide’s ProRAW support. We didn’t just add ProRAW and ticked the box. By actually extensively using ProRAW in the field and testing it we found how to make the best possible camera for it.

![]()
![]()
It starts with ProRAW+. When set to this mode, Halide will take a ProRAW photo along with a JPG file so you can quickly share and view images in apps that do not (yet) support RAW files. This makes it a lot easier to just leave ProRAW on and not run into any issues in other apps.
As we mentioned, ProRAW is great, but there are tradeoffs.
![]()
As we beta tested our ProRAW support, it became obvious we had to make it easier to fiddle with capture settings without diving into Settings. Enter the new format picker menu. Just long-press on the RAW button, and you’ll be able to choose between RAW and ProRAW, your desired bit-depth, and whether you wish to save the processed version alongside your DNG.
Being able to quickly change your shooting format allows in-the-moment decisions depending on your exact needs.
![]()
As mentioned earlier, we allow you to customize your bit-depth, and disable capturing the JPEG version of your photo, inside Capture Settings. Together, you can expect to cut ProRAW file size in half without trading too much in your editing flexibility.
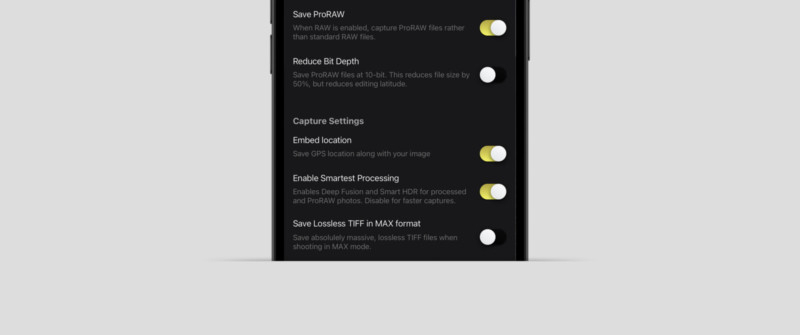
We also ensure to remember and persist your ProRAW settings. With great power comes great iCloud consumption, so please use this responsibly.
We’re still absorbing all of the implications of ProRAW, so we expect to continue to iterate on our features over the next few months. We have a list of things we want to improve after the App Store holiday shutdown, so if you’re shooting ProRAW, 2021 is going to be an amazing year.
However, native RAW is not going away.
The vast majority of users can’t shoot ProRAW, there are circumstances where regular single-shot RAWs will be superior, and there are certain computational photography algorithms that rely on Bayer-level information. We’ve got enough native RAW features planned to keep us busy for quite some time — and to keep bringing fantastic features to all iPhones that can run Halide.
If a picture is worth a thousand words, congratulations on reading over three pictures. Now get shooting!
About the author: Ben Sandofsky is the co-founder and developer of Halide, a groundbreaking iPhone camera app for deliberate and thoughtful photography. The opinions expressed in this article are solely those of the author. You can connect with him on Twitter. This article was also published here.