Using a 50-Year-Old $100 Lens on a Modern $4,500 Camera

I made a big purchasing decision a few months ago by investing in the new Fujifilm GFX 50R camera. It is a larger-than-full-frame ‘medium format’ sensor camera. The 50R was by far the most affordable medium format option in its class at the cost of $4,500.

My main workhorse camera is still the Canon 5D Mark IV, so I’m already equipped with an arsenal of Canon EF mount lenses. I picked up the Viltrox adapter, the only one that seemed to be in stock in North America at the time.
The Viltrox is a smart adapter, which enables both autofocusing and aperture functions while using the Canon lenses on the 50R. However, even with a smart adapter, the autofocus was often too slow or inaccurate, so I would default to manual focusing instead. The Canon lenses aren’t designed very well for manual focusing, so the idea of buying into an old film lens system, specifically designed with manual controls, seemed very appealing.
Deep Dive into Old Lenses
When I looked into compatible film lenses for the GFX system, I had three basic criteria: 1) I wanted something that was going to be relatively affordable and available on the used market, 2) I wanted the lenses to be fast (wide apertures), and 3) I wanted a lens that was fairly compact so it would fit better ergonomically to the 50R’s rangefinder-style camera body.
I wasn’t overly concerned about sharpness, lens distortion, or how it handled chromatic aberration. After a bit of research, one interesting lens that came up over and over again was the Minolta 58mm f/1.2 Rokkor.
I had a brief look at the prices and was somewhat surprised to see that this lens is still in high demand. In all honesty, the prices were a little more than what I wanted to spend ($400+) especially considering I wasn’t even sure if this would be a truly viable option.
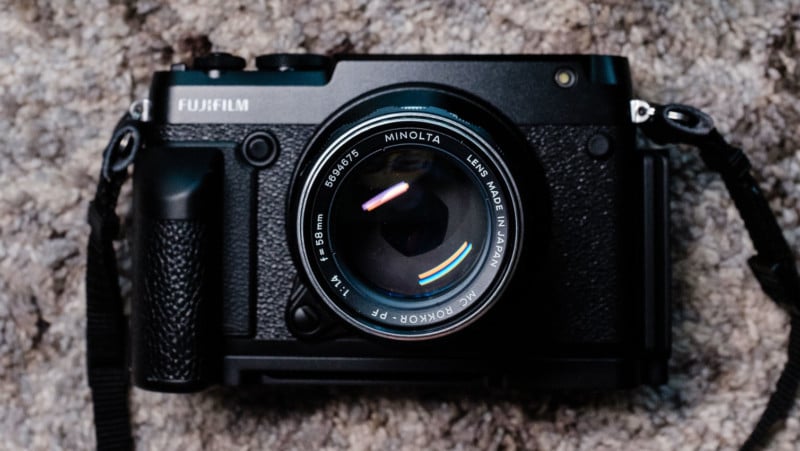
Being the frugal blue-collar photographer that I am, I instead purchased its cheaper, less desirable brother – the 50-year-old Minolta 58mm f/1.4 MC Rokkor. I paid a little under $100 for it. Paired with an inexpensive Fotodiox Minolta SR to GFX dummy adapter that only one camera shop in Canada had in used condition, I was good to go.

Real World Testing

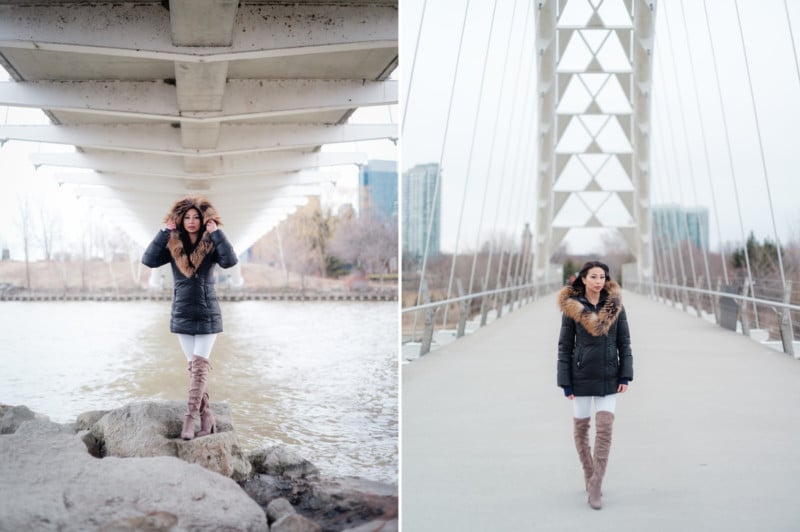
In order to test this lens, I wanted to mimic a real-world scenario – no shooting charts, graphs, or straight lines on a wall. With the help of my friend Karen, a local real estate agent, we hit up a park for some natural light portraits. For simplicity, I shot the entire session at f/2 (full disclosure: I think it may have accidentally moved to f/2.8 for a shot or two).
To my surprise, the lens performed a lot better than anticipated. The focusing ring was smooth and the metal construction of the older MC version felt nice in the hands. The 50R allows you to zoom into your focus point in camera (through the viewfinder or LCD), so it was easy to nail focus fairly quickly. I more or less hit ‘good enough’ focus every time, even with my bad eyesight.
The Results

I’ve never been much of a pixel peeper when it came to portraits and I am a big believer in photos being “sharp enough”. Although the images looked pretty amazing in camera (with the standard film simulation), I applied a little bit of a bump in Lightroom using one of my Classic Chrome RAW presents. You can be the judge of the images that you see throughout this blog post and determine what you like or don’t like about how this lens renders the images. Personally, I can’t say enough good things about it.

With more people viewing images on smaller mobile screens, a lot of the lens’ faults don’t appear too noticeable and definitely not deal breakers. It is not the sharpest lens. It suffers from chromatic aberration at f/2. There is slight vignetting in the corners (which can be fixed in the Lens Correction tool in Lightroom). The corners can suffer from that weird swirly bokeh because of rear lens element distortion (too small for the sensor). That said, the way this lens performs is exactly what made me excited when I bought this camera.
Other Lenses Tested
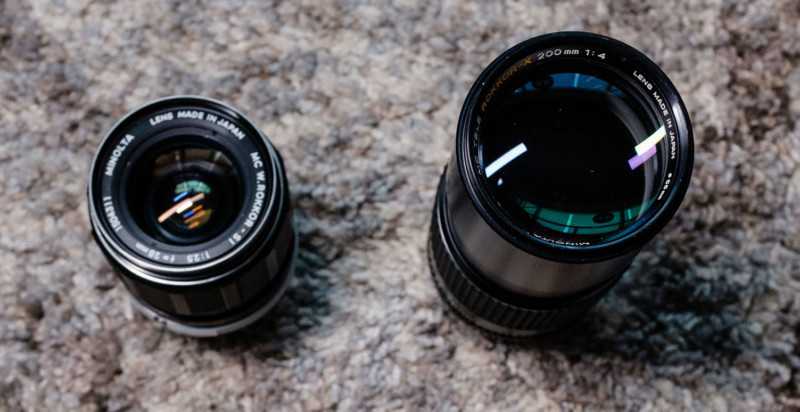
I did purchase a couple of other Minolta lenses as well; the Minolta 28mm f/2.5 MC Rokkor and the Minolta 200mm f/4 MD Rokkor-X. Each of these lenses was also under $100 each. The main focus of this review was for the 58mm f/1.4 MC Rokkor but I did want to share a couple of sample test shots with these lenses as well. Thanks to Bun Cha the Dog and Toronto photographer Ben Roffelsen for standing in as my models.
Looking at the sample below, you can see there is some heavy vignetting around Bun Cha the Dog in the original image. The MC version of this lens is an earlier release, which had a metal focusing ring. Like its 58mm counterpart, the focusing ring is smooth. The focus throw doesn’t seem as long on this lens as the 58mm, so the speed of focusing from one end to the other would be quicker.
Keeping the same 4:3 ratio, the lens seems usable with a bit of a crop and manual Lens Correction adjustment. In terms of sharpness, this lens seems sharper than the 58mm, though it is important to note I did not run tests on the 58mm at the same aperture (f/2.5). As a side, the image shows the minimum focusing distance for this lens on the 50R.


The 200mm f/4 MD Rokkor-X was a little bit more difficult to focus because of the increased focal length. When zoomed in to fine focus, my hands couldn’t hold it very steady to get a good read on the focus. Another factor in the focusing difficulty could have been the result of the newer rubber focusing ring on the MD version. It is more difficult to work with compared with the old metal focusing ring.
Again, the before photo shows significant vignetting. If you maintain the 4:3 aspect ratio, you can crop the image slightly and apply a Lens Correction in Lightroom. The minimum focus distance on this camera is about seven feet on the 50R. If you prefer to shoot in a 3:2 aspect ratio, I think both the 28mm and 200mm lenses would work really well with even less cropping and Lens Correction.


Conclusion

As you can probably tell, I am super thrilled with the results produced by the Minolta 58mm f/1.4 MC Rokkor lens on the Fujifilm GFX 50R! I feel like I am able to achieve an almost-film look with old lenses mounted on new camera technology. The separation at wide apertures is pretty impressive and it’s my personal belief that the characteristics of the Minolta lenses (with its flaws) create images that feel more authentic.
Oftentimes when I am shooting my ultra-sharp digital lenses like the Sigma 85mm f/1.4 ART, I find myself loving the separation it creates but not loving the more clinical, crisp, flawless look.

Ultimately, there are something like 30 different lens options that can be adapted to the Fujifilm GFX line of cameras. 35mm film lenses are a great option for those looking to take advantage of the wider aperture lenses. Medium format film lenses tend to be larger and have slower maximum apertures. The Minolta SR aka MC aka MD mount is serving me well so far and I can’t wait to create more work with them. Now, who needs some photos?