How to Nail Exposure in Film Photos With and Without a Light Meter
In this article, we are going to be talking about 3 different ways you can set the right exposure for film. The biggest thing for beginning film photographers is to learn is how to meter your film properly. For our example today, I’m going to be shooting on Portra 400 and Fuji 400, and the Portra 800.

These are 3 methods I’ve learned over the years about how to properly set your meter, from doing it without any equipment to using a handheld light meter, which I recommend as the best way.
The Sunny 16 Rule
The Sunny 16 Rule is the tried and true method for getting the right exposure for film cameras that started when film was invented. They used to print it on the back of a lot of cameras on a plaque, so you could look at it and figure out what your exposure should be.

This rule is based on the fact that the sun is always f/16. If you have a 400 film stock, set your shutter to 400, and your aperture to f/16 and it’ll give you the correct exposure. If you are going to compensate, give it a little bit more exposure.
f/16 in the sun, f11 overcast, f/8 if it’s more overcast, f/6 is heavy overcast, f/4 in the shade.
This is not meant to be an exact form of metering, it’s meant to estimate if you don’t have the equipment. Let’s take a look at how I did with my Sunny 16 shots.
Open Shade f/4
So the first shot is in the open shade with f/4, it looks very good. I’m getting good detail in the whites.

Direct Sun f/16
When I go into the direct sun, I get a lot more contrast and clarity in the image. The shade could have even used a stop or a half stop more. In the sun you get a lot more density with the image in f/16. The Sunny 16 rule worked perfectly with this exposure.

Medium Shade f/8
I think this is could use another stop of exposure. I would have gone to f/6, but the photos are usable. I could correct them and make it work just fine.

Deep Shade f/4
Great detail throughout, the sunny 16 worked really well here with great contrast and light in the image. The only thing that I missed with this rule was not giving it enough exposure for the medium shade shot.

Use a Digital Camera
First, set the ISO at one half the box speed of your film. So if your film is 400, you set the camera to ISO 200. This makes it so that you are overexposing your film by one stop. Now you set the aperture you want, then find the shutter speed, then transfer the exact numbers to your film camera and shoot away!
Use a Light Meter
This is the best, safest way for your photos to come out look great with the correct exposure! By using an external light meter, you can take a reading of whatever is being picked up by the camera. I’ve got an old-fashioned light meter and the new Illuminati Light Meter, both are good for different reasons.

The Sekonic Light Meter is an incident light meter that records the light that falls onto them directly, so they take an immediate reading. With this meter, you need to walk up directly to your subject and take a reading there pointed towards the camera.

The reflective light meter records the light that bounces off your subject that’s why cameras have internal reflective light meters. With the Illuminati Light Meter (below), you can put your light meter on a stand and let it stay there while you continue shooting.

Setting up our meter

First off, I’m going to aim this meter back at the subject aiming directly at the camera with the bulb in or out. If the bulb is in, it cuts your exposure in at over half at a stop, There isn’t any reason to do that, so I leave the bulb out.
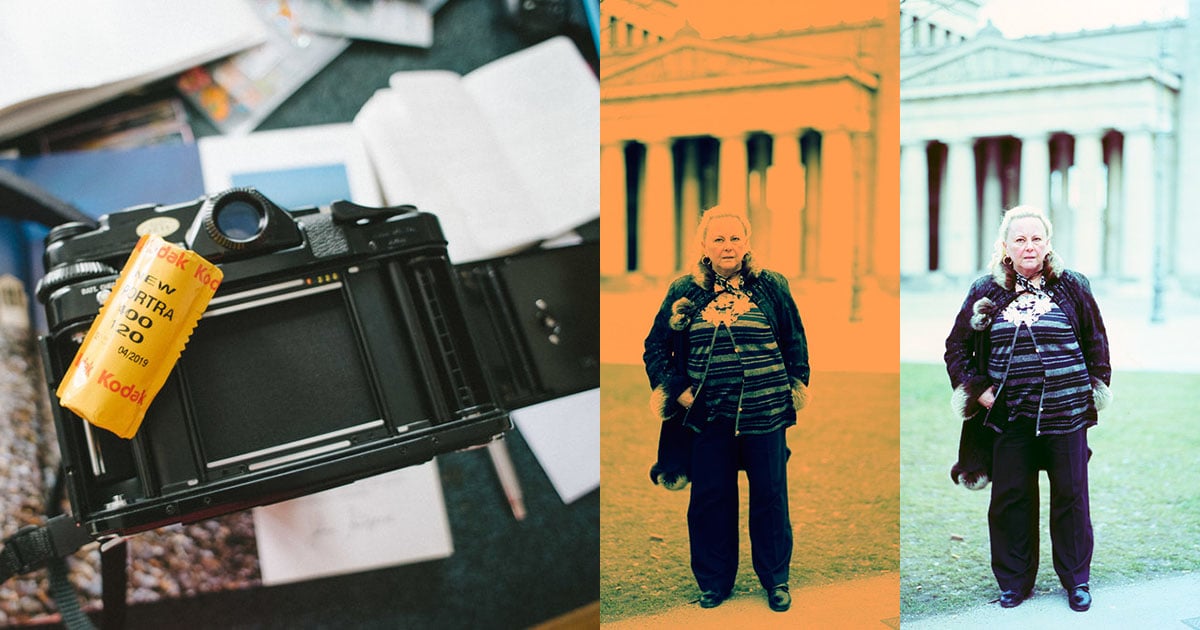
Now the Fuji 400 I would probably cut it one more stop. I would take my Fuji 400 and rate it at ISO 100. With the Portra 400, I’d set it at ISO 200. Let’s take a look at the shots in the studio!
Portra 400

I started at with 1/500th at f/4, it gave me a normal reading.
Fuji 400

The Fuji 400 is popular film stock for many photographers, but I like the Portra 400 mainly because it gives a lot more contrast and color to the photo. You can see that in the Fuji 400 photo, the whites in her dress are blowing out with the normal exposure.
Portra 800


Lots of people use the Portra 800 when shooting inside. This one has the same problems as the Fuji 400, in that with normal exposure I don’t get very good detail and contrast in the image. When I go to +1 EV , I get better detail.
So there’s a look at 3 ways to meter to get the correct exposure and also some film tests to be able to see what kind of stock you might want to shoot with in the future.
Remember: more exposure is better; less exposure, you’re in trouble.
P.S. All of our film stock was processed and scanned by Richard Photo Lab.
About the author: Jay P. Morgan is a commercial photographer with over two decades of experience in the industry. He teaches photography through his company, The Slanted Lens, which runs a popular YouTube channel. This article was also published here.