10 Tips for Capturing the Essence of a Rainforest
Australia is home to some of the most extensive areas of subtropical rainforest in the world. These protected environments are often the highlight of many international visitors who travel thousands of kilometers to experience the unique flora and fauna. The best part about these geological wonders is that there’s always something new to discover and they make ultimate subjects for nature photographers.
Over the years I’ve developed a strong connection for these natural environments and happily say some of my best work has come from countless hours of trekking through these lush environments in search of those raw and beautiful moments. Here are 10 basic tips to help you make the most out of your shooting time the rainforest.
1. Best time to photograph
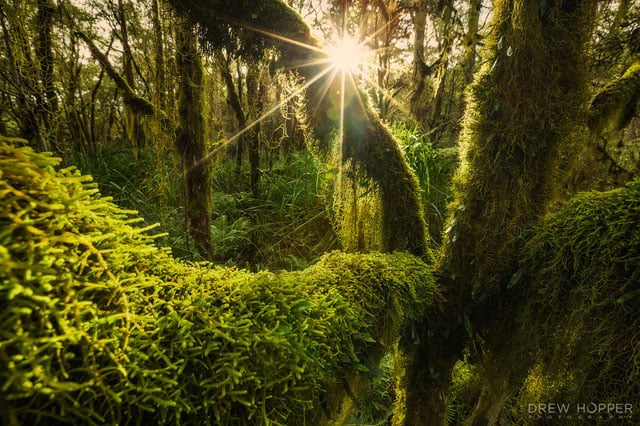
Photographing in the rainforest is all about timing — ultimately it’s best to be in forest is when it’s overcast or raining. It’s a common mistake to assume clear skies and sunshine are the best time, but this is often not the case. On an overcast day the clouds act as giant diffuser softening the light which helps prevent harsh highlights and shadows. If there’s moisture in the air you’ll most likely find mist enveloping the forest, which is ideal for capturing those atmospheric shots.
Unfortunately it isn’t always possible to be in the forest when it’s overcast/raining. If you are holidaying you may not get the conditions you had hoped for. As a general rule of thumb it’s a good idea to visit early in the morning when the light is low and the air is cooler. This will give you a better opportunity to capture something more subdued without the distractions of harsh light and shadows and mist will only add to the atmosphere.
2. Which lenses to pack
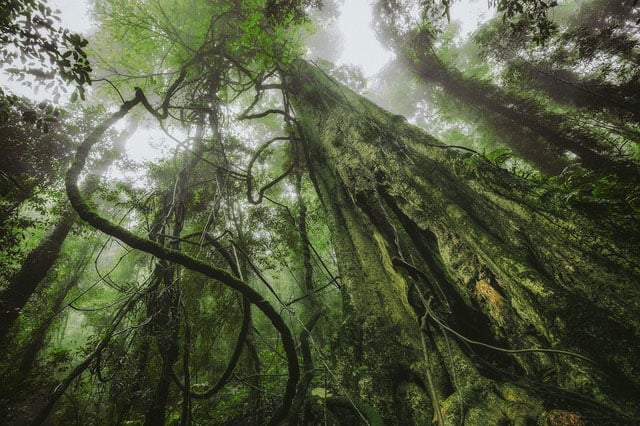
Wide-angle zoom lenses have several advantages in the rainforest. Firstly, they exaggerate a sense of perspective, which can help give the viewer a sense of being there in the middle of forest. Another advantage is the ability to capture everything in frame. This is great when shooting from a low angle looking up at the canopy, for example.
The downside is the wide-angle distortion on the edges of the picture. Trees can sometimes appear like they are falling into frame. You can make this work in your favor if you have a strong enough focal point in the center. Trees or people standing in the center of frame make great subjects when photographing from low angles, giving an undeniably surreal feeling to the image.
Another useful lens I like to use is a telephoto (I use a Canon 70-200mm f/2.8L). This a great lens for capturing wildlife, getting up close and personal to wildlife or for capturing an image from a point that may be inaccessible by foot. Keep in mind 200mm isn’t quite long enough for serious wildlife photography, at least not on a full frame sensor. If you are serious about shooting wildlife then I recommend something in the 400-600mm range.
Macro photography opens up a whole new realm in the rainforest. We often forget to stop and look at what’s beneath our feet. Macro photography can be extremely rewarding in the forest and the best part is you don’t have to walk very far to find interesting subjects – get down low and observe the miniature world. Mind you don’t flatten a potential macro shot when you put your bag down or step on something tiny and beautiful. If you’re serious about macro photography then it’s a good idea to invest in some speedlites because the light can be challenging in the forest. This will make it easier to shoot fast moving insects in low light. Alternatively, a small LED torch can add enough fill light to get a great shot.
3. Use a polarised filter
A polarizing filter is the most important piece of equipment apart from your camera and lens. Polarisers will help reduce the glare on water and saturate the green foliage to give your images more impact and eliminate unwanted distractions from your image. Even on a sunny day a polarised filter will dramatically improve your photos. Circular polarizers come in a wide variety of brands and sizes for different lenses and allow you to “dial” the intensity for best effect. Some popular brands are Hoya, B+W, Tiffen, Lee and Cokin.
4. Use a tripod
An essential piece of equipment that every landscape photographer should have in their kit. It’s important you use your tripod in the rainforest because it’s often dark beneath the canopy when shooting at small apertures (f11 – f16), so handholding your camera isn’t always an option. By using a tripod you’ll be able to increase your exposure (slow your shutter speed down) while still capturing a sharp focused image from foreground to background.
Trying to capture steady shots handheld with small apertures in low light is almost impossible unless you’ve got really steady hands or can brace the camera against something solid. For this reason I always carry a sturdy tripod, especially if the wind picks up and you are trying to take long exposures – you don’t want your camera to end up on the ground or in a river.
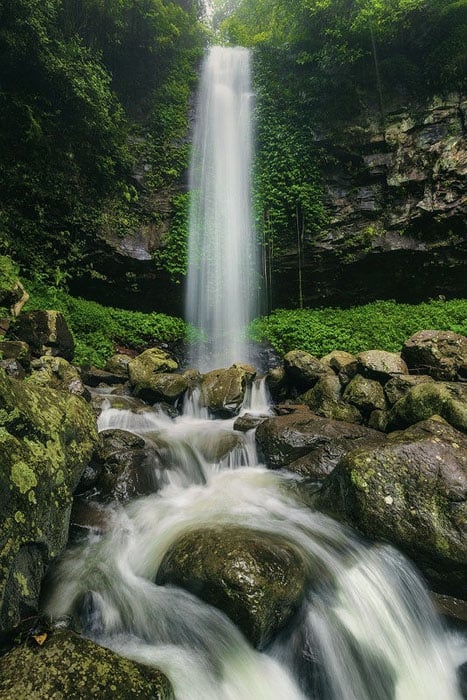
5. Photographing waterfalls and rivers
Water is the heart and soul of all rainforests and give photographers incredible opportunities for beautiful imagery. Standing amongst the forest with the tranquil sound of water gently flowing past is one of those timeless moments every nature photographer cherishes, so why not capture it’s serenity. Waterfalls and rivers can be tricky to photograph because it’s another element (water) to contend with to get a dynamic shot.
Observe your surroundings. Where is the light falling? What foreground subjects grab you? How fast is the water moving? These are all factors to consider when shooting moving water. For best results plan to shoot on an overcast day where the light is diffused rather than dealing with direct sunlight. A polarised filter will also help cut down the glare on the water and saturate the foliage to bring out those rich organic colors.
If you are trying to achieve the silky smooth water effect, use a smaller aperture (f11 – f16) and low ISO of 100, this will allow you to use a slower shutter speed. Anywhere between 1/5th to a few seconds will give you the desired effect.
If the light is harsh then the use of a neutral density filter (ND filter) can help with getting long exposures to smooth out the water. Most people photograph rivers looking upstream, however you could try shooting downstream to capture the water flowing away from frame. You will want to capture clean lines, the curvature of the river as it snakes through the forest, rocks that pull the viewer’s eye towards a waterfall in the background or an overhanging tree branch framing your shot.
Be creative and don’t be afraid to get your feet wet. Make sure your tripod is firmly footed when placed in the river, slippery rocks and the force of the water could spell disaster!
6. Choosing your subjects
Rainforests are busy environments, cluttered and full of distractions. It can sometimes become overwhelming choosing your subjects to shoot. An over abundance of trees, foliage, roots, rocks, vines may make or break your shots. The old adage of less is more and composition is equally important as light. A great rainforest image requires balance and structure in order to make visual sense. You may already have an idea in your mind for the type of pictures you want to create. Scope the location and look for details that immediately catch your eye. Once you’ve found your subject study it from various angles to work out what works and then frame your composition. Keep in mind you’ll often be shooting at small apertures, which means your background will also be in focus.
It’s always nice have something interesting in the foreground that leads the viewer’s eyes into frame. My all time favorite rainforest picture was shot from the ground; literally on my stomach shooting up at the canopy with a dominant tree in the center of frame as my focal point. The background is very busy, however by finding a solid focal point I was able to draw attention away from the clutter in the background and focus on the foreground subject even at a small aperture.

7. Invest time and patience. Enjoy the journey
Time is the most important investment you can make in getting great rainforest pictures. Your time begins the moment you make the decision to visit a new destination. It takes time researching new locations, time driving or hiking to get there and time taking the photo. You’ll want to figure out where the sun will rise and set to make the most of your time in the field.
Perhaps you’ve found an interesting tree but the light is falling on the opposite side to where you had hoped to shoot – you can either recompose your shot or revisit when the lighting has changed angles. Often I’ll do both to get a different feeling of the same subject. Be patient, the forest has all the time in the world. That gigantic tree you want to photograph didn’t sprout up overnight. That’s the best part of photographing the natural world: Mother Nature is extremely patient. Sometimes you’ll be rewarded with something special, other times you may walk away empty-handed with zero pictures. Find time to reflect and take in your surrounds.
8. Wet weather protection
You don’t need an expensive wet weather setup ~ raindrops, water falling from leaves and mist will all add to the moisture issue.
Here are a couple of simple solutions to make sure your gear stays dry.
– A large microfiber cloth for wiping down the camera or lens which can be placed over the camera while it’s on the tripod if there are water droplets falling from the canopy. You’ll still be able to see the screen and body of the lens,
– An extra-large ziplock bag can be placed over the camera while still on the tripod if you’re walking and brushing past water laden trees.
– If the ground is really wet or dirty, you can always hang your camera bag from the centre support of your tripod which adds stability as well.
– Take care if using your tripod in water – the hollow legs can sometimes fill with water.
9. Cleaning up
Your shoes, bag, knees, and tripod may be covered in dirt, leaf matter and compost from the forest floor.
As we know, water is number one enemy of electronics and anything metal.
– Make sure you allow time for internal moisture to dissipate when you get home and leave your camera out of it’s bag in a warm, dry environment.
– Check your tripod legs and latches for dirt and moisture, extend the legs and wipe down with a clean cloth. A little water dispersant spray on metal nuts and bolts, and then wiped down will prevent corrosion.

10. Don’t worry about “rules”
This would be the most important piece of advice I’ve learnt over the years as a photographer. How do you identify yourself as a photographer? What got you interested in photography? Firstly, not everyone will like what you do. There will always be someone who disagrees with what you are doing or how you achieve what you do. Don’t let this stop you from enjoying your craft.
Do what you love and love what you do. Yes, there are certain guidelines to capturing great pictures, but these ‘rules’ aren’t mandatory to creating a successful shot. Take photos that express who you are for the things you are most passionate about.
Most importantly: be yourself, no one else is better qualified. Own it!
About the author: Drew Hopper is a fine art travel and landscape photographer based out of Australia. Captivated by the diversity of cultures, people and environment, Drew ventures far and wide to capture pictures that define his experiences with the vision that they will impact and inspire an audience in a way individual to each viewer. You can find more of his work and writing on his website and blog.
Image credits: Photographs by Drew Hopper and used with permission