5 Steps to Creating a Dreamlike Gown in Photoshop
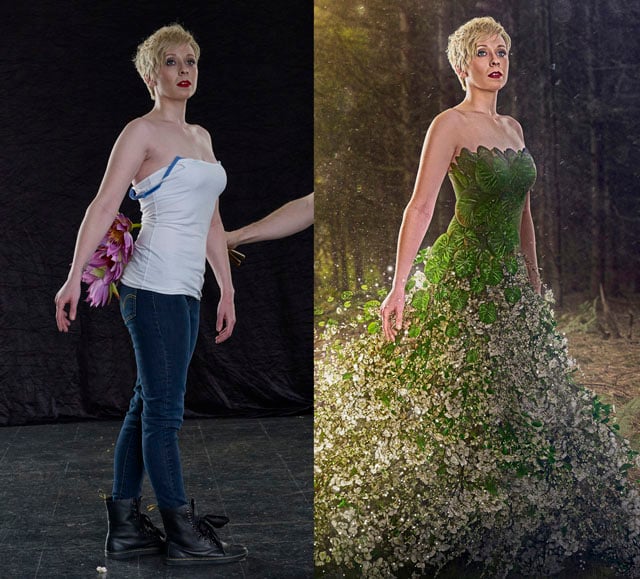
Today, I’m going to show you how to create a dress from scratch out of something that was not a dress… at all. Here are five steps to creating a gown using Photoshop.
#1: It Can Be Almost Anything
Seriously, people – I’m having a hard time coming up with a single thing that I don’t believe could be manipulated into a dress. In fact if you can think of anything that wouldn’t work, I’m all ears. Obviously some things are going to make prettier dresses, like I don’t know, maybe fake flowers perhaps?
I’ve seen dresses Photoshopped out of keys, feathers, fans, paper snowflakes, and even milk (warning: slightly not work safe); the options are seriously endless. As long as you have the time, patience, and know-how (or at least the time and patience, hopefully the “know-how” can be acquired from this post), you can dream up any outlandish gown and make it a reality… well at least you could make it a real-photo-manipulation.
#2: Take Lots and Lots of Item Shots
One thing you definitely want to have when creating a dress is more than enough pieces to work with. Let’s say you want to create a gown out of an ornately decorated dinner plate (’cause why not), but you only take one angle of the plate. It’s going to be rather hard to make a convincing dress if every little piece is a copy that’s facing exactly the same way, with the same lighting, shadows, and reflections. It’s going to look very cut and pasted.
If you don’t have images of the plate turned at various angles to make the dress appear to have some shape and to be wrapping around your model’s body….well then you’re screwed and you’d better go shoot some more plates. Take images where you let the light hit it differently, rotate it around, let parts of it fall into shadow.
Also, it’s a good technique to hold the item right against your model in several different spots so you can see how it naturally reacts to the light falling on your subject and the shadows your subject might cast on it with their arms or something.
#3: Solid Backgrounds Foreva
I’m aware that not everyone has the luxury of shooting in a studio. If you’re shooting your dress off in the woods somewhere, bring a blanket/sheet/piece of fabric to hold up behind your item-to-be-dress-ified when you shoot it. If the item you’ve chosen to craft into a dress is in fact something like the aforementioned ornately detailed dinner plate (therefore having an obvious shape and hard edges), then selecting it should be super easy on any background.
However, for something like the tiny detailed flowers that I used, it’s going to take you half a bazillion years (maybe even a whole bazillion) to select around all the little leaves, petals and stems, especially if you are shooting it in the woods and the forest behind the fake flowers is really similar. The main trick is to take photos of your item-to-be-dress-ified on a solid background that contrasts the item.
I shot all of my images on black knowing that I wanted my subject to end up on a slightly darker background. Plus, the flowers were all rather light in color and tone, so I knew they would come off the black quite nicely. Also, be sure the color of the fabric doesn’t match the item too well. If you shoot a bunch of roses on an reddish-orangish background, this next technique I’m about to explain is going to laugh in your face.

#4: Color Range — It’s Usually Awesome
Once you’ve taken lots of different angles of your prop on a nice clean background, bring it into Photoshop and go up to the “Select” menu, and navigate down to “Color Range.” This will give you a pop-up window. Using the “eyedropper” (it will automatically be on that tool when you open this window so don’t worry you won’t have to find it), click on the background and you’ll notice the black & white thumbnail in the pop-up window change.
Now hold “shift” and then click and drag around the background a bit more until the background in the thumbnail is mostly white. Holding “shift” is telling Color Range that you want to be adding to your selection; you can subtract from your selection by holding the “option/alt” key. Also feel free to mess around a bit with the “Fuzziness” slider at the top, but use it sparingly.
Like all Photoshop techniques you’ll just have to try things to see what works best. If done correctly, the preview should look like a black silhouette of your item on a white background. Click “ok.” Next go back up to “Select” and under “Modify” pick “Expand” and set it to one pixel. This will cut into your item ever so slightly and help it to not have any sort of a fringe around the edge.
Then go back to “Select/Modify” and pick “Feather” and set it to about 0.6 pixels, then hit delete! (Or use a layer mask if you’d like, but I usually get ballsy and just delete it…) If all goes to plan you should have your complicated bouquet of flowers (or whatever it is) nicely cut off their background, HOORAY! At this point you might still have to erase some little flecks of background here and there until you just have your item. (This technique is great, but not perfect.)

#5: Flat Lighting Helps You Be a Cheater
This last tip comes to you courtesy of my completing this project. You see, when I shot this image I had never created a dress-out-of-nowhere before; it’s a technique I’d always wanted to try so I just dove in head first. Unfortunately the pool wasn’t quite as deep as I was expecting so I ended up hitting my head on the bottom.
More so than most images I create, this picture REALLY fought me in editing. I went way too stylized and dramatic with my lighting and later discovered this was a bad plan. Because of my harsh edge lighting it was hard to turn and/or flip pieces because then the lighting didn’t look right. I’m not saying I didn’t flip items around, just that if my lighting was much flatter it would have been WAY easier, especially with the shiny plastic-y lily pads.
I ended up basically having to paint them flatter and then shaded them later as one larger unit. What I’m saying is that the top part of her dress was a GIANT PAIN AND I THINK I COULD JUST KEEP EDITING IT FOREVER.
So, if at all possible, do yourself this favor and try to shoot your pieces with flat lighting. Should you be shooting outside, try to do your shoot just before the sun comes up when it’s light out but there aren’t any really directional shadows, or immediately after the sun goes down in those few magical moments when everything is hazy and flat before it gets too dark.
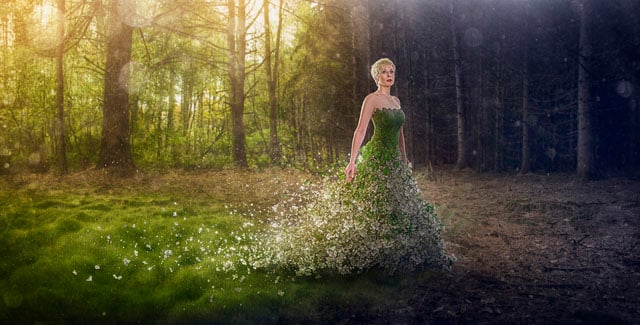
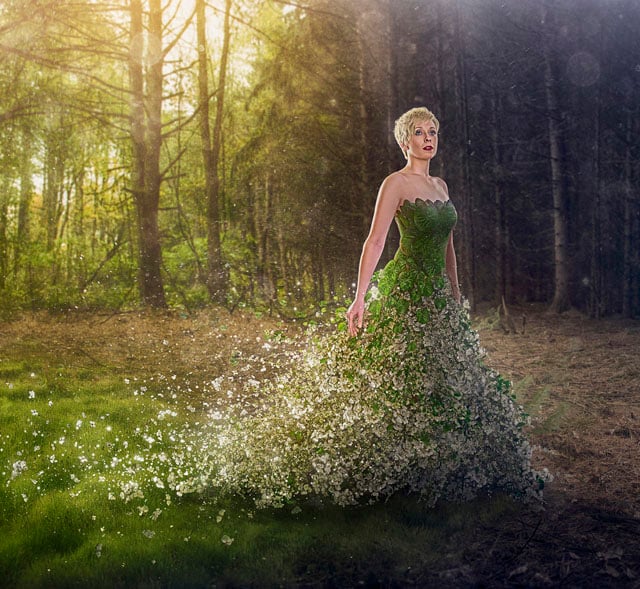
Here’s a behind-the-scenes speed edit video for this photo, which I titled “Lady Solstice”:
This is the final photograph:
About the author: Robert Cornelius is a photographer and an award-winning Photoshop guru based in Lebanon, Pennsylvania. You can find more of his work on his website and read more of his writing on his blog. This article originally appeared here.