How-To: Picking a Great Lens for Milky Way Photography
The lens is the most important factor in the image quality of a landscape astrophoto.
There are a number of lens traits that will determine the quality and usability of a camera lens for astrophotography. Let me explain what sort of thinking should go into choosing and using a lens for making astrophotography and Milky Way nightscapes.
There are two basic traits of a lens that will affect how to take your landscape astrophotos: focal length and clear aperture size.
What Focal Length?
For simple non-tracked landscape astrophotography and nightscape images, you will generally want a wide angle lens. I usually suggest something 24mm or shorter on an APS-C camera or 35mm or shorter on a Full Frame Camera. Finally, about 16mm and shorter on a 4/3 camera will do best. These wide angle lenses offer some advantages when shooting images of the Milky Way:
- Wide angle lenses have a larger field of view (FOV) and allow you to frame more of the Milky Way. This trait lets you collect light from a larger area of the sky and offers a balancing compromise to a typically small clear aperture for light gathering capability. More on clear aperture later.
- Short focal length, wide angle lenses produce a smaller image size at the sensor allowing you to use longer shutter speeds without creating star trails from the Earth rotation.
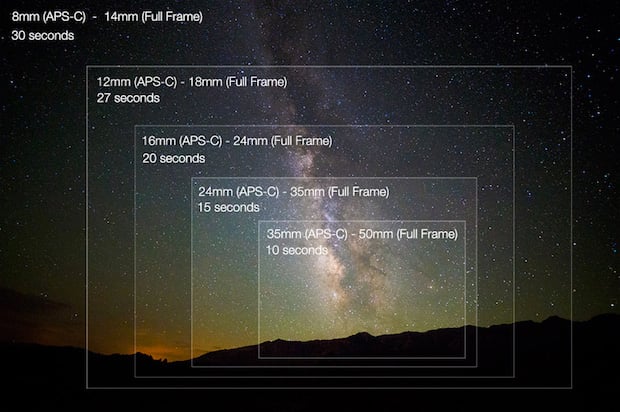
The shorter the focal length, the wider angle the lens. Most APS-C sensor digital SLRs like the Nikon D3100 or Canon EOS T5i come in a kit with an 18-55mm focal length lens. It can zoom from a relatively wide angle 18mm to a medium telephoto 55mm.
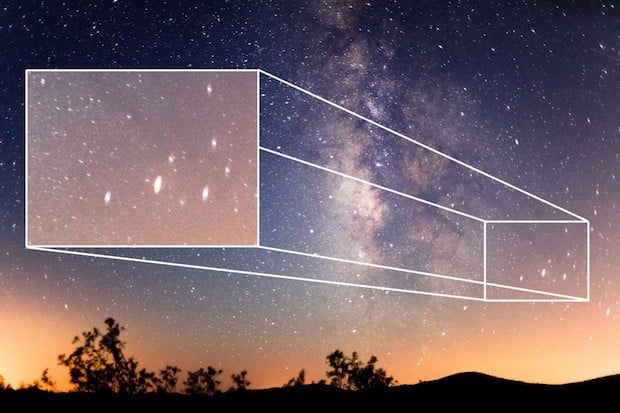
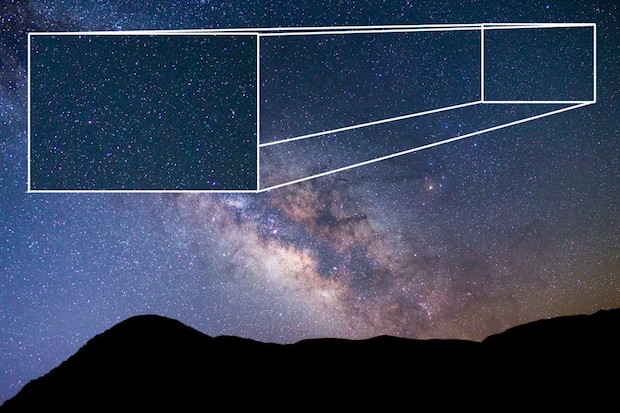
Star trails (as shown in the images below) are caused by the rotation of the Earth. For any given angle of view, or any given lens, there is a certain amount of exposure time before the Earth will have rotated enough to start to “smear” or “trail” the stars across your image frame. 18mm on an APS-C sensor is considered a relatively wide angle lens but even so, the angle of view is narrow enough that you will start to see star trails on exposures longer than about 20 seconds.
It tends to be more difficult to take landscape astrophotos with longer lenses like a 50mm or 85mm because the narrower field of view makes movement of the stars due to the Earth’s rotation more apparent.
This can be solved by tracking the stars but in turn adds complexity and extra expense for the equipment required to track the stars while make your photos. Tracking is possible with the use of a manual barn door tracker or motorized equatorial mount, sometimes controlled by an autoguider that provides feedback for the motor mount movement. Star tracking is an essential technique for imaging of deep space objects with lenses and telescopes that have comparatively long focal lengths. For nightscapes, however, where we are usually capturing the landscape as well, tracking the stars will in turn start to streak the landscape in the foreground.
When getting used to taking untracked astrophotos, I highly recommend that you check whether the stars are trailing by reviewing the image and zooming all the way into the detail.
Rules to Prevent Star Trailing
I’ve heard of several rules that different astrophotographers use to determine how long your shutter speed should be to prevent star trailing. For full frame cameras, the chart below roughly uses the so-called “500 Rule” which means that you take the number 500 and divide it by your focal length to determine the maximum number of seconds of your exposure before star trails are apparent. For example: If we have a 24mm lens on a full-frame camera, we can take 500 and divide it by 24 to get 500/24=20.8 or about 20 seconds.
Note that differences in sensor resolution, pixel size and even the direction you point your camera in the night sky will change how the rule works. APS-C cameras and cameras with higher resolutions sensors need shorter focal lengths to achieve similar shutter speeds without star trailing and the rule becomes something closer to a “300 Rule” for APS-C sensors the guide below. Basically, it differs by camera.
Also, pointing your camera toward the celestial equator line will cause more star trailing than near the poles due to the larger arc length swept by the stars in that portion of the sky. The important thing for you to do is to generally determine what maximum shutter speed will work best for your particular camera and lens combination. Start with the recommendations here for your lens and then adjust accordingly.
Once you have determined the maximum shutter duration with no star trailing for your lens or focal length of choice, remember it. That shutter duration will always tend to work for that particular lens on that particular camera. For instance, at 18mm on my APS-C cameras, I have found that 20 seconds works for most photos of the milky way.
The take home point is that narrower, longer focal length lenses will require shorter shutter durations to prevent star trailing. This makes longer lenses more difficult to use for Milky Way photography and nightscapes because it limits your maximum shutter time.
For the sake of maximizing the signal to noise ratio in your images (for better image quality), you should try to use as long a shutter speed as you can without trailing the stars. Once you venture past 30 seconds at all but the shortest focal lengths, you will tend to see some star trailing. Just to demonstrate, the animation below simulates different shutter speeds (corrected for exposure brightness changes) to show how longer shutter speeds can create star trails.
You can see that with the longer exposures, the stars appear to get brighter but start to streak across the frame, especially with exposures longer than 30 seconds.
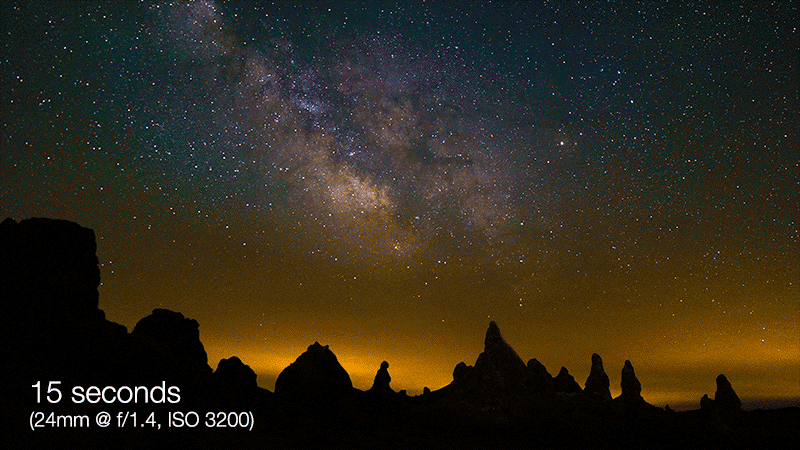
The image below is an example of what we get with a less than ideal setup for landscape astrophotography. It’s an untracked astrophoto made on a fixed tripod with a relatively narrow lens/camera combination: A 40mm/2.8 on an APS-C camera.
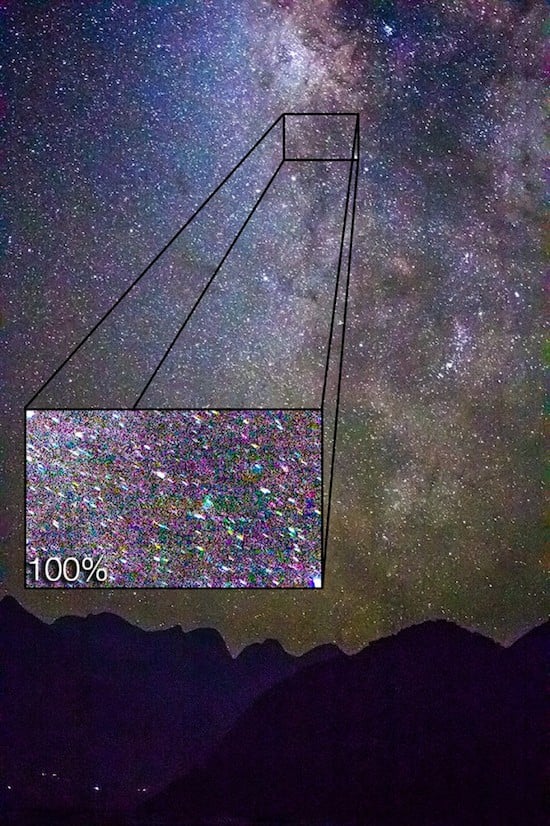
With the 14 second exposure that was required to collect enough light, the narrow lens shows star trailing at 100% magnification. Another thing that is very apparent in this image is high levels of noise. The relatively small aperture on the 40mm/f2.8 required the used of a high ISO. This example leads me to the next consideration for a nightscape lens: clear aperture size.
Clear Aperture Size
The above image is an example of a photo with relatively low signal to noise ratio. In photography, the signal is photons that the camera is collecting and the noise is from any number of things such as stray energy like heat energy from the camera electronics or the environment. Higher signal to noise ratio images will have higher image quality with clearer details, better color saturation, smoother tones and less noise.
One important thing that will affect signal to noise ratio in your astrophotos is the clear aperture of the lens for any given focal length. The clear aperture is a measurement of the diameter of the lens opening as calculated by dividing the lens focal length by its relative aperture or f/number. Let’s see how we consider this for nightscape photography. Warning: the next section may be rather verbose.
A 100mm f/2.0 lens has a 50mm clear aperture (100/2=50) while a 24mm f/2.0 lens has only a 12mm clear aperture (24/2=12). Even though the f/number is the same, the longer lens captures more light from one portion of the sky due to its physically larger aperture. For nightscapes and astrophotography, we usually want to be able to resolve as much detail in the night sky as possible, especially really dim features such as nebulae and faint stars. A physically larger aperture for any given focal length will help us achieve more detail in any given portion of the night sky. This is why the world’s best telescopes have huge diameters: to collect more light.
The light gathering capability of a lens is directly proportional to the area of the clear aperture. Since the area of a circle is proportional to the square of the diameter, the clear aperture area increases quickly with lens size. For example, when you look at equal portions of the night sky between the two lenses, the 100mm f/2 lens collects over 16 times more light from that portion of the sky than the 24mm f/2 lens due to its much larger clear aperture. (excluding the rest of the 24mm/2′s field of view, sort of like cropping the 24mm/2′s image to the same field of view as the 100mm and then making the comparison.) But wait, didn’t I just finish saying in the last section that we wanted a short focal length so we can use longer shutter speeds? Which one do we actually want?
The 24mm f/2 lens collects light from a comparably wider field of view than the 100mm f/2. Since they’re both f/2, they both capture light at the same “speed”. So for equal shutter speeds, they should provide the same illuminance at the sensor. So in terms of exposure value, the 24mm lens will produce equivalent brightness images for any given ISO and shutter speed because it’s pulling light from more of the scene than the narrower 100mm lens, hence the identical f/number rating. The long lens collects more light at a time from a smaller area of the scene while the short lens collects less light at a time from a larger area of the scene. Without being able to track the stars with an equatorial mount, the limiting factor of the 100mm is then its field of view which will only allow us a 5 second exposure before the stars start to trail. That’s a two stop (four times) disadvantage to the 24mm. Looks like we want the shortest focal length lens with the largest clear aperture.
Unfortunately, short focal length wide angle lenses also tend to have small clear apertures because shape of the lens at these short focal lengths makes it prohibitively difficult to manufacture the lens with a large diameter opening. Everyone wants an ultra-wide 12mm f/0.7 lens for their full-frame camera but it’s a little bit difficult to actually manufacture such a device. Choosing a lens for untracked nightscape photography then becomes a balance between choosing a short lens for less star trailing and a slightly longer lens that may offer a larger clear aperture at the expense of slightly shorter shutter speeds. So which lenses have the best combination of a wide angle field of view and a large aperture?
To make comparison between lenses easier, we can calculate a value to quantify how well a lens will perform for nightscapes based on the amount of light it will collect using the lens’s clear aperture area, the angular area field of view of the lens, and the maximum shutter time we can use for the lens without producing star trails in our image (for the chart below, I use the 500 rule as describe above).
Here is a quick comparison chart of common lenses for the purposes of nightscape photography based on the traits we just talked about:
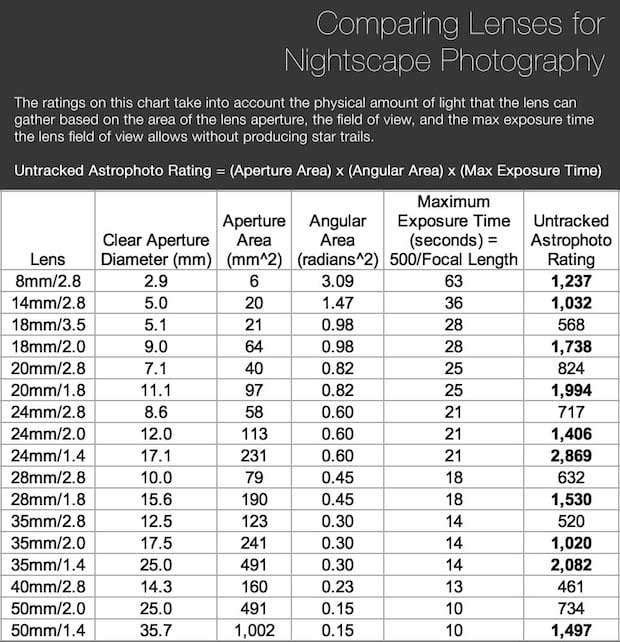
Don’t see your lens listed? Wonder what happens with different sensor sizes? What about a lens turbo or speedbooster? Feel free to see the expanded chart with additional lenses and explanation by downloading it here. (Google Drive Doc)
The rating system does not take into account other factors that affect the image quality such as distortion or chromatic and coma aberrations. It’s only good for comparing lenses within one sensor size, but it’s helpful when comparing one lens to another in terms of its overall light gather capability for untracked Milky Way photography. For example, when comparing within one focal length like the 35mm/2.8 versus the 35mm/2.0, the f/2.0 lens scores twice as much as the f/2.8 because it’s exactly one stop brighter. Just as we would expect. (Read more about f-stops here.)
The results compare nicely across constant f/numbers and differing focal lengths as well. For example: a 50mm/2.0 lens scores half as good as a 24mm/2.0 lens because it’s limited to approximately half the shutter speed due to its narrower angle of view.
This means that we can interpret the results across variations in both focal length and f/number ratings: A 35mm/2.0 lens (Score: 1020) scores almost exactly the same as a 14mm/2.8 (Score:1032). Even though the 35mm is limited to a shorter shutter speed due to its longer focal length, it makes up for the reduced shutter speed with one more stop in its f/number rating. The two different lenses should be expected to achieve very similar nightscape results with very different fields of view.
The highest scoring lens I know of to date is the 24mm/1.4 which offers the best mix of field of view and aperture size. However, I have successfully taken nightscapes with some of the lower rated lenses in the chart, such as the 18mm/3.5 so don’t be discouraged if that’s all you have to start with. Just keep in mind that an equipment upgrade will actually make a tangible difference. Here’s an example image made with an 18-55mm f/3.5-5.6 set to 18mm/3.5. It’s a little noisy but still has adequate detail in it. In order to collect a little more signal to make up for the slower lens, I used a higher than recommended shutter speed of 30 seconds. There’s a little bit of star trailing at 1:1 magnification but it works fine at this viewing size:

The above image is a great example of what you can do with a relatively cheap camera and lens combination. Post processing noise reduction can also make a huge difference in your results when you are limited by your lens. Another method for reducing noise is image stacking and can be very effective when you are lens limited. A better scoring lens will only improve upon these results by collecting more light for a final image with less noise.
Fast wide angle lenses available from nearly every major lens manufacturer but they tend to be a little more expensive. If you are on a budget, I have a few affordable recommendations below:
Affordable Lenses for Landscape Astrophotography
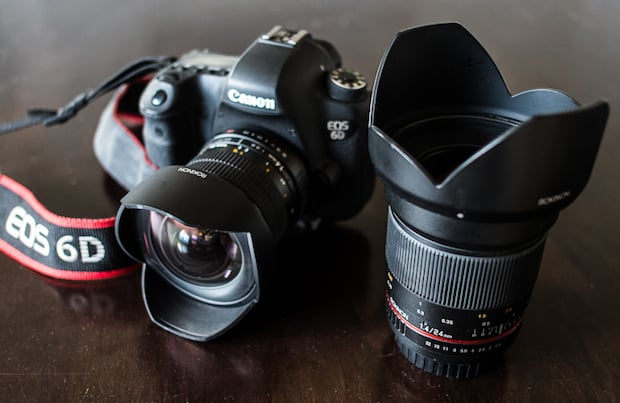
I highly recommend lenses from Samyang or its other equivalent name brands, Bower and Rokinon for astrophotography. Most of these lenses are available for a whole range of cameras including Canon, Sony, Nikon, Fuji, Pentax, Olympus and Samsung. I currently use a Rokinon 14mm f/2.8 and Rokinon 24mm f/1.4 for most of the nightscapes you see on lonelyspeck.com. They’re wide, cheap, sharp, and fast.
These lenses are all Manual Focus (MF) only lenses so they will require more patience than your autofocus lenses for everyday shooting but their optics often match or exceed the quality of top-of-the-line Canon or Nikon lenses and at a quarter of the price. About the product links below: I use affiliate links to the respective products that I mention on this page. If you decide to buy one of the products below, consider using the links in this article to support lonelyspeck.com. It won’t cost you anything extra but I’ll get small commission to support this website. I don’t blindly suggest products that I would never buy, everything here is something that I would use (or already use) myself. Here are the lenses I highly recommend for astrophotography:
- Rokinon 8mm f/2.8 (APS-C)
- Rokinon 14mm f/2.8 (Full-Frame or APS-C)
- Rokinon 16mm f/2.0 (APS-C)
- Rokinon 24mm f/1.4 (Full-Frame or APS-C)
- Rokinon 35mm f/1.4 (Full-Frame or APS-C)
Some other options that feature autofocus from other third party manufacturers that I have seen great results with are:
- Tokina 11-16mm f/2.8 (APS-C)
- Sigma 35mm f/1.4 (Full-Frame or APS-C)
All of these lenses are relatively affordable and score above 1,000 with the calculations on the chart above. I use the score of 1000 or higher as a criteria for an excellent lens because it’s the score of a 14mm f/2.8, which is my most used lens for astrophotography. The equivalent focal length and f/number lenses from the major manufacturers like Sigma, Tokina, Nikon, Sony, and Canon will also work great, just use the lens charts above as a guide in your decisions.
While not particularly well corrected for chromatic aberration, one of the primary benefits of the Samyang/Rokinon/Bower lenses is in their well corrected coma which results in sharper images, especially at low f/numbers. Many other fast lenses that I’ve used in the past tend to appear to blur the edges of the frame, creating “coma” or comet-like or UFO like shapes of the stars. (See the Canon 28mm f/1.8 image below.) Astrophotography is particularly sensitive to this effect because of the pinpoint light sources of the stars and that we tend to shoot at lower f/numbers where more comatic aberration will be present.
If your lens seems to show coma aberration and you’re using a really low f/number like f/1.4 or f/1.8, try stopping down a little bit to f/2.0 or f/2.8. By stopping down and closing the aperture a little bit, you can reduce the effect of aberration.
Conclusion
When it comes to camera equipment, your lens is the most important part. It is the lens that makes the image, the camera only records it. Different lenses are suitable for different functions. In the realm of landscape astrophotography, the fast wide angle is king. There are a plethora of fast-wide choices available for any given camera. Luckily there a few which are very high quality and relatively inexpensive. Of course, you can make an image of the Milky Way with a cheapo 40mm f/2.8 (as I showed above) but great results will be much easier and much cleaner from a fast wide angle lens instead.
Astrophotography pushes your equipment to its limits. Knowing these limits are the first step to creating great images. For the best results in your own images, familiarize yourself with the limits of your lens and camera. Test how long of a shutter duration you can use before the stars being to trail with your lens, practice visualizing your lens’s field of view before you even look through the viewfinder and find the suitable f/number that gives you the best balance of exposure and image quality. Once you’ve fully mastered the limits of your equipment, you are only limited by your imagination.
About the author: Ian Norman is a photographer, engineer and entrepreneur based out of Los Angeles, CA. He is deeply passionate about photography, and takes great joy in teaching others what he has learned over the years. You can follow him on his website, Twitter, Google+, Instagram, Vimeo and Flickr. You can also support him by purchasing his online Skillshare class on photographing the Milky Way. This article originally appeared here.