How I Created a Four-Story-Tall Print of One of My Photographs
It’s fun to print big, but when a client recently asked me to create an image more than four stories tall I have to admit it was really outside of my usual perspective.
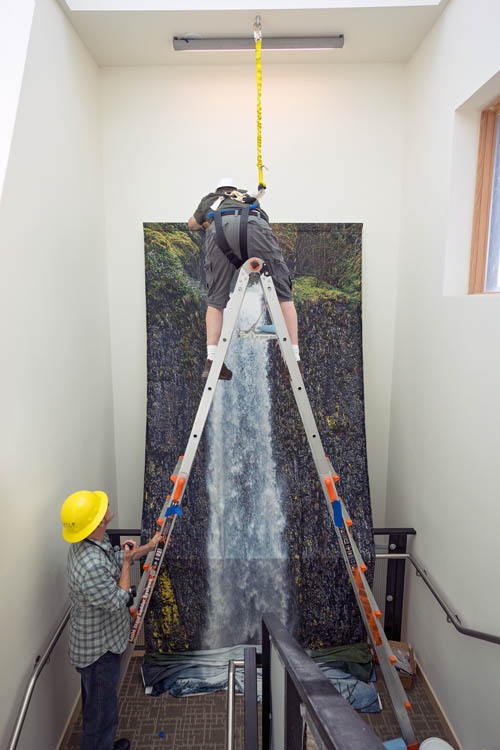
I went to view the site and soon decided that this could be a really fun project—provided I could get past three initial challenges. First, I had to find a very tall, but very, skinny waterfall. Then I had to crack the compositional and image capture challenges of photographing it. And finally, I needed to consider the kind of print material that would work best for the site, keeping in mind that it would be no easy task to mount an image onto a wall when there’s a drop of at least 40’ below the top installation point.
Since the developers of the building were emphasizing sustainable design and regionally made building materials, I’d hoped to find a waterfall that is part of the Northwest landscape—something would exemplify the area’s natural surroundings.
Like all good projects, I started with a lot of research: looking online, talking with hikers I know and reading outdoor guidebooks. Eventually I narrowed my search down to three possible waterfalls in Washington and Oregon that were all over 200’ tall and no more than 25’ wide. I hoped to capture an entire falls from top to bottom, and I figured I needed something with at least an 8-to-1 height-to-width ratio in order to have proper proportions for the installation site.
Now that I had some actual targets in mind, I began to think both about what equipment I’d need to capture such an image and how it would be printed. I decided to work backwards since the quality and resolution of the print would determine what I would need to capture the image.
After looking at various options, I decided that printing on fabric would be an ideal solution. Other materials would significantly raise both the cost and the weight of the final print, and I had to consider both of these issues. I quickly warmed up to the idea of printing on fabric after realizing that the right kind of material would move slightly in the air currents of the vertical shaft and, I hoped, provide just enough motion to give the effect of water rippling down the surface.
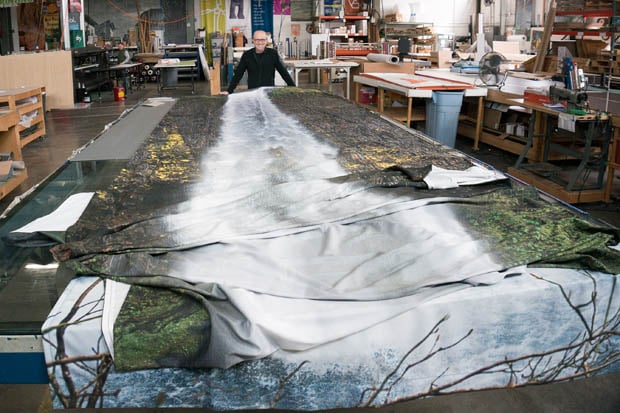
I’d previously worked with a local printing firm called StellaColor, and I thought they would be perfect for this project because they print large banners for the sides of stadiums and office buildings. An added bonus with their company is that they have expertise in unusual installations and agreed to do this one without hesitation.
They provide many print fabric options, but one stood out because it was both classified as fire retardant (an important factor in a stairwell) and could be run through a dye sublimation printer. Dye-sub printers (as they’re known in the business) provide great color stability and longevity, and the print can actually be washed if it got fingerprints or other dirt on it over time.
One factor that’s inherent to printing on fabric is that overall image resolution is reduced due to the weave of the fabric. It’s not possible on most fabrics to show fine detail, and the effective DPI is about 200 rather than the more common 300+.
After viewing the site again, I decided this would not be a problem since the print would hang about 3’ from the viewing areas on the stair landings, and at this distance the perceived detail level would be fine even at a lower resolution.
With all of these points in mind, I began to select the gear I’d need to capture the image. I knew I’d have to stitch together multiple images to create a file large enough to print at this size, even with the reduced resolution. I decided to err on the side of too much detail, thinking I may be able to use some segments of a waterfall to produce stand-alone prints for use elsewhere.
With that in mind only one camera came to mind: the Nikon D800. With its 36.3MP image capture, I felt sure it would give me everything I need even if I were limited to only a few shots of a waterfall. Because I wasn’t sure how close or far from a waterfall I would be, I chose the Nikon 80-400 f/4.5-5.6G ED VR lens because of the versatility it provided and its highly rated sharpness.
I didn’t own either of these pieces of equipment, but fortunately I was able to rent both of them from a local camera shop for a reasonably inexpensive day rate. I combined them with a Gitzo Mountaineer tripod and Really Right Stuff BH-55 ballhead I already owned and was ready to go.
After making day trips to the first two sites I identified I started to get worried. At the first waterfall there was no way to photograph it in its entirety without a lot of tree branches in the way; the second site was more open, but the waterfall itself was against a plain gray rock background for its entire vertical distance. While it had the right dimensions, the resulting photo lacked enough contrast and was fairly boring as a composition.
Fortunately, the third site I went to two weeks later was ideal. Elowah Falls, on the Oregon side of the Columbia River Gorge, is a huge, beautiful falls with contrasting green, yellows and browns in the background. It’s at the end of a narrow valley, and there is a large outcropping about 100 yards from the falls that allowed an almost unobstructed view from top to bottom.
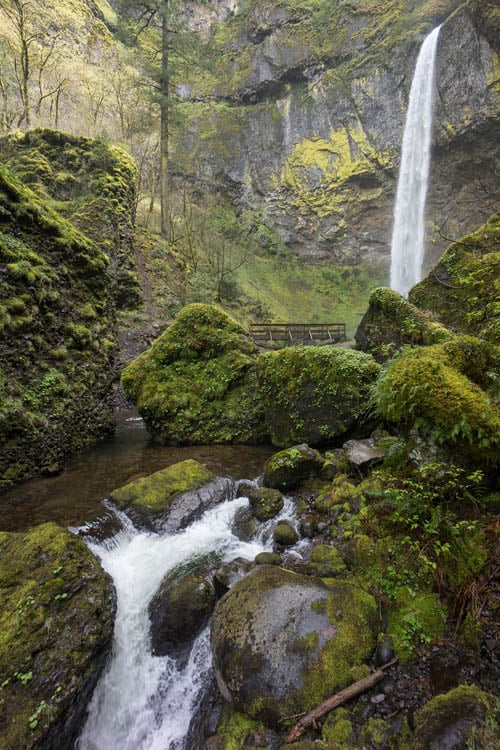
Photographing moving water is always tricky because you never know exactly what the exposure will look like until you see the image. I knew I wanted the final print to capture the beauty of the scene but also to suggest the power of the moving water. From past experience, I knew that a high shutter speed would not show the water’s movement and that too long of an exposure would remove details that I thought would be necessary for viewers to feel like water was cascading before them.
Since I had plenty of data cards with me, I took about two dozen different series of details at various focal lengths and exposures, ranging from 200mm at 1/10 of a second up to 400mm at 1/500th of a second. For each exposure I captured a small section of the entire waterfall, with the plan in mind of stitching the various images together later in Photoshop.
It really helped that I was blessed with wonderfully even Northwest overcast lighting for the several hours I was there. I reviewed my work on an iPad before I left the scene, and I felt sure I had the best possible RAW images to make this a successful project. Back in my office I began to tackle the challenge of assembling some of the individual images I took into a single coherent print.
It’s difficult to try to translate what a photograph will look like once you take it to a giant size, and even with a 30” monitor it’s a big leap to understanding what the viewing experience will be like when the print is four stories high.
Initially I selected 24 individual images to combine in Photoshop’s Photomerge function. This automated function is an amazing time-saver, and within a few hours it gave me a general idea of how the final print might appear. I spent several days playing with various combinations of images and exposures.

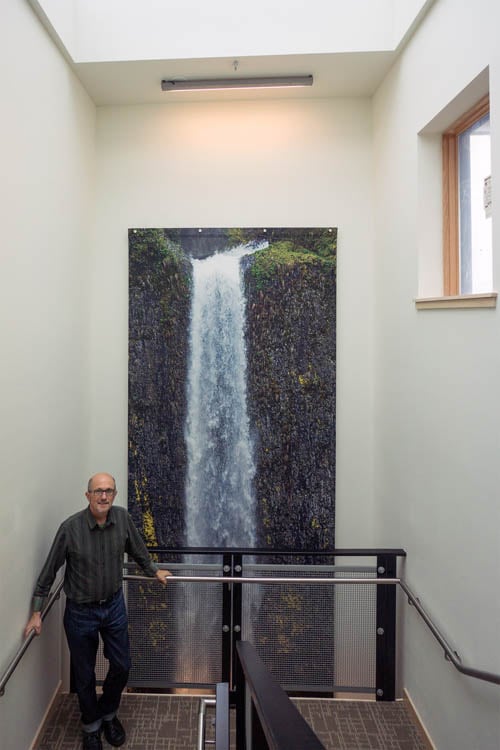
One of the oddities of this project is that no one would see all of it in normal proportions. On the upper stair landing one could see about the top 15’ of the image, on other landings another 10-12’ would be visible, but only by looking straight up or down would you see the entire image.
After thinking about it from that perspective I decided to add images taken with faster shutter speeds at the top, where more natural light would fall on the print, and add images with gradually slower speeds toward the bottom. This matched my experience at the falls, where the water fell in big, slower moving globules as it first came over the cliff and then spread into a fine, watery mist at the bottom.

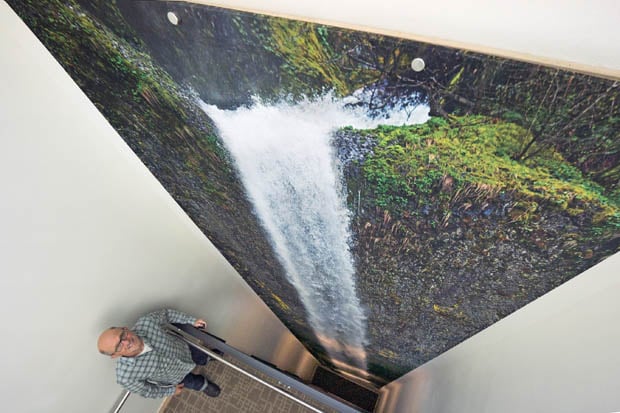
It took another few days to tweak the blending between the various layers (working with an 8GB file tends to slow down even the best computer), but in the end I had exactly what I’d envisioned from the start. Printing and installation of the final print came off without any major problems.
The entire piece is anchored only at the top and bottom, leaving it to waver in the natural air flow of the space. I’m very happy with the final work, and, most importantly, so is the client.
The next time someone tells me to think big, however, I can truthfully say I know how to do that.