How to Watch and Photograph the Total Lunar Eclipse on November 8
Aloha and welcome. You must be here because like most people, you waited until the last minute to do something. Or maybe you are just genuinely curious and had no idea there is a total lunar eclipse coming up. Whatever it is, welcome, and thanks for being here.
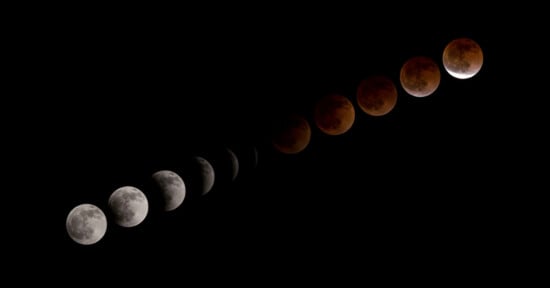
What is a “Total” Lunar Eclipse
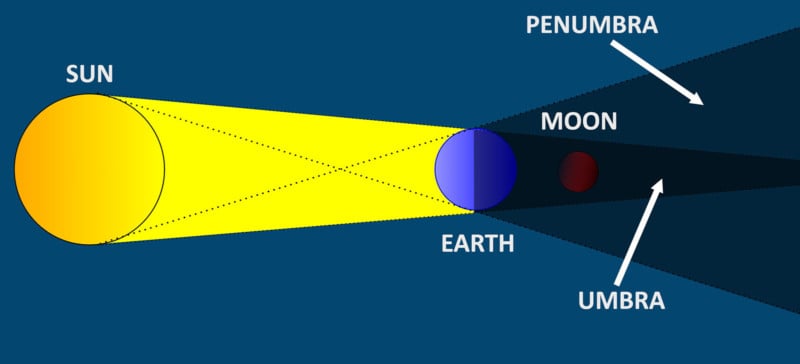
First, let’s define what a lunar eclipse is. When the Earth is positioned between the Sun and the Moon, the “shadow” of the Earth projects upon the Moon. The outer shadow is known as the penumbra and the inner shadow is known as the umbra. This alignment can vary ever so slightly as the Earth is much larger than the Moon, so three types of lunar eclipses can occur:
- Penumbral: This is where the Earth’s penumbra essentially “dims” the Moon.
- Partial: This is where the umbra starts to actually eclipse the Moon.
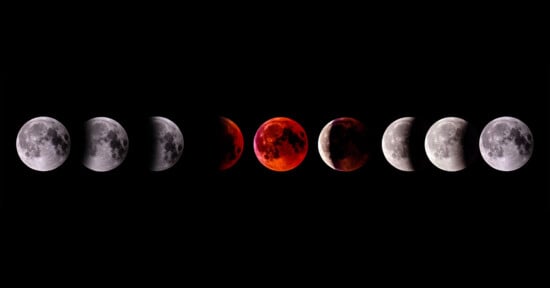
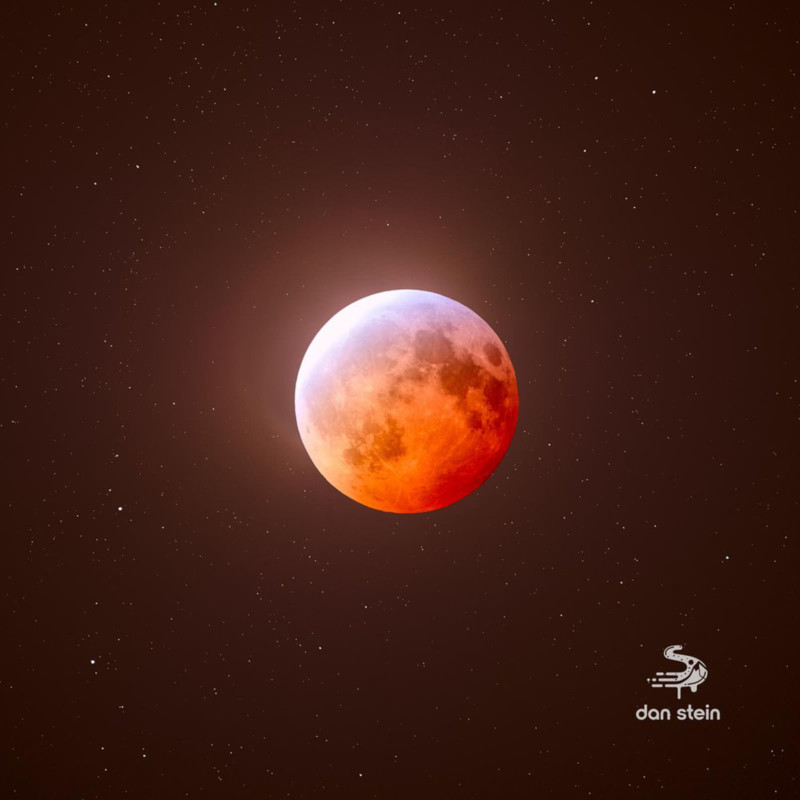
- Total: This is where the umbra completely engulfs the Moon, causing the “Blood Moon” this is the one you want and the one we are going to get on Nov 7-8. Total eclipses incorporate the penumbral and partial phases as well.
Now that you know that, let’s get to the planning.
Eclipse Visibility in Your Region
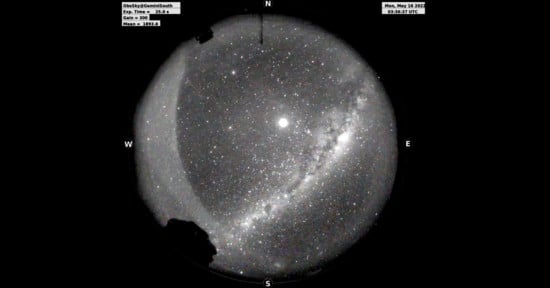
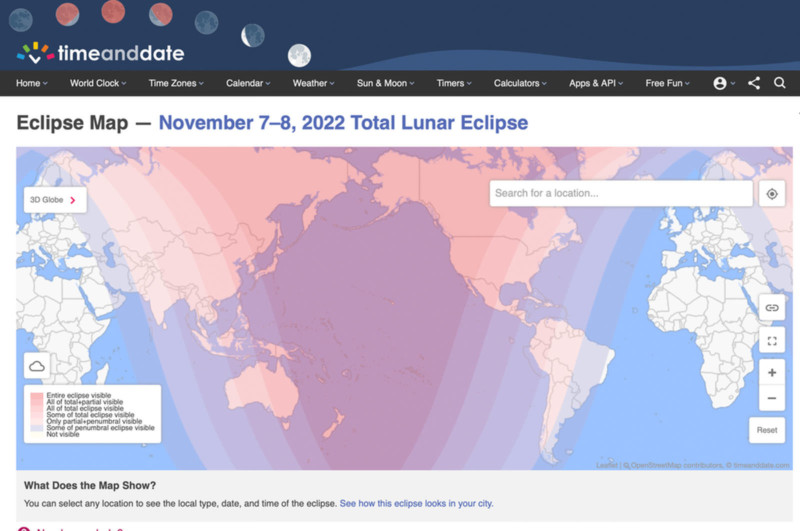
Since you may be reading this in Tokyo or maybe at a bagel shop in New Jersey, it is important to realize that the location of the Moon will be different depending on where you are located. The best way to figure out where the eclipse will be is the handy dandy nifty map on timeanddate.com.
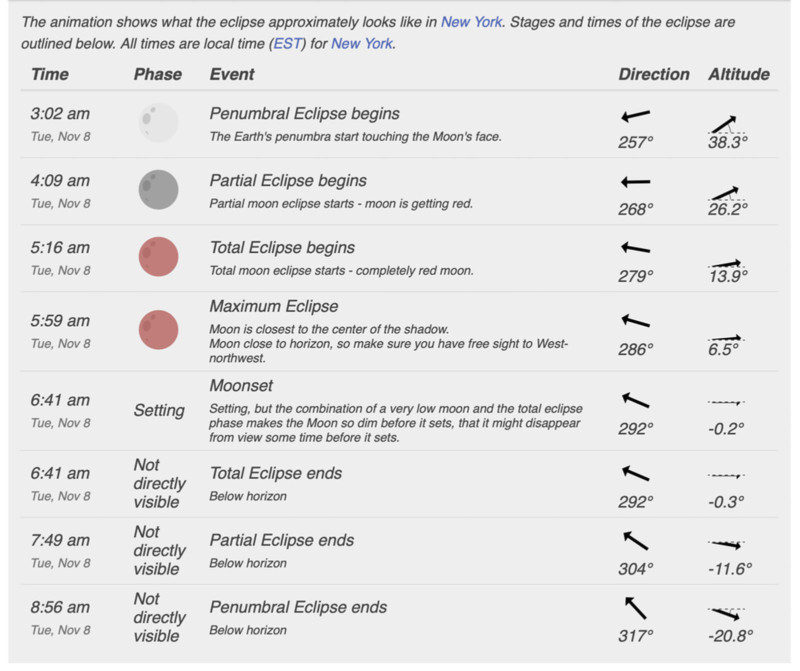
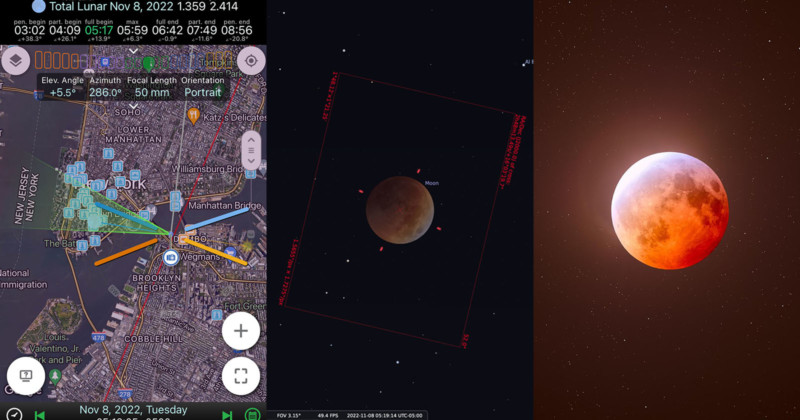
Let me explain what you are looking at here. All the times on the left are local to the location you typed in. Each timestamp represents a phase of the eclipse. As discussed above, there are a few. On the right, there are some important astronomical attributes to pay attention to.
The direction will be the location in the sky the Moon will be chilling in — the degrees represent north, south, east, and west. In astronomy, this is known as the azimuth. If you pull up the compass app on your phone you can match the degree markings on time and date to the cardinal point they correspond to. The altitude will be how high the Moon is above, and also below, the horizon.
So in my example, the Blood Moon will occur at 5:16 local time due 279º west. As the eclipse continues, the Moon will actually start setting low on the horizon.
Weather
Here we go: the most frustrating thing ever in the world of astronomy. Since this article is being published so last-minute, you can bet that the weather sources will be pretty accurate for eclipse day. My recommendations for weather sources are your region’s federally funded entities. For me, that would be the National Weather Service. It still would not hurt to cross-check your weather with an additional source such as Astrospheric. Type in your location and see what you have.
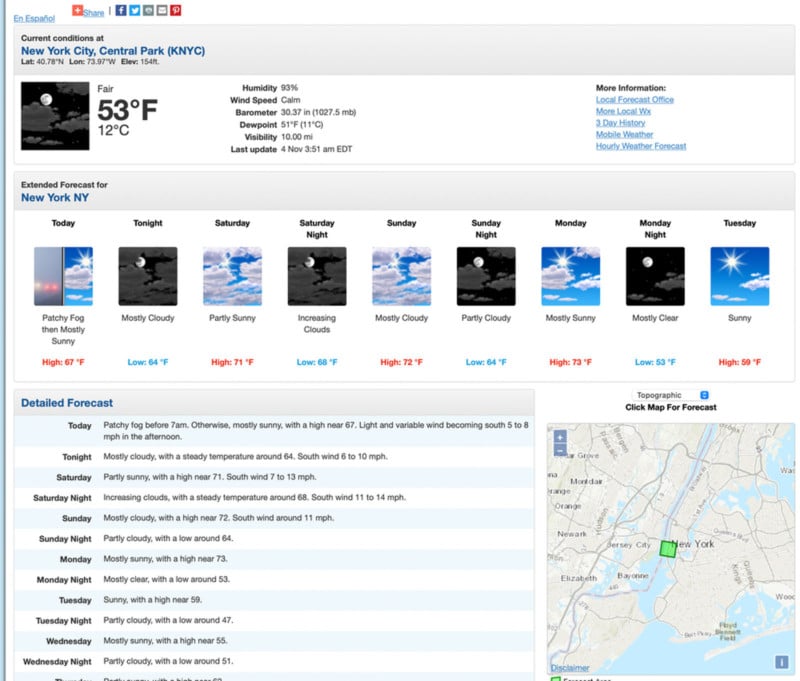
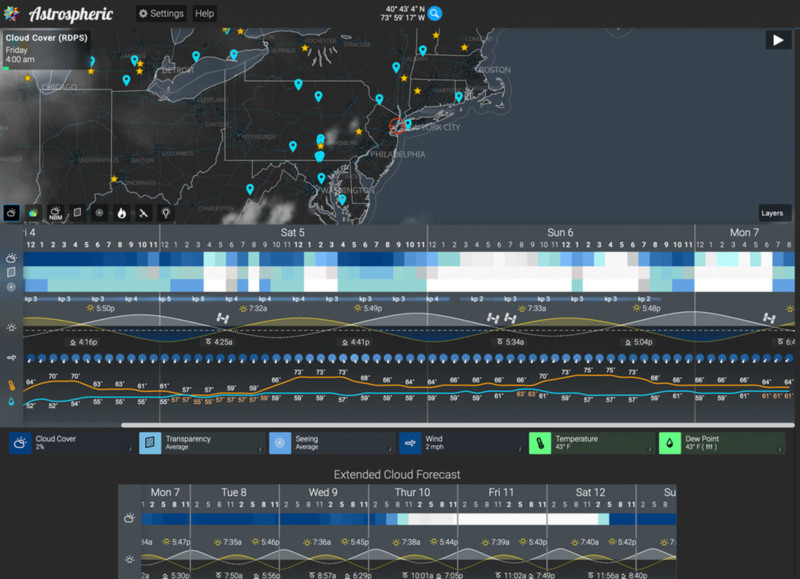
Keep an eye on the weather and have a backup plan if it changes!
If all you want to do is view the eclipse, you are all set. This next portion will be dedicated to those with those shiny camera thingies.
Shooting the Total Lunar Eclipse
Photographers, you need a few things you are most likely already familiar with to make some magic.
- Your camera and whatever lens you have (it can be wide or it can be telephoto — it just depends on what kind of shot you want)
- A good sturdy tripod
- A remote trigger or your camera’s built-in self-timer function
- Optional: a star tracker
And that is mainly it, now let’s talk about how you can plan this shot using the tools discussed above as well as an app like Planit Pro or PhotoPills.
Compositions
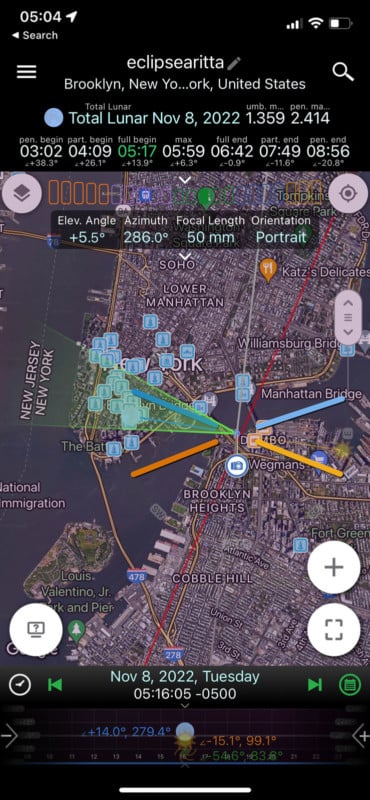
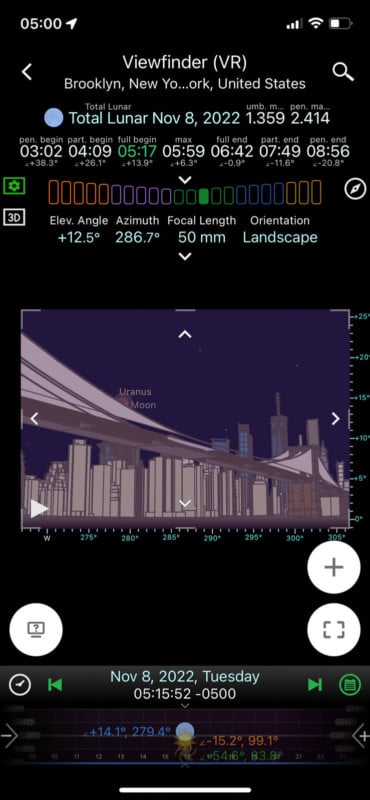
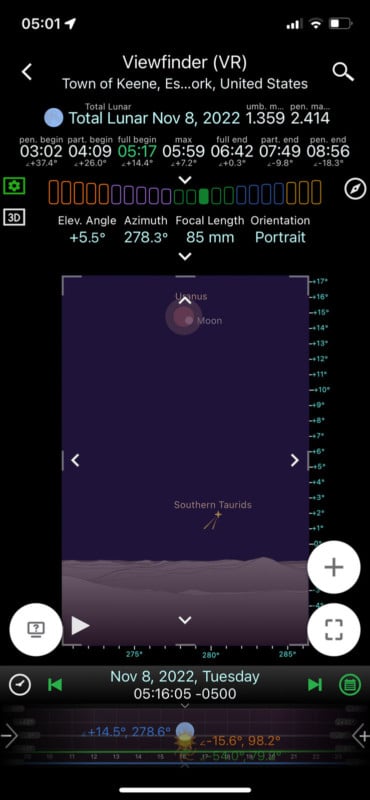
After figuring out where the eclipse is in your sky, you may want to think about how you want to shoot it before you even drive out to the location. In my scenario, the eclipse is low on the horizon, so my goal is to pair the Moon juxtaposed with a landscape feature. This means shooting a little bit wider and trying to capture a foreground all in one shot. I can use Planit to figure this out, now watch this drive:
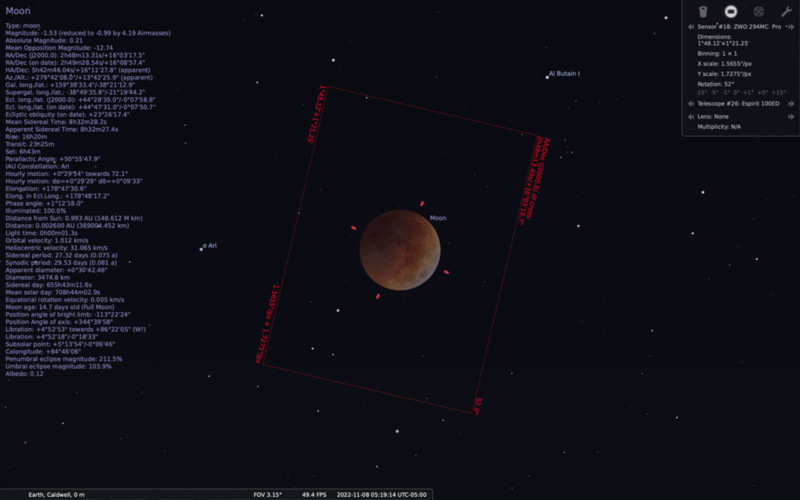
Next onto the full disc image. This is where using a free tool like Stellarium is nifty. You can punch in your camera lens, sensor size, etc, and know exactly how large the Moon will appear in the sky, coupled with all the other details above like altitude and azimuth.
Okay, great, your shot is planned. Now how do you shoot it?
Shooting
Ok still gotta go fast so let’s run through a checklist of how to shoot this thing.
- Place your camera on your tripod.
- Point your camera at the Moon. I think this one should be pretty easy to find.
- Start with a reasonably fast shutter speed, say 1/250 of a second. Depending on many factors, this may be too bright or too dark, but it is a good starting point as the Moon moves very quickly and we want to freeze the motion.
- Start by adjusting your aperture to its widest.
- Compensate with the ISO to achieve a median exposure on the histogram.
- Shoot and see what you get. The Moon’s edges also show some chromatic aberration, so if you notice a significant amount then stop down to a narrower aperture. Then, use the ISO to compensate.
- Shoot as many shots as possible. Stacking is ideal here for more detail.
- Vary your shutter speed enough so you can ensure you have captured enough details for post-processing as well as compensation for under/overexposure.
- Landscape photographers may need to also shoot an additional shot with a long shutter speed and low ISO to capture detail in the foreground which can be masked in post.
Now let’s do it with a tracker:
This is a more advanced technique, so if you have no idea what this is, just ignore it. Star trackers also have a Lunar mode, depending on the make. You will want to use this. Follow the same steps as above, but this time align your tracker and:
- You can most likely drop your ISO down pretty low.
- Your shutter speeds may vary between 10 seconds to 1 minute depending on your focal length, and polar alignment accuracy.
- Because of the tracker advantage, use the most ideal aperture for your lens. Many have a sweet spot around f/8 or f/11 to achieve maximum sharpness.
- Shoot as many frames as possible so you can stack.
- For landscape photographers, turn the tracker off and shoot another shot for your foreground as it will be blurry from the tracker exposure.
Holy smokes, is that it? Yeah, that is it. The most important thing here is to enjoy yourself. Lunar eclipses are a magical experience and if you are struggling with your camera or getting frustrated, put it down. Watch and observe what the universe can do.
P.S. If you enjoyed this article, be sure to check out my complete guide to astrophotography.
About the author: Daniel J. Stein is a passionate nightscape photographer working full-time in New Jersey in his family’s commercial plumbing contracting business. The opinions expressed in this article are solely those of the author. You can find more of Stein’s work on his website and Instagram. This article was also published here.