35+ Rules and Guiding Principles in Photography

A primary question in photography is, “What is composition”? Photo composition governs the manner in which our eyes travel through an image. It defines how objects within an image are placed relative to each other in such a way that generates visual excitement. Used correctly, it transforms the ordinary into the extraordinary.
The term “unbreakable rule” is an oxymoron at best. If rules are made to be broken, then why do we have them? However, my favorite quote about them is as follows: “Rules are for the obedience of fools and the guidance of wise men.” In photography, our rules are important, yet at the same time unimportant. A great image surpasses all rules, yet sometimes a broken rule completely destroys a photo.
In photography, we have two rather distinct levels of rules. Some are guides. Others are suggestions. Some are major. Others are minor. The issue is that we do not really know which ones are which. Only the end result, the photo, determines if the rule was important. However, the approach of the amateur differs from that of the experienced photographer. The novice should study the masters, review the rules, and see when their rejection makes the image.
Rules Perhaps Left Unbroken
The first category consists of rules that should perhaps never be broken, or at best, sparingly. These are rules that relate to infractions that somehow jump out of a photo and cry “snapshot.”
1. White balance, Image Sharpness, and Proper Exposure. These are critical!
2. Straight Horizon Line: Thirty degrees crooked can be fine, but three degrees off is always bad.

3. Separate Subject From Background: This is done by either utilizing depth of field or exposure density.
4. Border Patrol: As you finish post-processing, survey around the border of your photo. Are there any distractions there? Content Aware them away.

5. Overly Strong Post-Processing: The entire photo need not have strong changes. Use a layer mask, and paint in non-affected areas from the original. This is especially true for faces.

6. Hands and Feet Whether animal or human, if you show knees or elbows, you better show feet and hands.

7. Travel into the Photo: If the subject is running, sailing, or traveling, simply make sure it is in the direction towards the center of the image. A photo where the subject is leaving the image simply says the area behind the moving subject is not that important.
8. Selective Color: As Scott Kelby says, “Nothing says 1980 like selective color.” The point here is that just because Photoshop allows one to use selective color does not mean it is a good idea to do so. It is simply dated.

9. Square Things Up: When the geometry of buildings is a key to your photo, make sure parallel lines remain parallel. As with horizon lines, a little off is usually bad, but way off is acceptable.

Techniques or Guidelines to Always Consider
This second list consists more of a series of established techniques rather than rules. These are guides and approaches that are pleasing to the eye. They are not a must, but understanding their power and influence is essential for any photographer.
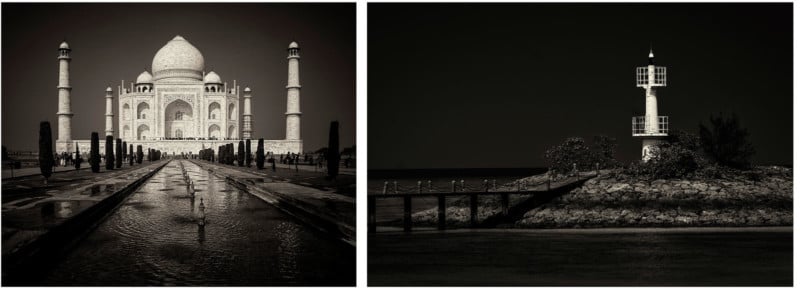
10. Rule of Thirds: The rule of thirds gives the photo a place to breathe, yet some photos cry out to be centered.
11. Horizon Line: Keep the horizon line of your photo away from the middle of the image. Place it on the first or second guideline from the Rule of Thirds.

12. Rule of Odds: Three objects in a photo are helpful in preventing the viewer from dividing the image into halves.

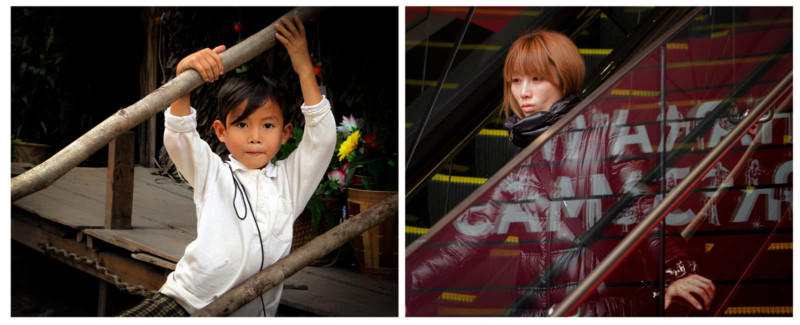
13. Point of View: Normally the point of view is directed straight at the subject. Altering it forces the viewer’s brain to actively focus which creates an added interest in the photo.
14. Leading Lines: Have your major lines lead the viewer to the subject rather than branch away from the point of interest.

15. Symmetry: Providing symmetry in a strange way actually tricks the viewer into seeing two related images, which increases the strength of the photo.

16. Fill the Frame: All areas of the image should complement or enhance the subject.

17. Balancing Elements: With photos that involve an off-centered subject, place something in the vacant section of the photo to enhance or balance the photo.

18. Left to Right: This is one of those subtle suggestions that as we in the West read from left to right, the action in our photos should also go from left to right.
19. Patterns: In photos where the subject is basically geometric, make sure the lines and angles again complement each other.
20. Children: The rule here is simple. Hit a knee! Eye-level with an adult is different from that of a child. Shooting down at children is usually bad unless it is exaggerated.

21. Backgrounds: Always be aware of your backgrounds. Strange colors, out of place objects, and misdirected light can distract the focus away from the subject. The purpose of the background is to complement and draw attention solely to the subject.

22. Framing: Whether with a scene or a portrait, sometimes careful framing can bring the eyes of the viewer directly to the focus of the photo.

23. Depth or Flatness in the Image: The problem is when neither is obtained.

24. Centering the Dominant Eye: If the dominant eye is centered in the image, it gives the effect that the subject is following the viewer around the room.

25. Cropping: Many photos, like those involving sports, require a tight crop. The emotions and actions are the keys to these photos, so crop tight.
26. Control of Colors: Be aware of colors as you shoot. Coordinate the colors in the image. Learn what colors work together and which do not. On the color wheel, opposite colors are complementary and work well together.

27. Geometry: The creative use of geometric shapes in a photo helps create dynamic tension between the subject and the background. However, do not overdo it!

28. Juxtaposition: This is when the photographer uses two items together within an image to illustrate contrast or similarities.

29. The Quest for Emotion: Emotion is what separates the smile from the human condition. It should always be the ultimate goal.

30. Simplicity: Many times the photographer can overthink the process, and the result becomes confused. Sometimes the best is “simply simple.”

31. Having Fun: Look for those unique aspects of culture that serve to make people laugh.
32. World without Color: Seeing your surroundings in Black and White with the absence of color allows an inner beauty to come to the forefront. Sometimes color can conceal the true nature of an image. B&W facilitates the return to the early days of photography.
33. Diagonal Lines: They help create interest as they provide avenues for the eye to travel through the image. They also add a feeling of action which makes the image more dramatic.
34. Negative Space: There is a large portion of empty area surrounding the main subject which aids in highlighting the important positive space. Together, negative space and positive space define the image.

35. Sun Behind You: In the early days of film photography, when all one had was a camera with a set meter and slow film, this was perhaps the golden rule. However, now the reverse is probably true. Today for portraits or scenic shots, the photographer generally wants open shade or the sun on an angle. With careful utilization of post-processing, one should not be afraid of having the sun behind you. Highlights can be controlled and shadows opened.

Some Subjects Better left Unphotographed
There are some subjects that we all shoot that are over time better left alone. This is something Scott Kelby talks about in relation to railroad tracks, dogs, and street people. The reason for the first two is perhaps simply because they are shot so often. However, while shooting people down on their luck, the question is more related to a sense of intrusion and respect. They are also the low-hanging fruit of street photography.
When photographers take a photo of someone living on the street, they are acquiring something of value to themselves, yet leaving nothing to the poor subject. Personally, this is something I do at times only after interacting with the people and giving them something in return – like a meal. We get a photo, and the subject gets food.
One modern-day item can be added to the no-shoot list. This relates to people on phones! These images are definitely becoming commonplace. Every street photographer has them. They can also be added to the items that are the low-hanging fruit of street photography. Shooting someone on a phone anywhere is beyond easy. We all shoot them, but we have to realize that they are becoming visually routine.

Scott also talks about not shooting dogs or cats unless they are obviously part of an assignment. However, sometimes a picture of a canine or feline actually becomes a portrait.

Summary
Whether we consider the above as a collection of rules or techniques, they are important for all photographers to consider in the creative process. Sometimes it is only a matter of taking a few steps left or right. Those few steps, however, can be the key to a dynamic photograph.
Lastly, the paramount rule for any photographer is to study the works of others. Whether it is Ansel Adams, Dorothea Lange, or the fellow photographers in your club, it is important to see how others tackle the creative process. The greatest school of photography is an extensive collection of Photo Books. The goal is to establish your own photographic vision, and this can only be obtained by studying the visions of others.
About the author: Charles Levie is a photographer and math educator based in West Friendship, Maryland. The opinions expressed in this article are solely those of the author. You can find more of Levie’s work on his website, Facebook, Flickr, and Instagram. This article was also published here.