My Photo Backup Workflow with the 3-2-1 Rule

Whether you take your photos professionally or for fun, how many of you out there can truly say you’re are happy with your photo backup strategy? If a drive were to fail, will you lose any photos? If you have a house fire or were to be burgled, do you have a copy elsewhere?
For those of you that don’t know, I am an IT professional and with the help of my team, we manage large enterprise-grade storage systems with petabytes of creative data and I have to ensure this data is backed up. I am employed to ensure all of this data is fully secured, redundant, and protected from all types of threats and I take this incredibly seriously as I know without data, no company can function.
Just as my company’s data is important to them, my photos are important to me so I employ a similar approach to ensure my pictures are protected throughout my own workflow allowing me to sleep easy at night knowing my most treasured data is safe and secure.
I get it. Getting your backup processes in place is a bit boring and not very creative but the more seriously you take your photography, the more you need to have a robust workflow in place. So, in this post, I want to run through my own strategy, explain a bit of the geeky jargon, and suggest a few different backup options you could adopt, depending on time and budget.
If you’re already familiar with backup technologies and jargon and want to skip directly to my backup workflow, click here. Otherwise, feel free to read on.
The 3-2-1 Backup Rule

You can’t research photo backup strategies online without coming across references to the 3-2-1 backup strategy. Put simply, the 3-2-1 backup strategy provides an easy-to-remember approach to how many copies of your data you should have and where those copies should be stored in order to protect against the most likely threats to your photos such as drive failure and house fire, etc.
Before we get stuck in, it’s worth noting that there is no such thing as a perfect backup system. It is impossible to predict and protect against all possible eventualities but this is a great starting point for anyone be it individuals or small businesses to get a solid workflow in place in order to protect their photos.
3 (copies of your data)
Including your working copy of data, it is recommended to have at least 3 separate copies of your photos. Why 3 copies? 3 copies are the minimum number needed to be able to fully adhere to this 3-2-1 strategy. You will see why as get to the following points but it’s important to note that having 3 copies is just the minimum, which means you really don’t have to stop there. If you can manage more, and it gives you extra peace of mind then go ahead and create more but just be careful around creating an overly complex system as you’ll read a little later, keeping things simple is the name of the game here.
2 (different media or hard drives)
This point is important to avoid what we in the business call a “single point of failure” which means the last thing you want to do is store all copies of your photos on the same drive, only for that drive to fail and take all your photos with it. So, what you should do is ensure that all three of your copies of data are stored on separate devices so that if one fails, the remaining copies are completely unaffected.
1 (copy of your photos in another location)
So far, you’ve created 3 copies of your data and stored them across separate, individual hard drives but all of that means nothing if they are all sitting on the same shelf when a nasty burglar breaks into your home and takes all of your valuable electronics, including all copies of your photos. It’s for this reason, it is recommended to have at least one copy of your data in another location. This might seem a little difficult to achieve but I run through a few simple options further down in this article.

Let’s Break Down the Jargon
As much as I want to keep this post as simple and jargon-free as possible, there’s no way to fully avoid including some of the technical components involved in creating a good photo backup workflow so to help those less familiar, I have tried to explain some of these in the simplest way I know.
What’s an internal hard drive? (Internal HDD)
When referring to internal storage, this means the hard drive which is installed inside your laptop or desktop computer. When you buy a new computer, you normally choose the capacity in either gigabytes/terabytes, and when you save files onto your computer’s desktop or “My Documents” folder, that is normally stored on your built-in/internal storage.
What’s an external hard drive? (External HDD)
To expand your computer’s storage capacity, you can buy external drives that plug into your computer’s USB, USB-C, or Thunderbolt port. These days, external drives come in in terabytes rather than gigabytes.
HDD (hard drive) vs SSD (solid-state drive)
Although I don’t really talk too much about SSDs in this article, it is worth knowing the difference when deciding which to buy. Here’s a simple comparison.
- HDD: Hard drives are an older technology and with a spinning drive inside, are more prone to physical failure but being an older and more developed technology, they currently have more capacity and cheaper to buy. With the advantage of being able to store more data, HDDs are still the go-to technology for backing up your data.
- SSD: Solid-state drives are the modern equivalent to the HDD. The main advantages are that they read and write much faster and with no moving internal parts, are less prone to failure. The downside is that for now at least, SSDs are considerably more expensive than HDDs. With less capacity, SSDs are not widely used for high capacity backup locations but rather with their superior read/write speed, they are more commonly used as a computer’s main drive where speed is much more important than capacity.
What’s a NAS? (Network Attached Storage)
NAS stands for Network Attached Storage and that’s essentially what it is. Instead of having your files and folders on a locally attached drive that only one computer can access at a time, a NAS can store your files somewhere on your home or office network and providing they have access, anyone on your network can edit and store files on it.
What’s RAID? (Redundant Array of Inexpensive Disks or Drives)
This is where things get a little technical but stay with me here. Most people do not need to know how a RAID works but when you buy a NAS which can hold multiple drives, you have the option to configure the drives in a way that means your data will be protected even if you suffer a failed drive. The two most common options to use are either a RAID5 or RAID6.
- RAID5 – This option protects you against a single drive failing but of the two means you have more usable space on the RAID to store your files.
- RAID6 – With this option, you can lose up to 2 drives and your data will still be safe so it is more resilient but the trade-off is that it will eat into your useable space on the RAID meaning not as much space to store your photos and other data.
So, depending on how much space you need and the size of the drives you can afford, you need to choose the best option that fits your needs from a capacity and protection point of view.
What’s Cloud Storage?
Simply put, cloud storage is a place on the internet where you can store your photos and other data away from your home and as long as you have a good internet connection you can essentially access your files from anywhere. You can get a small amount of space for free with services like Gmail or Outlook but if you take lots of photos and want to store them in the cloud, then you may need to pay for the amount of space you need. Although paid cloud storage services tend to require a monthly subscription, these days it can be pretty inexpensive.
In addition to services that just offer space to store your files, there are also dedicated cloud backup services such as Backblaze and Carbonite, etc. These will install software on your computer and automatically upload your files to the cloud for you. Each offers different options so these should be studied carefully to make sure they fit your individual needs.
How I Backup My Photos
Hopefully, you are still with me and I didn’t bore you too much so far but what I want to do now is run though how I backup my photos. I won’t go into too much detail and to avoid too many words, I have created a simple diagram for you but if you need me to expand on anything I talk about here, just pop a question below in the comments.
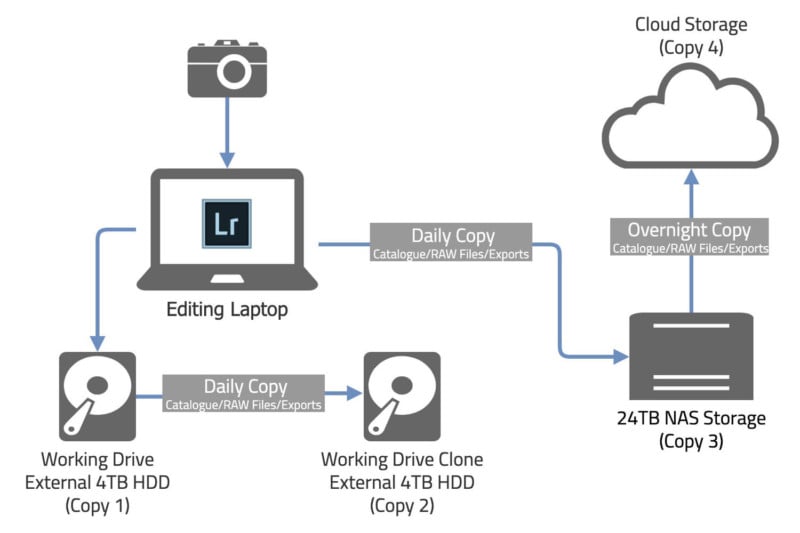
Although this approach follows the 3-2-1 backup workflow, for my own peace of mind it goes a little further by having 4 copies on 4 devices but as I mentioned previously, the 3-2-1 backup system is a great starting point but once in place, there is nothing to stop you going further to make it even more robust. To help read the diagram above, I have summarised each copy in the process below.
Copy 1:
Once I get home after a shoot, the first thing I do is copy my photos to my working drive. This is an external 4 Terabyte Lacie Rugged hard drive (the orange and silver device you can see in the photo above) which I use to store and edit my photos.
Copy 2:
As soon as I have the photos stored on my working drive and in Lightroom, I immediately make a clone of my working drive to an exact replica 4TB Lacie Rugged drive. I clone the drive daily from that point to ensure any new edits and new photos I export are quickly protected just in case my working drive fails.
There are so many tools out there for Mac or Windows to help copy your data and as I edit on MacOS, my tool of choice is Carbon Copy Cloner. It’s inexpensive and easy to configure and importantly, it just works.
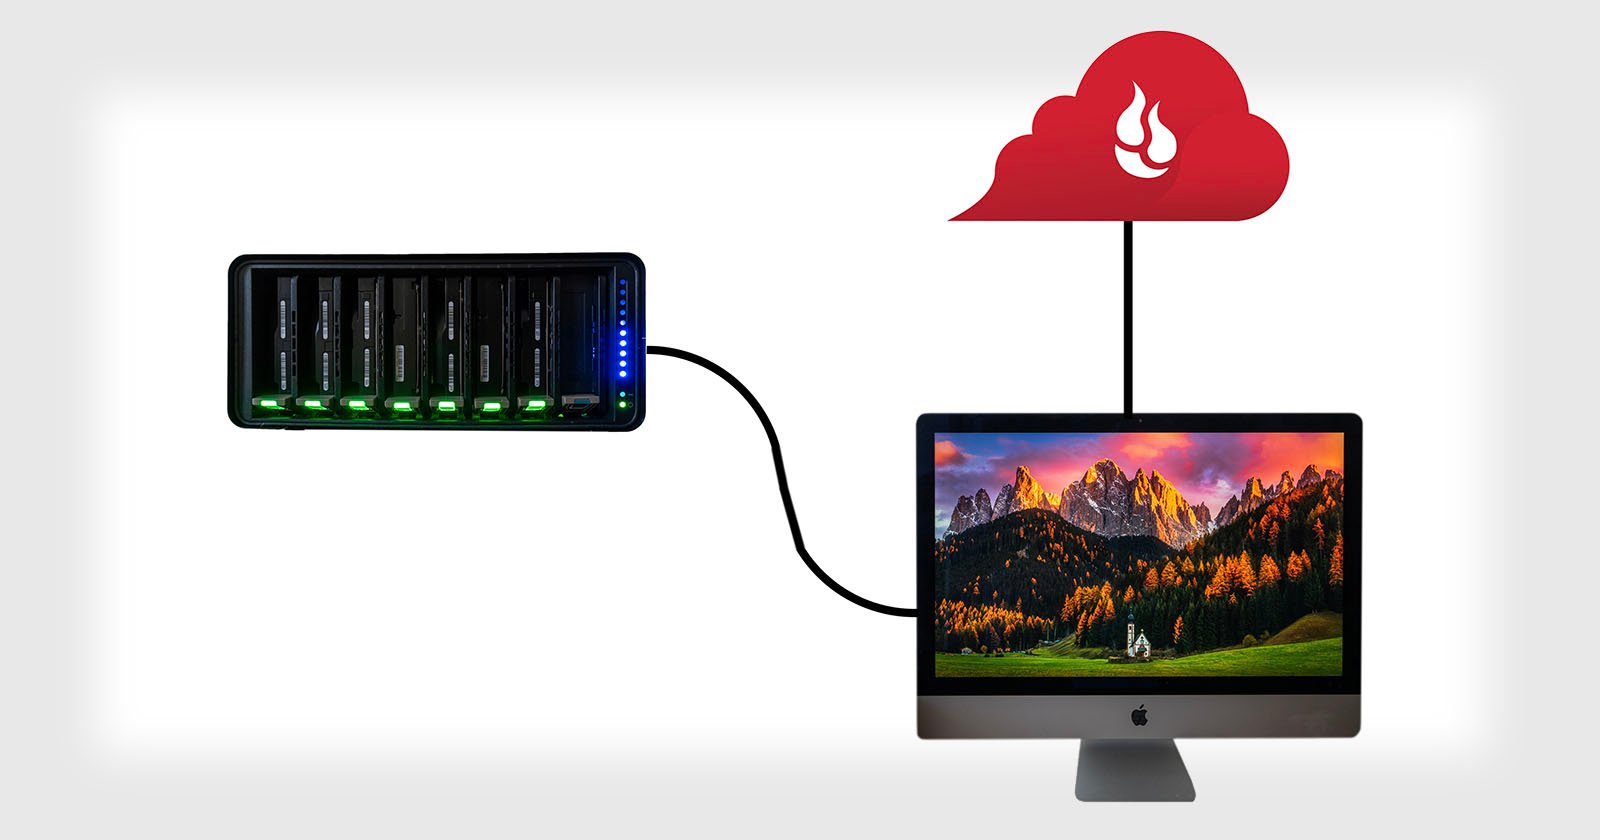
Copy 3:
Next up, using Carbon Copy Cloner, I make a daily copy over my network to my NAS storage. I use a 6 bay QNAP device with 6x 6TB (terabyte) drives installed. I have configured this as a RAID5 which means I lose the space of one of the 6TB drives resulting in 24TB of usable space on my NAS.
So, at this stage of my workflow, I now have 3 copies of my photos, and only now will I go ahead and format my memory cards that held the original photos.
Copy 4:
Copy 4 is my offsite backup. I don’t pay for a dedicated backup software but instead, utilize the 1TB of space in OneDrive I get with my Microsoft account and unlimited photo storage Amazon offers their Prime members.
Top tip: Many people subscribe to Amazon Prime and know that they offer unlimited photo storage with the subscription but what you may not know is that they count RAW files as photos too, so I automatically sync terabytes of RAW photo files with no additional costs to my standard Prime subscription.
If you own a NAS drive, take a look at the features it has as many will allow you to set up and schedule copy tasks that will sync your photos to your cloud storage automatically for you. I have a daily task that synchronizes a selection of my folders from my NAS up into OneDrive and Amazon Photos. That way, I never have to worry about forgetting to do it. The more automation you can introduce, the more reliable your backups will be.
Alternative 3-2-1 Backup Options
That was a quick run-through of my workflow and I accept with the 2x 4TB drives and the 24TB NAS, it’s not a cheap one so I have also come up with a couple of workflows below that don’t require the purchase of the NAS system but will still be robust enough to protect those precious photos following the 321 backup approach.
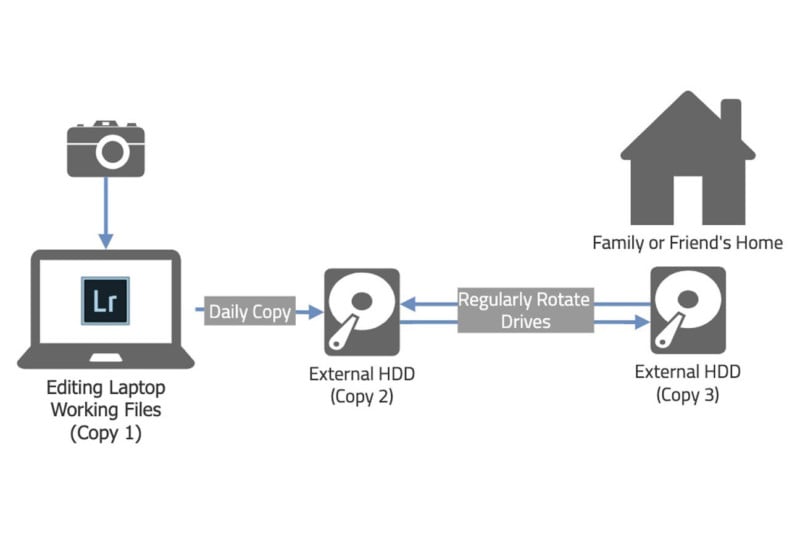
Alternative option 1 – Backup drive rotation
A fairly simple backup strategy is to make a copy of your photos onto a separate external drive and storing it at a family or friend’s home and every now and then, bringing it back to update with your new photos. This process only needs 2 or 3 backup drives which are relatively inexpensive these days (depending on how large your collection is) but is very manual so you would need to adopt a disciplined approach to ensure new photos are protected.
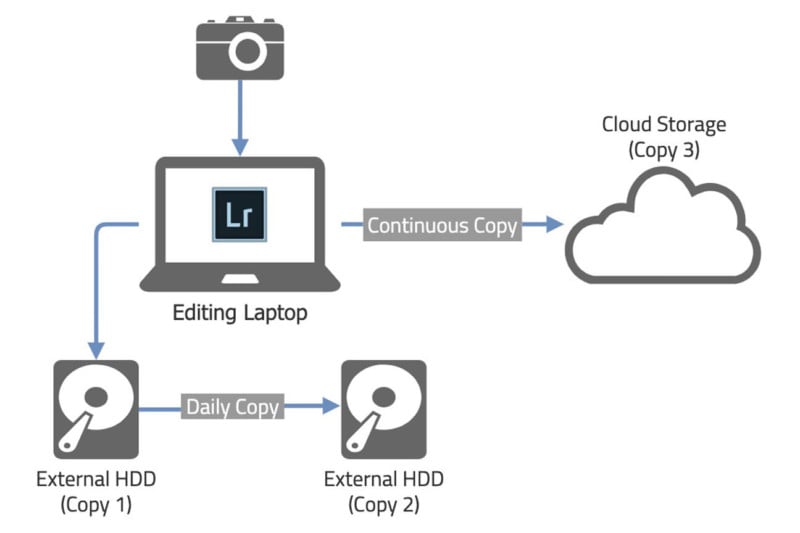
Alternative Option 2 – Cloud Backup
You can still achieve the 3-2-1 backup workflow by having a local copy on a separate external drive and a remote copy synchronized to cloud storage or an inexpensive cloud backup service such as Backblaze. This option is dependent on your internet speed and cloud storage space, especially if you want to send large amounts of data over but is a great option with a small amount of upfront cost.
The reason I suggest Backblaze is that they have an inexpensive unlimited plan which also allows you to back up a connected external drive. Many providers don’t offer this so it’s worth looking about for the best option for your needs.
Backup Workflow Top Tips
To finish up, I wanted to leave you with a few tips that may help you create and maintain a successful backup workflow.
#1. Keep your files organised
The reason this is important is that if your files are all over the place, some of them might not be included in the backup so try to keep your entire photography workflow in just one location so you know all of your precious files are safely protected.
#2. Keep it simple
Keeping your workflow simple and introducing as much automation as possible will help you stay on top of the process. If backups are time-consuming or you need to retrain yourself every time you attempt it, the reality is, it just won’t get done. Trust me, I’ve been there.
#3. Don’t just think about your photos
I have many other files that I need such as templates, fonts, spreadsheets, etc, all relating to my craft. Consider all the files you will miss if lost when choosing what data needs to be protected. Everyone’s needs are different so protect the files that are important to you.
#4. Buy enough memory cards
As I mentioned previously, I don’t wipe a memory card until the photos are protected so I need to make sure I have plenty of cards so this can happen. Cards are cheap so make sure you have enough so you’re not forced to format them until you are happy your photos are protected.
#5. Test! Test! Test!
How do you know your backups will save you if you don’t test them every now and then? Make sure you check the backups are working and on occasion restore some files so you can be confident it will all come together when you really need it.
There are many different ways to back up your photos, from the basic process of swapping drives to the more involved, technical workflows, full of automation and scripts, but the most important message I can convey is to find the right approach that suits your workflow and skillset so you can be confident that your system works and your most important photos and data are protected.
I hope you found this article useful and I was able to introduce you to a few different backup concepts (or maybe it helped you re-affirm your confidence in your existing approach).