Shooting Insect Macros on the Cheap with a Reversed Lens
If you’re looking for an inexpensive way to achieve high magnification in your photography, you need to know about the reverse lens macro photography technique. Reverse lens macro photography has allowed me to achieve the magnification I couldn’t come close to with my more expensive equipment.
In 2012, I (spent a lot of money and) purchased the Canon EF 180mm ƒ/3.5L Macro lens. A year later, I (yet again spent a lot of money and) purchased the Canon Macro Twin Lite MT-24EX. I spent years begging my husband to let me buy these two pieces of equipment. With $2,500 in shiny new toys in hand, I was ready to take my macro photography to a whole new level of pure awesomeness.
I loved my new macro setup. The 180mm macro lens was my first professional lens and I could clearly see the difference in the quality of photos I was taking (before the 180mm I was using the Canon 100mm macro lens for most of my work – I still adore that lens).
Unfortunately, my shoulder wasn’t so happy about the new load I was carrying for hours every week. I developed pretty bad tendinitis in my right shoulder (my shooting arm) and I could barely lift my arm let alone my arm plus my camera. I was carrying something like 11 pounds with my camera, the 180mm macro lens, and the macro flash. I ended up taking a break from photography for a while and starting researching new macro techniques. That’s when I came across the reverse lens technique.
Mind blown.
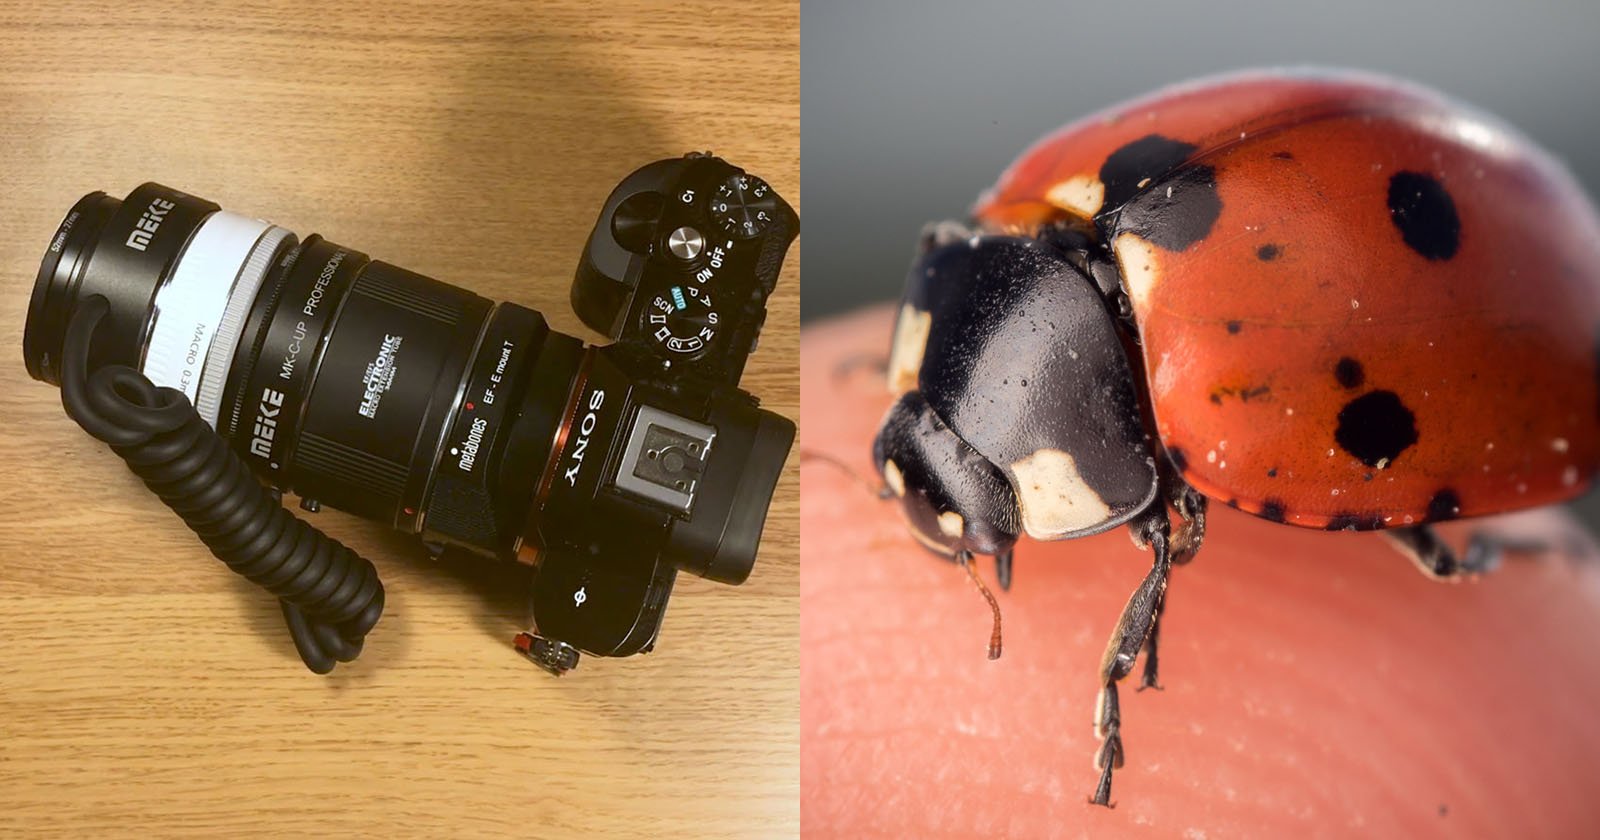
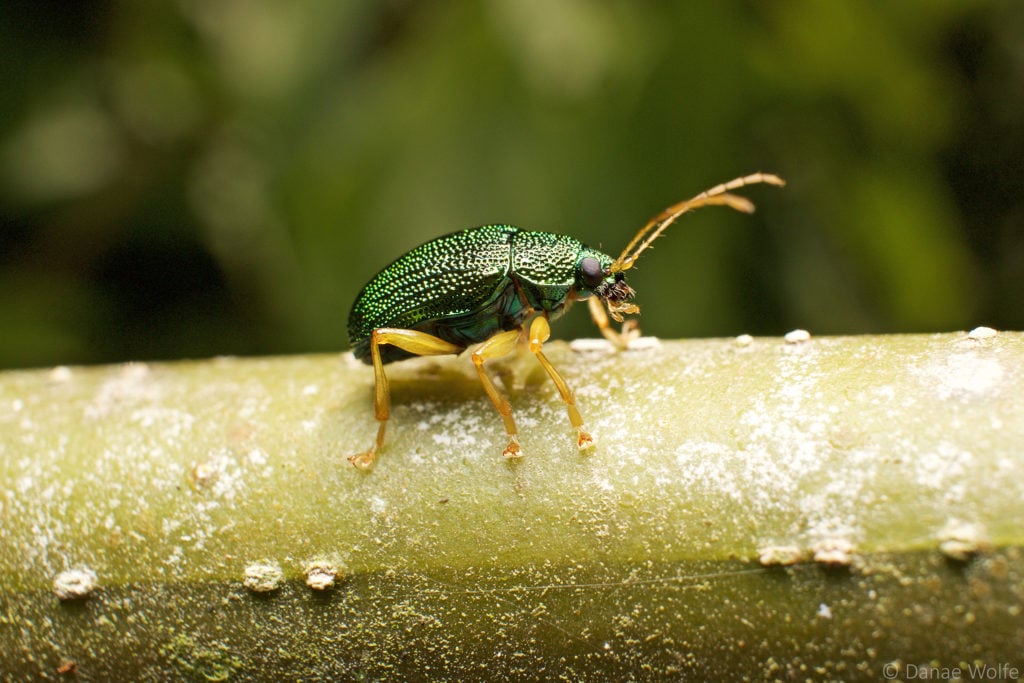
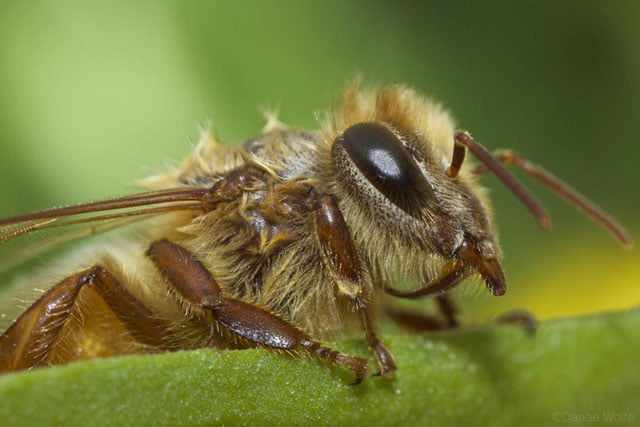
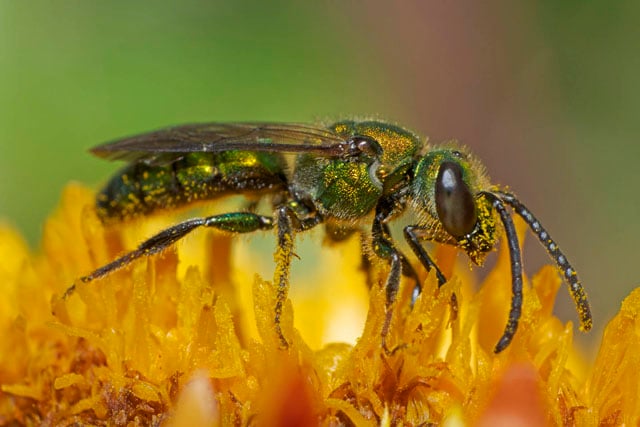
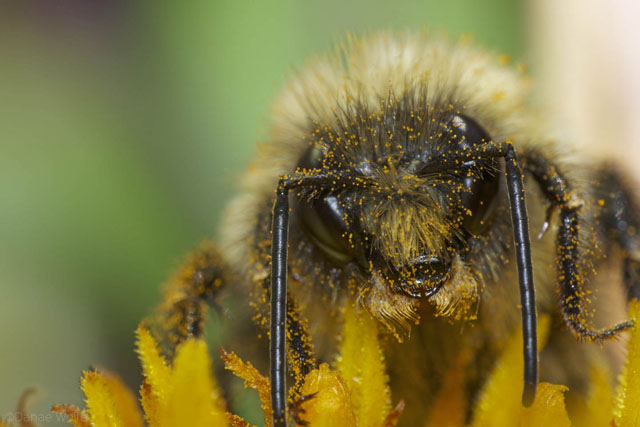
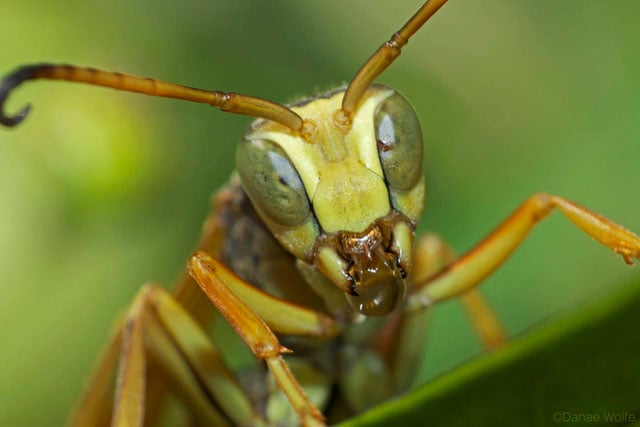
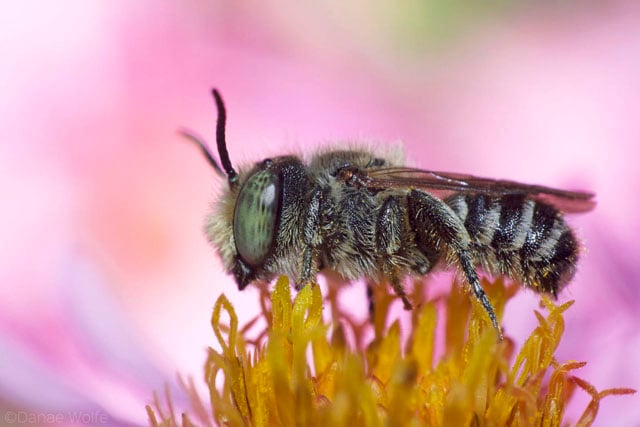
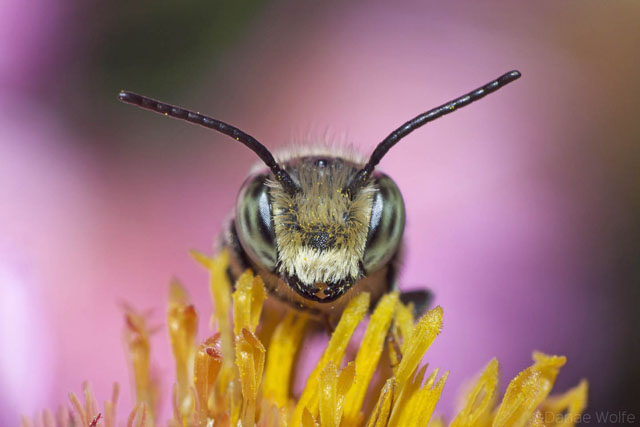
If you’re not sure whether you feel like reading any more, take a look at the photos below. I took those photos with macro setup that cost me about $50 (not including my camera).
What’s the Reverse Lens Technique?
The reverse lens technique is exactly what it sounds like. You mount your lens on your camera backwards (with a special adapter). Sounds crazy, right? With this technique you can achieve high magnification macro photography.
What Equipment is Needed?
For the reverse lens technique, you only need three pieces of equipment: your camera, a prime lens with manual aperture control, and an adapter.
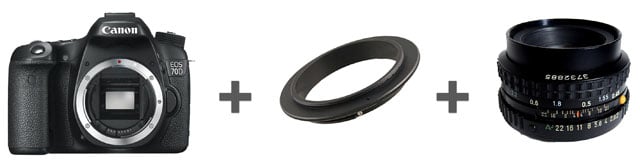
The Lens
A 50mm or 28mm prime lens with a manual aperture ring is your best choice. The wider the angle of the lens, the greater the magnification you’ll achieve when the lens is mounted backwards on the camera. Since the lens will be mounted backwards, you will NOT have electrical connectivity from the lens to camera. Because of this, you will not be able to change your aperture from the camera.
Most modern lenses do not have manual aperture rings, so you’ll probably want to look for something that was produced in the film days (you may have something stored away in a closet that you can use!).
The Adapter
The adapter you’ll need will depend on two things – your camera lens mount and the filter diameter on your lens. For example, I use a Canon 70D with an EF lens mount. The lens I use for my reverse lens photography is a Canon FD 28mm ƒ2.8 with a 55mm filter diameter. The adapter I use is a Canon EOS EF to 55mm filter diameter.
Things to Consider
If you’re like me, you may be incredibly frustrated with the reverse lens technique the first time (or first several times) you give it a shot. The technique requires some degree of patience and practice. Below are some things to keep in mind when perfecting reverse lens macro photography.
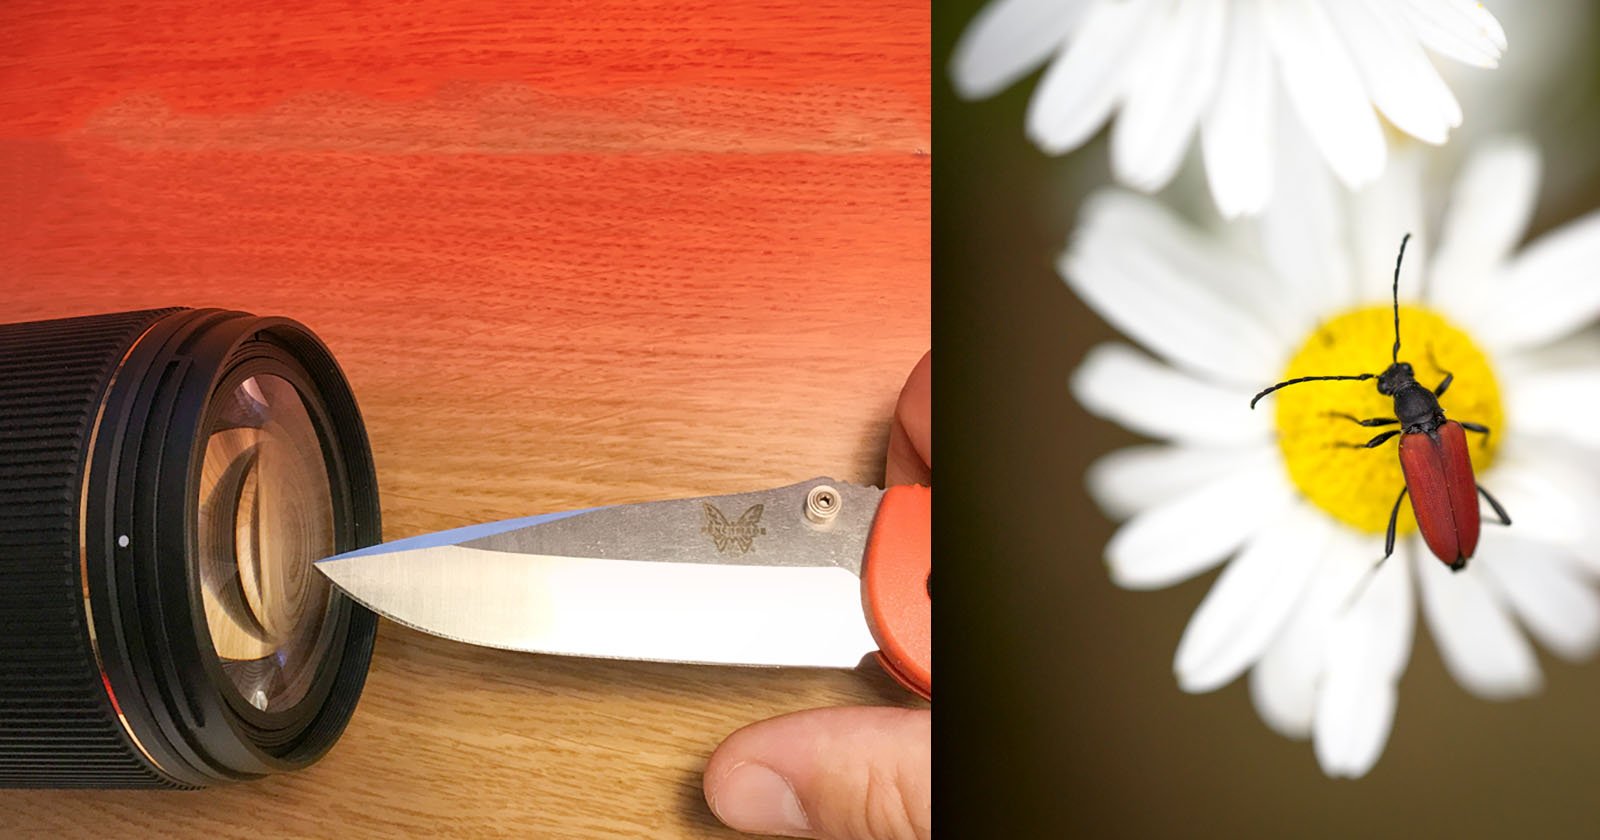
Manually Changing the Aperture
Although you can use a lens without a manual aperture ring, it’s probably not the best choice as your depth of field will be incredibly shallow (since the aperture will be wide open). Depth of field is already a challenge with the reverse lens method because you’ll need to be just inches away from your subject to achieve focus (the physically closer you are to your subject, the shallower the depth of field). You need to be able to stop down your aperture as much as the lighting conditions will allow to achieve enough depth of field to get your subject in decent focus.
Some lenses (like the Canon FD lens I’m using) do not allow you to change your aperture unless the lens is mounted to the camera. Because of this, you need to “trick” the lens into thinking it’s mounted on the camera. Check out the video below to learn how to do this. Other lenses may allow you to change the aperture without having to trick your camera. Whether or not you have to do this will depend on the lens you’re using (and there are SO many options).
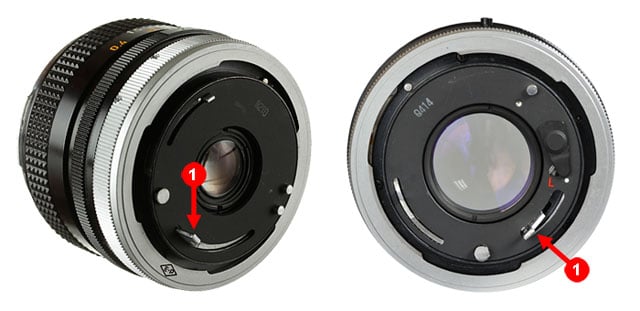
With my Canon FD lens, I’ve also noticed that in order for the aperture to stay stopped down, I need to use a little lever lock on my lens mount. Most lenses do not have a lever lock so you may need to jam the aperture lever (indicated by the number “1” in the left image below).
Here is a comparison between two Canon FD lenses, one with a lock (on the right) and one without (on the left). If you’re looking into getting a Canon FD lens, I recommend looking for one with the lever lock (indicated by the red “L”). They are difficult to come by, but you may be able to find one on Ebay or Etsy. I have an old Nikkor lens that my husband fished out of the trash a few years ago and while I have yet to use it for reverse lens photography, I’ve noticed the aperture stays stopped down without any weird hacks or lock levers.
Proximity to Subject
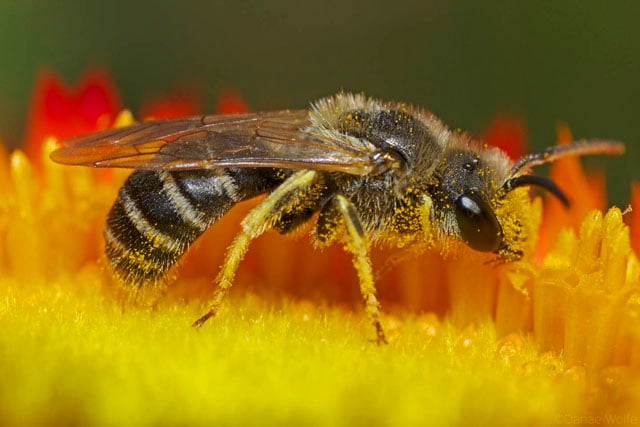
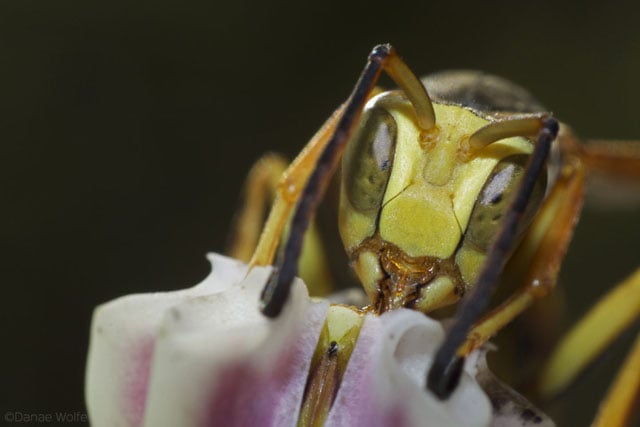
When giving photography presentations, I’m often asked how close I am to my subjects when photographing them. With a macro lens like a 180mm, I can be quite a comfortable distance from my subject and still achieve decent magnification. This is great when photographing particularly feisty insects (like baldfaced hornets). With the reverse lens technique, however, you need to be just a few inches from your subject.
Keep in mind you will NOT have infinity focus when the lens is mounted backwards so you won’t be able to switch back and forth between taking macro shots and taking shots of your adorable kids (you’ll need to switch out lenses for this). Despite the close proximity, I’ve found that I can get quite close to my subjects. Take a look at the wasp below.
Focus
We’re often used to using autofocus or manually focusing our images from the lens, but with the reverse lens technique, it’s best to physically move your entire camera back and forth until you achieve your desired focus. You’ll be moving mere millimeters so it’s not as difficult as it sounds. The littlest movements make all the difference so you may find yourself holding your breath as you press the shutter!
Lighting
As with any macro photography, lighting is always a challenge. When I first got started with reverse lens macro photography, I quickly learned that when you’re so zoomed in on your subject, an extra light source is a must. I played around with my Canon Twin Lite Macro flash, but seeing as how I couldn’t mount it on my lens, this proved cumbersome.
Out of sheer curiosity, I popped up my on-camera flash (which had previously been little more than useless). Much to my shock, the on-camera flash gave me the perfect amount of light I needed to take awesome insect and flower photos. Now the weird part… the built-in flash worked perfectly with my 28mm lens, but I’ve noticed the lighting is poor when using my 50mm lens. Try it out for yourself and see what works.
If you happen to have a camera without a built-in flash (many pro camera do away with this feature), you can try a hot-shoe flash with a diffuser and see what happens!
Handheld vs Tripod
Don’t be fooled by photographers who say the only way to get crisp macro shots is by using a tripod. All of my reverse lens work (and 99% of my work in general) is handheld. I hate tripods. I find them cumbersome and awkward. By the time you set up a tripod in the field, the insect or spider you were about to photograph is miles away.
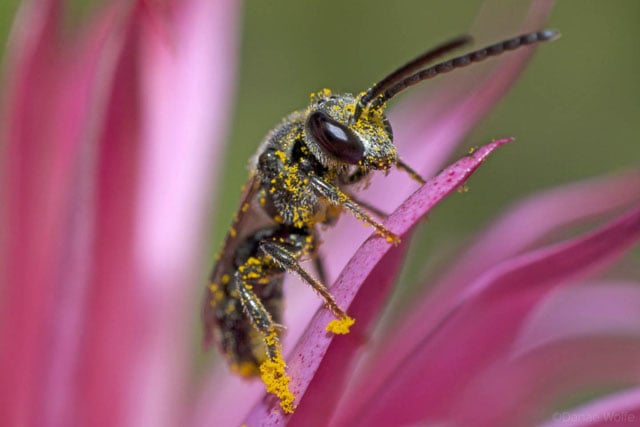
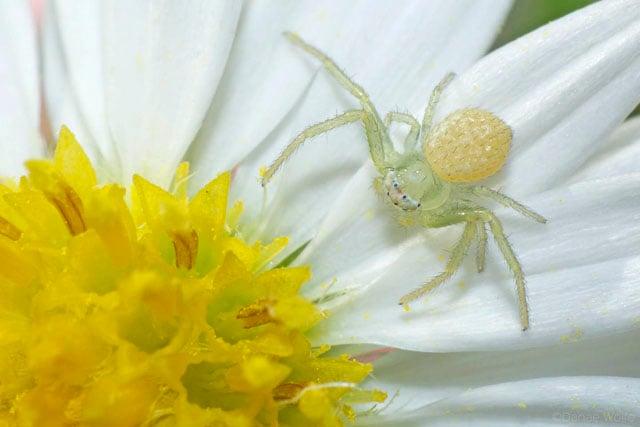
Shooting reverse lens takes some patience (and lots of practice) but you can achieve amazingly sharp photographs handholding your camera. Because of the close proximity you need to be to your subject, I find it convenient to hold my camera with one hand and use my other hand to hold my subject steady (usually a plant with a bug on it). Usually the most challenging part about this technique is ensuring my big fat fingers don’t end up in the shot.
In the shot of the crab spider below, for example, you can see my fingers in the upper left side of the photo (between the flower petals). Fortunately, had I not told you those were my fingers, you probably would have never known!
Keep in mind that the above information is based on my personal experience with the reverse lens technique. I’ve attempted to simplify the information as much as possible. Some people have great success with using their modern prime lenses (like the “nifty 50″) for reverse lens photography. While these lenses often do not have a manual aperture ring, I’ve seen amazing photographs with this set up.
There is a way to manually change the aperture on a lens without an aperture ring – this requires mounting the lens to the camera for normal shooting (i.e. not reversed), setting the desired aperture in manual mode, holding down the DOF preview button while removing the lens from the camera, and mounting the lens in the reversed position. The huge disadvantage to this method is that you must redo this entire process each time you wish to change the aperture. Removing the lens when the mirror is up and the sensor is exposed is probably not the best idea.
If you’re feeling particularly daring, you can even try to mount a reversed lens on another lens or use a combination of a reversed lens with extension tubes.