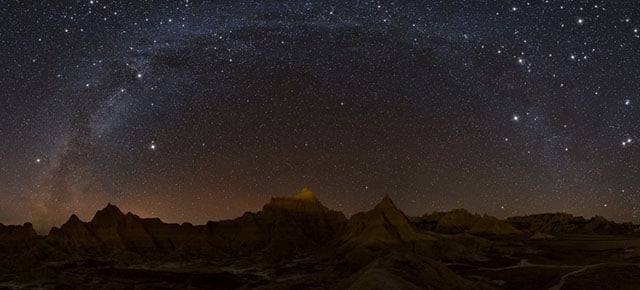
The NPF Rule: A Formula for Sharp Star Photos Every Time
A common rule of thumb to figure out your maximum shutter speed for sharp stars at night is to divide 500 by your focal length. Sometimes it’s called the 600 Rule or the 400 Rule or several other numbers that can be used depending on your sensor size. Unfortunately, it’s a a very inaccurate rule today.
The so-called 500 Rule was designed for 35mm film grain at higher ISOs; but current digital sensors far out-resolve grainy film, especially with high-megapixel count, medium format, or printing larger than 20″ x 30″. The rule doesn’t take into account pixel density, aperture, or diffraction; however, it is an easy formula to remember and calculate in your head in the field, so it is often used.
If you’re going to use this rule, I recommend subtracting 5 or 10 seconds from the result if you wish to print large from a high-resolution sensor. Or, better yet, use…
The NPF Rule
A much more complicated and accurate rule for sharp stars is: (35 x aperture + 30 x pixel pitch) ÷ focal length = shutter speed in seconds. Pixel pitch = the camera sensor’s physical width in millimeters ÷ number of pixels in width x 1000 to measure it in microns.
Don’t forget your “order of operations” from high school math class for the above formula: solve the multiplication before the addition or you won’t get the correct results!
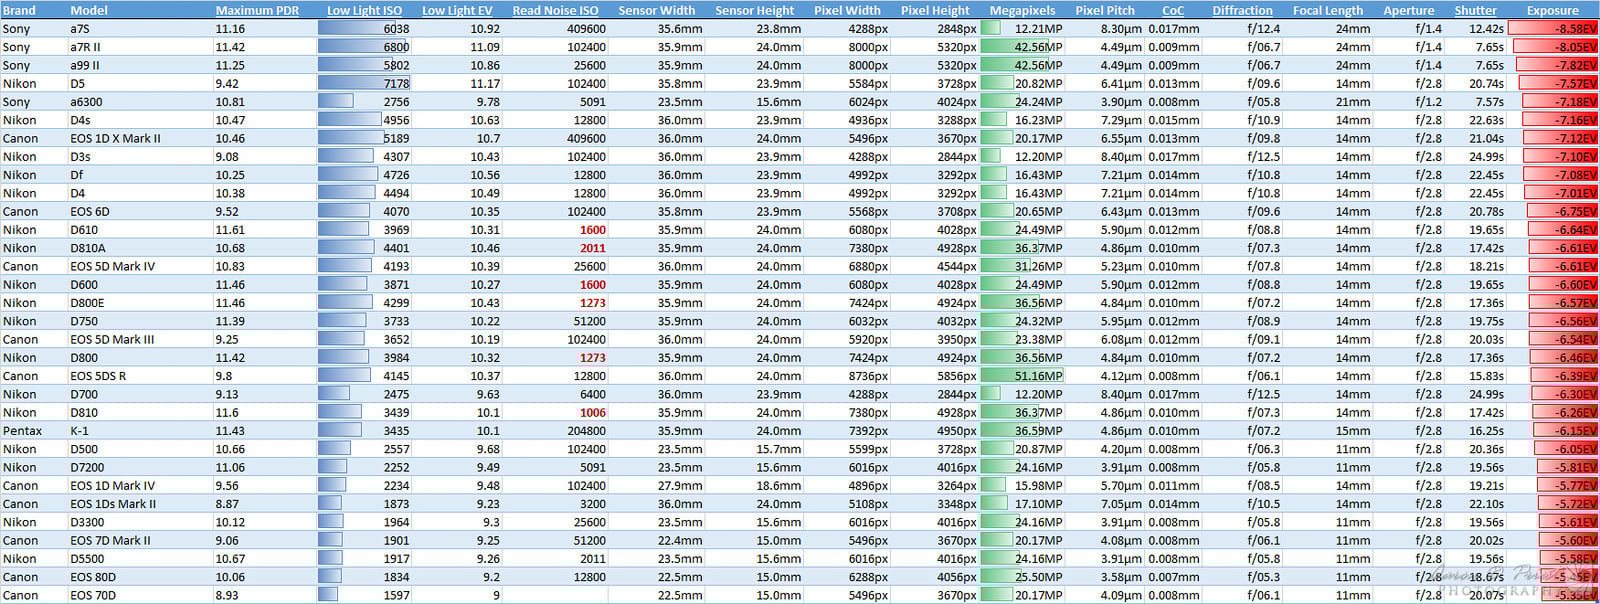
That’s a lot of mental gymnastics in the field, so I made the below spreadsheet to reference on your computer or smartphone to do the calculations for you (click to download).
Instructions
There are many more camera models in the spreadsheet than the screenshot above. You can sort or filter by brand or model by clicking the drop down arrows for each column (not shown here). By default, it is sorted by the Exposure column. Some of the column descriptions are clickable hyperlinks to their source for more information. I’ll summarize each column below…
Maximum PDR is Photographic Dynamic Range, typically at base ISO. It’s more accurate than the manufacturer’s specified claims for real world usage and editing. This gives you an idea of how much highlight recovery or shadow boosting you can get from a RAW file. A higher number is better.
Low Light ISO is the recommended highest ISO to use for the night sky with minimal noise for each camera model. You can go higher, but you’ll have to use more aggressive noise reduction techniques in post-production. Some cameras have a better low light ISO, but less dynamic range (Nikon D5 for example).
Some cameras have more dynamic range, but not as good a low light ISO (Nikon D810 or Sony a99 as examples). That being said, all three of those cameras are excellent choices for shooting the Milky Way. A few, rare camera sensors are exceptional at both high ISO and dynamic range, such as the Sony a7R II.
Low Light EV mirrors low light ISO performance when comparing cameras, and really isn’t all that useful without also taking into account focal length, aperture, and shutter speed for sharp stars, so the Exposure column will probably be of more interest for shooting the night sky.
Read Noise ISO is the highest ISO that is still capturing more photons than amp gain. It is likely to be extremely noisy, but it is useful for stacking many images to reduce noise as you are still capturing light from weak stars. You probably won’t use this high an ISO for anything except stacking, and even then you will likely prefer a lower ISO.
ISO invariance (highlighted in red): some sensors are unique in that the read noise ISO is lower than the low light ISO, this means you aren’t actually capturing more data at a higher ISO and you can boost the exposure in post-production with pretty much the same results because the lower read noise ISO has more dynamic range. The exposure and histogram will not look correct on the back of the camera, but the data is there in the RAW file.
You can also use a higher ISO and reduce the exposure in post-production to hide noise better, but you’ll be losing some dynamic range. This is called ISO invariance and there is an excellent article on the topic here. These special sensors have been marked in red in the read noise ISO column of the spreadsheet.
Sensor width and sensor height are pretty self-explanatory. These are from the manufacturer’s specifications.
Pixel width and pixel height (mostly from DxOMark) is the actual sensor resolution before demosaicing the Bayer matrix—not the somewhat smaller image resolution you will see in the RAW files. This makes the calculations for pixel pitch, circle of confusion, and shutter speeds much more accurate. Megapixels will be slighter higher than effective resolution as a result.
Pixel pitch is the camera sensor’s physical width in millimeters divided by the number of pixels in width times 1,000 to measure it in microns. It is the density of the camera sensor and the size of a single photosite.
CoC is the circle of confusion or resolving power of the camera sensor, based on the pixel density. It is the width of two photosites measured in millimeters. More megapixels in the same physical area results in more resolving power and thus a tighter circle of confusion. This is very useful for depth of field calculators when printing large or zooming in for gigapans.
Most hyperfocal and depth of field calculators assume a CoC of 0.030mm for 35mm full frame sensors, based on film grain and viewing distance, but today’s digital camera sensors are capable of resolving much more. For example, a 50MP Canon 5DS R has a true CoC of 0.008mm if you want critical sharpness when zoomed in to 100%. If you use 0.008mm in your favorite DoF calculator, such as PhotoPills, you will find a much shallower depth of field for any given aperture, and much further hyperfocal distance.
In practice, this is really extreme and doubling the true CoC will still give you fantastic results when printing large, much more so than the default 0.030mm for full frame sensors. If you want to know more about depth of field, hyperfocal distances, and circle of confusion, check out this incredible article by the PhotoPills team.
Diffraction is the aperture at which you start losing sensor resolution on a pixel level, at 100% zoom. Practically speaking, the depth of field gain from a smaller aperture than this value is usually worth the slight loss of sensor resolution unless printing very large or zooming in close for gigapans.
Focal Length and Aperture are the two fields that you will want to change to match your lens. The default values entered here are the widest lenses I could find for that lens mount to give maximum brightness for the Milky Way. It might not be the best aperture for coma though, and stopping down a little will often give you better results.
Closing the aperture a full stop will give you about a 1/3 stop increase in shutter speed time, but you’ll still be losing 2/3 stop light overall. Longer focal lengths will dramatically lower the shutter speed. Beyond 35mm on a full frame sensor will probably require stacked photos or a tracker.
Shutter is the above-mentioned NPF rule for sharp stars based on sensor size/density, recommended low light ISO, focal length, and aperture. It assumes 550nm as the average wavelength of visible light on the color spectrum and an average declination of 60°. Check out this link for more information on the math and physics behind the formula.
Exposure is the light level you are exposing for measured in EV based on the ISO, aperture, and shutter speed. The spreadsheet is sorted by this column by default from the best exposure of the night sky to the dimmest, based on the recommended maximum low light ISO and fastest lens I could find for each camera.
Because these are negative EVs you have to think in reverse. -6 to -7 EV is a good range for detailed images of the Milky Way, assuming no light pollution and no moonlight. -8 EV or lower (-9, etc.) will probably be a little over exposed, but you can lower the exposure slider in post-production to hide noise. -5 EV or higher (-4, -3, etc.) will probably be a bit too dark, but you can raise the exposure slider in post-production at the risk of introducing more noise.
With an ISO invariant sensor, you shouldn’t notice much difference between raising the ISO in camera or the exposure slider in Lightroom / Camera RAW, so you can shoot at the read noise ISO (the ones highlighted in red) for more dynamic range on those camera models instead of the low light ISO, regardless of what the measured exposure says in EV.
Data Sources
Many thanks to the following websites for most of this data:
http://photonstophotos.net
http://www.digicamdb.com
http://www.dxomark.com
https://photographylife.com/iso-invariance-explained
https://photographylife.com/what-is-diffraction-in-photography
http://www.photopills.com/articles/ultimate-guide-depth-field
http://www.sahavre.fr/tutoriels/astrophoto/34-regle-npf-temps-de-pose-pour-eviter-le-file-d-etoiles
For more information and tips about finding the Milky Way and night photography in general, check out my article on Night Sky Photography.
About the author: Aaron D. Priest is a Master Photographer with twenty years of experience in professional photography. He specializes in high-resolution HDR 360° panoramas, gigapans, and 4K timelapses of Maine. You can find more of his work on his website, or by following him on Facebook and Instagram. This post was also published here.