How to Process C-41 Color Negative Film at Home, From Start to Finish
I know there are a few guides out there for home processing, some of which were instrumental in helping me get over my fears. All of these other guides seemed to be a little incomplete and that lack of detail made me wait longer than I should have before taking the plunge. In reality, it’s easy to do your film at home. Let me show you!
The Tank
The first thing you are going to need is one of these magical things:
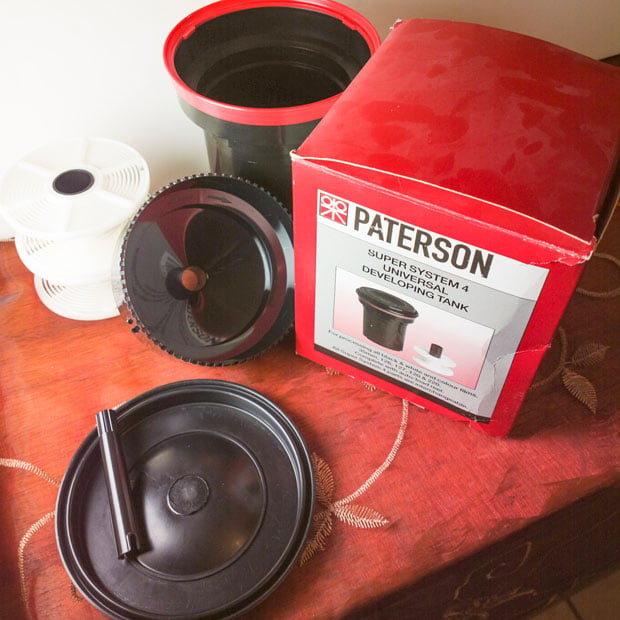
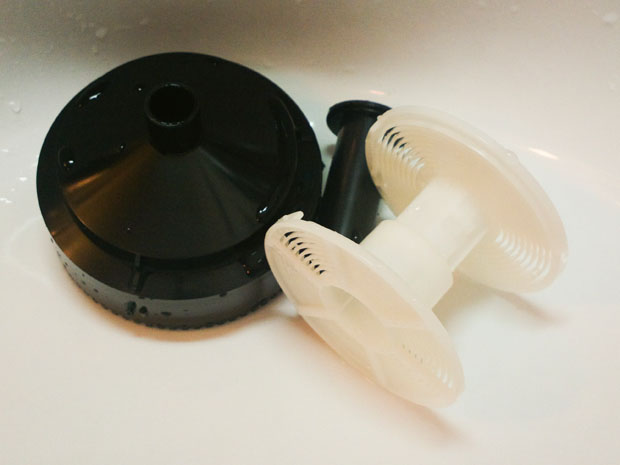
This is your ticket to daylight processing. No need for any darkness in your “darkroom” with one of these. The reels are convertible. In the small size they take 35mm film. Give one a twist and it extends to a size that takes 120 or 220 film. They fit on the central column as you can see in the picture.
So this one tank lets you do two 35mm rolls at once or one 120 or 220 roll. However, you can also process four sheets of 4×5 film at once in the tank if you remove both reels (you need to keep the central column to keep it light proof).
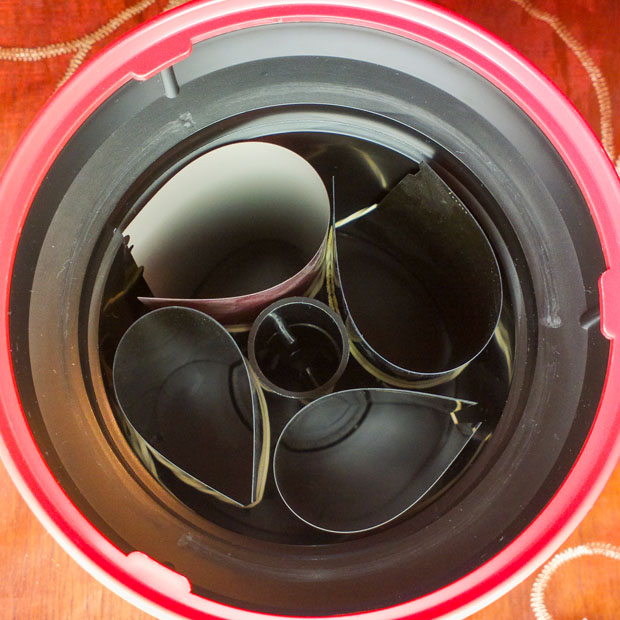
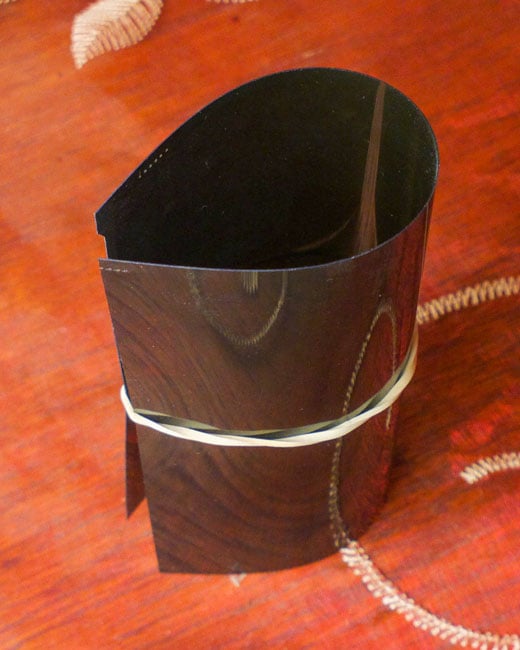
I bend them gently in half (emulsion side facing inwards) and hold the “tacos” together with a rubber band. I then arrange them around the central column.
Here is a 4×5 film “taco” and four of them arranged in the Paterson tank:
The Chemicals
Look on an online camera shop for “C-41″. You will find they sell a three chemical powder kit called a “Press Kit”.
It may be by Jobo or Tetanol or something else but but if it is a three bath powder kit selling for around $30 then that’s the one!
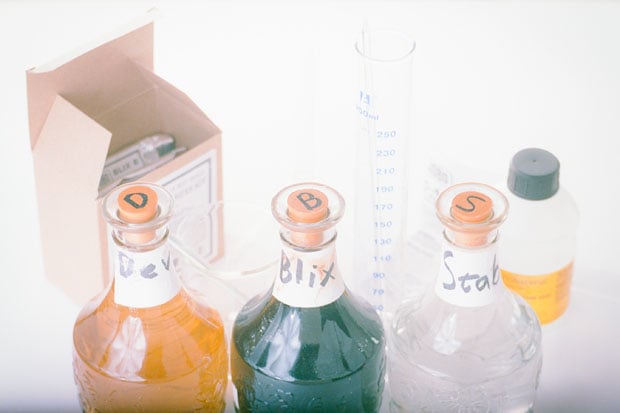
You mix up the chemistry into three containers and each will be one litre when mixed. You need airtight containers which plastic containers are not (they breath), so I recommend glass.
A narrow neck will be a big help in keeping air out and a wide base will be a big help in not tipping them over when working. In fact, you could do a lot worse than the bottles I found in a discount store locally for a few dollars brand new:
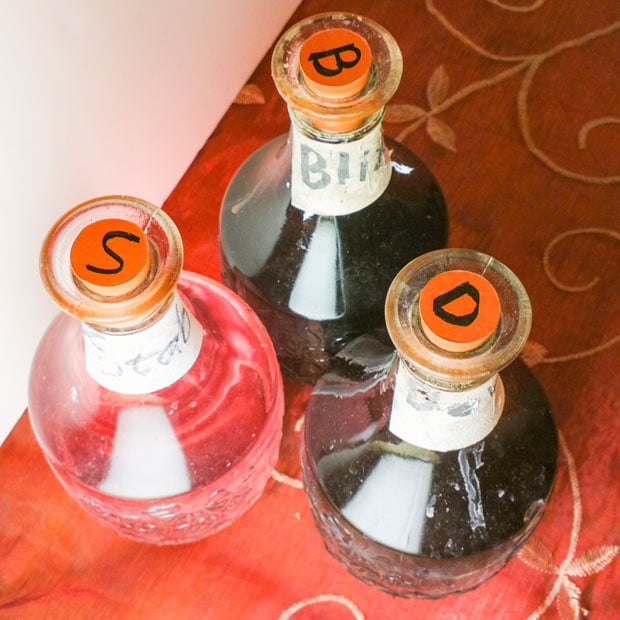
They came with some cheesy glass stoppers that were not airtight. I replaced them with some laboratory stoppers that are. You will notice that the glass is not brown or opaque. That hardly matters. I store them in boxes in a dark cupboard. Light, heat and oxygen are the enemies of your chemistry. If you can keep them airtight, cool and dark they will last longer than your nerve to keep using them! My current batch was mixed more than six months ago.
The Glassware
The next thing you need (in addition to a bathroom with a bath and sink) is a good thermometer (or two) and a good funnel. Don’t cheap out here. I must have spent close to $20 on decent lab quality thermometers and a good lab quality glass funnel. I also have two beakers that I found I didn’t need but they come in handy for holding the thermometers and funnel.
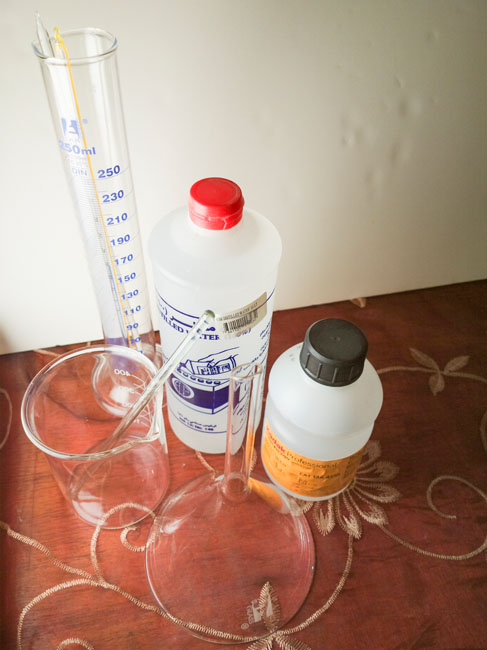
C-41 chemistry is very temperature sensitive. The whole thing should take place at 39 degrees C plus or minus 1 degree. Of this the most important stage is the Development stage. The later stages of Blix and Stabilise are not as critical. This is where your good thermometers and bathtub come in. I chose thermometers that were long (for easy use and easy reading) and that were fast. You can test this in the shop. Squeeze the bulb and as long as you are not a vampire the temperature should start going up. Let go and it should come back down. The faster this happens the better. I found these “spirit” thermometers are pretty quick.
The funnel is necessary because the chemistry is re-usable. You will be pouring the chemistry back into the bottles and you will want to do it quickly. Pretty hard without a good funnel.
The App
LabTimer. You really want this app for your iPad or something similar. Go ahead and download it while you are reading this. It’s free. Go ahead and set it up with the following four timers:
- Developer: 3:30
- Blix: 6:30
- Rinse: 3:00
- Stabiliser: 1:30
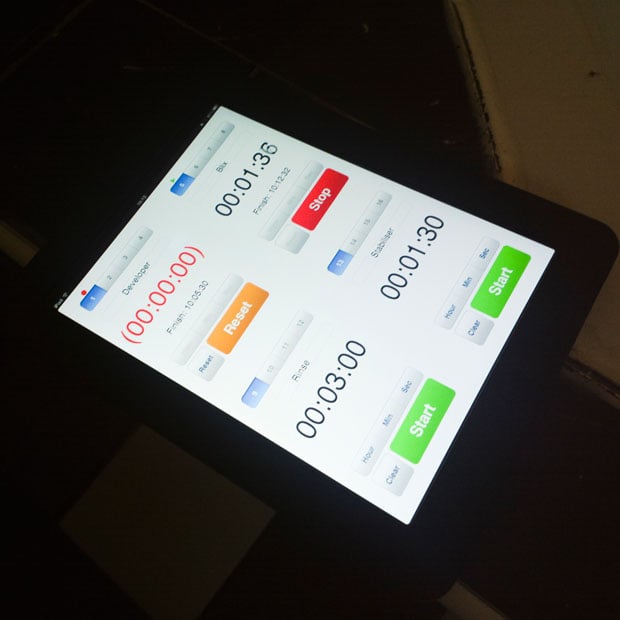
All downloaded and set up? We’re nearly ready! Go string up a line across the bathtub or shower stall and get some paper clips or metal office clips ready for when the film is done. It needs to be close to head height because a 36 exposure roll of 35mm film is pretty long.
The Procedure
Right, let’s soup some film!
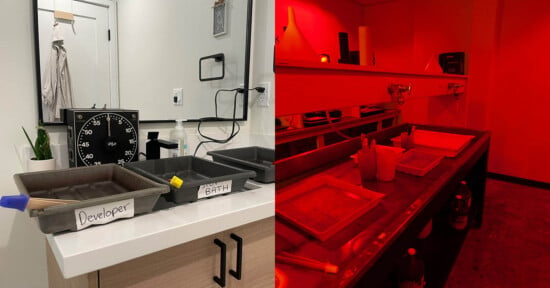
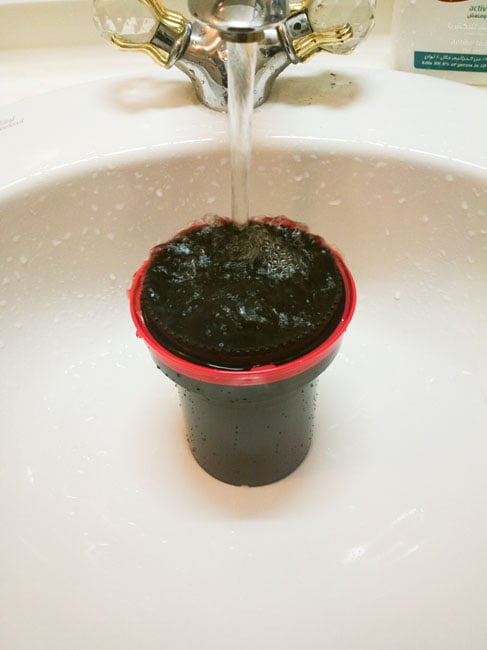
Here’s an action shot taken during an actual processing run. Sorry for the crummy quality, anything done in the middle of a run has to be done in a limited space of time as we will cover in a minute:
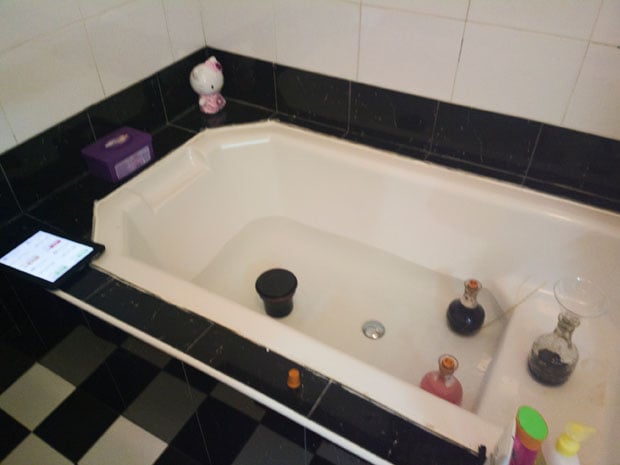
(That’s my wife’s Hello Kitty bubble bath, I’d like to point out.)
Here’s the decode to that picture: On the left is my iPad in a non-slip silicone case with LabTimer running. The Blix bottle is on the ledge there with very little chemistry in it because all that chemistry is in the Patterson tank with my roll of 120 Kodak Portra 800. The Developer bottle is back in the bath water keeping warm and has one of my thermometers leant against it telling me the temperature of the water bath. The Blix bottle has my funnel in it because I will be pouring back into it when the timer goes off.
Preview over.
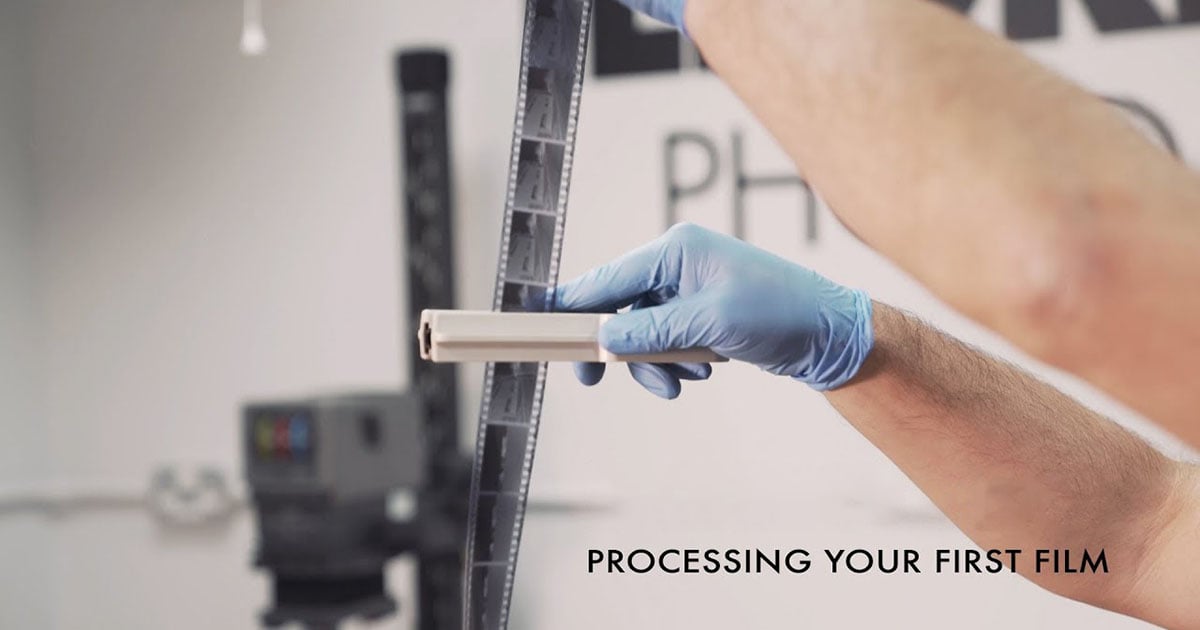
Loading The Film
First step needs to be done IN THE DARK. I know, it’s a drag. After this step it’s all daylight, though so don’t fear. If you have a changing bag then use it. For the longest time I loaded my film in a room with no windows in the cupboard under a bedsheet at night. The room may not have been perfectly dark but the cupboard in the dark was pretty dark. Under the sheet it was even darker. Darkness is like security, it’s all about layers. Practice the film loading in the daylight with junk film or a roll you sacrifice for the purpose before you try it in the dark. There is a knack to it but it is pretty easy. For 35mm film make sure you cut off the “tongue” so you have a square edge. It will make life much simpler!
The reels twist and have a little ratcheting motion in them. What you need to do is feed the film into the outer edge of the spool at the start of the spiral and feed it in a few inches. After that, you simply twist the sides of the reel back and forth and it will draw the film in. When you get to the end of the roll you need to cut off the end (for 35mm) or detach the end from the backing paper (120 film). Keep feeding the film into the spool a few inches past where it is all in.
Once the film is on the reel or reels put them on the central column inside the tank and install the inner funnel shaped lid and click it into place. I usually stick my little finger in the hole in the middle and make sure I can feel the central column before I go out into the light. The tank is light tight with the funnel lid on and central column inside. Nevertheless you can still pour liquids into and out of it. This is the genius part!
That’s it for darkness! Everything else is in the light.
Final Preparations
Proceed to your darkroo– er, bathroom. The rubber top lid of the tank should be somewhere where you can reach it. Now you are ready to get film wet. Once you get the film wet you are committed so make sure all is ready. Here is the checklist:
- Chemistry bottles are sitting in the bathtub in water of the right temperature. I usually heat the bath up about four degrees too warm and stick the bottles in as I’m first getting ready. When I have the film loaded in the tank and everything else ready it is usually close to the right temperature. If you need to fine tune just add a little hot or cold and stir it around well. You want a bath that mostly surrounds the bottles but isn’t so deep that your developing tank with film and fluid in it is going to try to float.
- Line and clips for hanging wet film is strung and ready.
- iPad in place with LabTimer open and all timers reset and ready.
- Funnel available as well as rubber top lid of for developing tank and in easy reach.
Time Critical Steps
Run the taps on your sink and adjust until the water running out of the tap is 39 degrees C or 40. When the temperature has stabilised put the tank under the tap and fill it almost full with the warm water. With the Press Kit chemistry the film should pre-soak for one minute at the temperature that will be used for developing. This gets rid of some of the anti-halation layer chemistry, softens the film and gets everything up to the right temperature.
After one minute dump the water. It may be all kinds of crazy colours so don’t be alarmed! It depends on the film brand.
Immediately next, start pouring the Developer chemistry into the Paterson tank. Fill it until you can see the fluid coming up through the funnel top. In other words, an inch or so from full. Too much chemistry in the tank won’t hurt but too little will leave some of your film undeveloped so don’t waste time measuring, just make it close to full.
Start the Developer Timer
Put on the top rubber lid and work the seal around the edge, rotating the tank as you do. Once you are sure the lid is fully on keep skooching the tank around in a circle until you see you have used up about 15 seconds of the time on the timer. Stick the tank in the bath water. At three minutes left you will pick up the tank for your first inversions. Here is how they go:
- Pick up the tank.
- As you are picking it up by the top get the other hand underneath so you have it top and bottom.
- Move it up in an arc and bring it down upside down as if you are trying to move all the fluid and contents from the bottom of the tank to the top.
- Reverse the motion bringing the tank back rightside up as if you were trying to move all the fluid and contents from the top of the tank to the bottom. This is one “inversion”
- Repeat the steps for a total of four inversions
- Put the tank back in the water
This “four inversions” exercise takes place at every thirty seconds and is essential to proper working of the chemistry with the film. Don’t skip it. And try to keep close to the right times. This is the tricky part because any housekeeping and so on you want to do during the process must fit into the gaps between one set of inversions and the next!
For example, here’s how I generally do the Developer stage:
- Pour chemicals into tank, start timer (3:30), fix lid, place tank in water
- First four inversions (3:00), tank back in water, place funnel in mouth of Developer bottle
- Second four inversions (2:30), third (2:00), fourth (1:30), fifth (1:00)
- Sixth inversion (0:30), remove rubber lid in preparation for pour, hurry to sink with rubber lid and rinse thoroughly then lay down ready for reuse
- Pour out Developer solution back into bottle (0:00)
Now some people will have you stress down to the second on these timings. As I said, you do want to get the inversions going pretty regularly and close to on time but if the total Developer time is 3:25 or 3:40 it isn’t going to make a huge difference. Nevertheless, do your best.
Here’s how I manage the transition from Developer to Blix: I try to start pouring the Developer back in the bottle very close to zero on the timer. You won’t be able to do it instantly since you are pouring close to a litre of fluid so just pour it as fast as you can without mess and don’t worry about the extra seconds.
Start the Blix Timer
When you have poured it all out pour the Blix in. Again, as fast as you can without mess you want to get the tank fairly full and then follow the same procedure as above with getting the lid sealed and hopefully in the water by fifteen seconds after you started the timer.
Here’s how I play the Blix stage:
- First four inversions come at (6:00). Put the tank back in the water and go run to the sink with the funnel and give it a good quick rinse and clean before putting it in the neck of the Blix bottle.
- Second set of inversions (5:30). Now you can put the stopper back in the Developer bottle and put it back in the water to keep warm.
- Third inversions (5:00). If you didn’t get any of the above housekeeping done yet finish it off now
- Inversions at 4:30, 4:00, 3:30, 3:00, 2:30, 2:00, 1:30, 1:00
- Last set of four inversions (0:30) and get the lid off and rinse it well. The Blix chemistry is somehow more of a pain than the Developer. It is more prone to leak past the lid and it takes a bit more rinsing to clean off of things. It also seems to generate a little pressure in the tank so I normally squeeze out a little air by pushing down on the centre of the rubber lid just before an inversion when Blix is in the tank. I find this leads to less fluid trying to leak out. Oh! Leave the tap running after you rinse the lid
- At the end of the time for Blix (0:00) pour the Blix back in the bottle and then take the tank to the sink and place it under a fast running tap. The water can be warm or cool.
Start the Rinse Timer
Let the fast running tap water fill the tank. Slosh it around as it is filling. When it is full dump all the water out in the sink shaking the tank as you empty it. Once empty immediately start filling again with the same sloshing motion. Keep doing this filling and emptying with a lot of motion until the Rinse timer goes off. The goal is to completely fill and completely empty the tank each time. This will get all the remaining chemistry off the film. When the timer finishes just dump the last tankful of water and turn off the tap.
Start the Stabiliser Timer
The Stabiliser is the most relaxed of the chemicals. Pour it in and jiggle the tank for the first fifteen or twenty seconds then let it stand. Temperature doesn’t matter much at this stage so you don’t need to put it in the water. At the end of the time just pour it back in the Stabiliser bottle.
At this point I like to do a little final rinse with some distilled water. It just helps the film dry a little cleaner. I pour in a little distilled water and slosh it around and pour it out. I do this a few times with a small amount of water each time.
You are done! Feels good, doesn’t it?
Drying

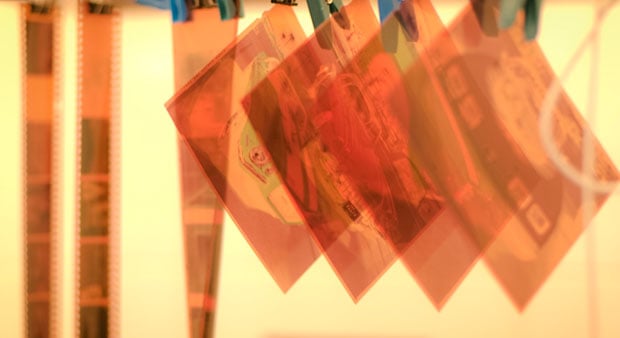
Take the reels out. One at a time pull the film gently off the reels and hang each with a clip from the line. You will need one or two clips at the top as well as one or two at the bottom. The clips at the bottom are weights because the film will want to curl around like a snake as it dries. The weights will keep it from running into other films and will help the water run off by keeping the film fairly straight.
When the film is dry you just cut it down and sleeve it.
Just a few notes about the drying stage. Try not to let anything touch the film whilst it is drying. It will be very soft and easily damaged at this stage. If anything should get onto the film panic! No, don’t panic. Get some distilled water right away and pour it liberally down the film. If you catch it right away the distilled water should wash off whatever got on the film without damaging it. Allow the film to dry again on its own. Don’t worry about the appearance of the film until it is dry. It is normal for it to look cloudy or uneven until it is dry.
Cleanup
Make sure you clean everything you used. If you rinse it well and dry it right away you shouldn’t need anything more than water to keep it all clean. Store it away from dust and it should be ready for next time.
Congratulations! You’ve helped keep film photography alive!