How and Why I Built My Own Bellows-Style Dynamic Digital View Camera

Why does someone build their own camera? Maybe for technical reasons, usability enhancements, or perhaps personal style and artistic outlook. The raison d’ètre for the experimental camera I made here falls somewhere between all of the above.
The prototyping process, over the last few years, has been about creating a tool that enables some of my own photographic ideas to be more readily realized, overcoming some creative limitations evident in “off the rack” systems such as the lack of truly fluid movements in hand-held full-frame setups.
In my art, I’m interested in gaining a greater understanding of how light interacts with the medium (and thus the observer’s eye) – creating images that use perspective and light control for specific visual purposes. I will show what I mean by this below, but first, let’s look at the camera in question, and talk about its short history, as I’d like to make this a “gear” as much as an “art” post.
I started in photography before digital sensors became widely popular. 35mm, medium, and large format (LF) were my go-to tools, with the latter, especially, offering great control over perspective, feel, and “form” of an image. When full-frame digital mirrorless cameras became available, I began looking for a solution that would, somehow, replicate the perspective control possibilities of LF in a portable, hand-held, and dynamic form factor. There wasn’t much to be found in the market, hence the idea was born to build my own, based on Sony e-Mount hardware.
The spec was deceptively simple: the camera should be portable, have full movements, use large format lenses for their extremely large image circles and thus sensor coverage, and do so without endlessly fiddly buttons.
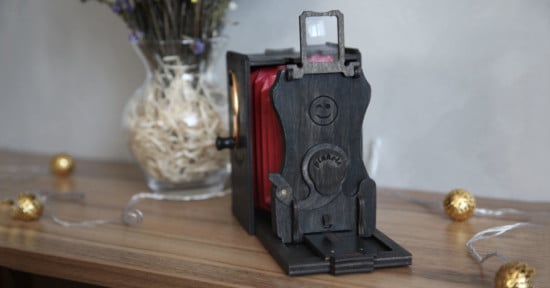
Imagine the strange love child of a free lensing setup – a Lensbaby and an LF monorail (but handheld) – and you will understand how the prototype works. The first iteration of the camera is shown in the above image, next to the wooden Shenhao field camera that inspired it. They have radically different appearances but identical possibilities of tilt/shift/swing – if you ignore the difference in film size (LF or roll film vs. full-frame digital) and the “grip it, unlock it, and just tilt it” operation of the first prototype model.
Also, front standard movements were only possible by tilting the entire rig and adjusting the back standard, which in practice is not a limitation. The “Susokukan” and “Wavefront” series, some images of which appear later in this article, were created with this basic first version of the camera.
The above prototype was made with selective laser sintering (SLS) of Nylon powder and Alumide. I engineered and modeled everything with Rhinoceros3D. The current version is just Nylon, albeit printed on a multijet fusion (MJF) printer that sinters by use of binder fluids and heat lamps. The design of Mk. II is locally too thin to be robustly printed on more standard fused deposition printers (the “hot plastic toothpaste” variety common to us DIY folks). Unfortunately, I don’t own an SLS or MJF machine, so the printing was done by commercial vendors.
Pictured above is the current camera variant and its digital source data, hand-held as it is supposed to be used and with a Sony A7r mounted. In marked contrast to the first iteration, it’s now a “duo-rail” camera made of (stock) carbon rails, plastic bearings, sintered Nylon, hand-cut glued Neoprene (for the bellows), and some stock aluminum rig parts with a magnet rack focus latch lock mechanism for easier operation. The entire camera now consists of modular assemblies, which gives much greater flexibility in adapting to new experimental setups – and without having to reprint large parts of the camera when some subassembly changes (e.g. when adding new lens mounts).
As LF lenses have no internal helical, it’s rack focusing only, just like LF cameras. The eagle-eyed will notice that there is a different lens mounted in this shot than in the introductory one – that is a Schneider Apo-Symmar 120mm f/5.6, as opposed to the previous Rodenstock Grandagon 75mm f/4.5. These lenses are attached to custom bayonet mount cones, doing away with the standard LF lens boards as still used in Mk. I and allowing space for some custom operable ‘stray light ports’ (the oval openings next to the Copal shutter). Basically, you can mount (and thus perspective control) any lens, with LF lenses from 75mm to 120mm most commonly used by me, but the occasional full-frame (e.g. vintage wide angle shift-only Nikkors) and medium format lenses (e.g. a Zodiak-8 fisheye) thrown in for good measure – as LF superwides are not usable with current digital sensors (rays too oblique!) and flange focal distance limitations (you’ll hit the mount at infinity!).
Now, this was a lot of tech talk. Why even bother doing this?
There is a range of stylistic opportunities the camera unlocks that are very hard to reproduce in post or with any other setup that I’ve used. I’ll briefly describe some of these effects, and their motivation, in this final section- beginning with the above image, shot at night in Madrid’s El Matadero.
This is pure dynamic swing and tilt, capturing people drifting in and out of thin slivers of projected light, which is hard to do “organically” with classic tilt/shift lenses and without a tripod, but achievable hand-held with a dynamic one. The lens used was a Zodiak-8 medium format fisheye, which doesn’t exist as a tilt/shift version on standard mounts.
Besides “normal” lens movements, introducing artificial flares and light leaks through the extra mount ports offers additional expression, as visible in the above diptych. Artifacts, errors, and glitches created in-camera only, when combined with perspective and focus control, render images slightly uncanny, almost self-aware, as if an echo of their making has imprinted itself into the final output.
To me, the chaos of breathing focus and stray light (all body movements directly translate into the images) ultimately makes each frame completely irreproducible, immediate, and directly linked to the position of my body in relation to the scene – a subjective record of having existed “then and there.” It was shot with 90mm and 75mm large-format Grandagons, and a Nikkor PC 28mm full-frame lens.
The root of the more recent images, perhaps, is a set of series shot from 2017 to 2019; these frames use what some people would call “intentional camera movement” and long exposure to combine scene and body movement into dynamic stills. “Susokukan,” or breath-counting meditation, is a term used in Zen meditation. The series was created during visits to Zen gardens in Kyoto and the “intentional” movement is actually just focused breathing, translated into long exposure traces of light.
As opposed to fixed lens cameras, the lens and sensor here moved independently in relation to the scene, which renders slightly more unusual results. To me, especially in meditation, this has always been an analogy to how the mind’s eye can float away from objective seeing, and instead focus on an ambivalent space that is neither internal nor external. It was shot with a 75mm large-format Grandagon.
Thank you for reading this far, and I hope you have enjoyed the images. You can find more of my work via the links below. Contact me for prints or exhibition inquiries, should you be interested. I also do regular custom printing.
About the author: Max C Doelling is an environmental engineer, former architect, and artist and has published photography under the thronged.org domain for more than a decade. He works and lives in Berlin, and engineers cultural buildings all across the globe during the daytime. You can see more of his work on his website and Instagram, and feel free to connect with him on LinkedIn.