Testing the Speed Boost in Luminar’s Jupiter Update
Luminar has a new update, and it’s fast! Although I recently published an extensive review of raw processors that included Luminar 2018 v1.1, the new update called Jupiter (v1.2) has significant changes and improvements. I believe it warrants an updated review covering the important changes. So here it is.
Bottom Line First
The most significant and usable improvement in this version is speed! I used two very challenging raw file types to try out the advance copy provided to me by Skylum: Fuji X-Trans raw files, which use a sensor pattern that requires special processing, and Sony 42MP raw files, which are a challenge due to their sheer size. Luminar Jupiter handles them easily and quickly. Keep in mind I’ve been using a pre-release build so it’s possible the official release version may do even better.
The Luminar “Jupiter” upgrade for existing users of Luminar 2018 is free so that’s a no-brainer (Luminar menu->Check for Updates…). If you’re new to Luminar or upgrading from pre-2018 versions, I believe it’s still worth it. I’ve advocated this program for a long time because it’s so intuitive and enjoyable to use, not to mention pretty inexpensive. And with this upgrade, it just got better. You can upgrade for $39 (use coupon code WOLFSON for these prices) and new users can buy it for $59 (use coupon code WOLFSON). There are a host of useful freebies included as well that Skylum values at $202.
Raw images open dramatically faster. I really noticed this on my 2014 MacBook Pro laptop which has average specs by today’s standards. Previously it took 21-23 sec. for a Fuji X-Trans RAF file to open. Now it’s 4-5 seconds to see the image and about 10 seconds total before sliders have an effect. Sony 42MP raw files are even faster. All of this is fast enough that you barely have time to find the slider you need before the sliders are already active!
You will still see the “Processing” wheel in the lower left corner continue for an additional 15 sec or so after the image is visible but the only aspect it affects is immediately zooming to 1:1. In this case, you will wait 17-20 seconds for the image to fully render at 1:1.
Remember we’re talking an average laptop here, nothing fancy. This is a huge improvement in efficiency (and IMO enjoyment) as I don’t have to wait to that 20+ seconds just for the image to open and I can start doing my initial raw adjustments right away.
On my faster desktop machine (2017 iMac Retina 5K with 4.2 GHz Intel Core i7 with 32 GB RAM and GPU is Radeon Pro 580 8GB) there are commensurate improvements but they are less important as Luminar was plenty fast on my desktop in the previous version.
Export speeds have also been improved. See my chart further down. You can compare the numbers to my previous review.
Windows users will see more parity with the Mac version than before including batch processing, free transform feature, faster export, editing speed, full-screen preview, and localization/language updates.
“Auto” Distortion and CA Corrections
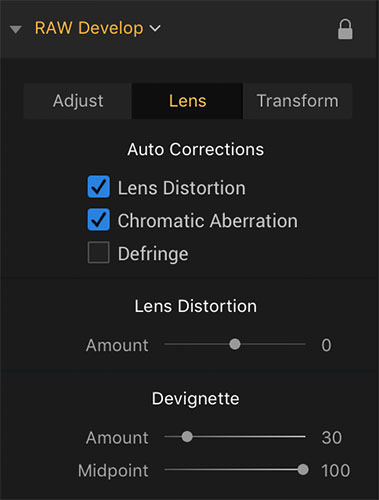
The not so automatic corrections are a welcome improvement but really a stepping stone to full implementation of automatic lens correction. Luminar 1.2 fixes lens distortion and chromatic abberation by clicking checkboxes in the Raw Develop filter under the Lens tab. There is no apparent way to manually adjust fringing. Currently, automatic correction of light falloff (some call this vignetting) is not implemented. There are two tools available to correct light falloff: Devignette sliders under the Raw Develop Lens tab and the Vignetting filter.
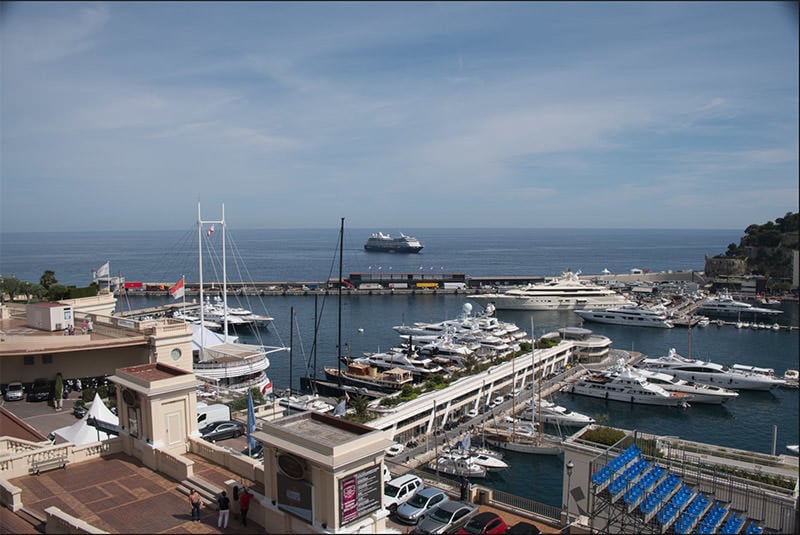
Some lenses have light falloff that is difficult to correct properly with the Devignetting or Vignette filter. One of my test images I use I shot with the ubiquitous Fujinon XF 18-55mm lens which can yield very dark areas in the extreme corners. I have also seen this type of falloff in other companies’ lenses as well. The distortion button, which ends up cropping the image as part of fixing the distortion goes a long way to eliminating the dark spots but there are still remnants.
In some images, you could clone this out but this is time-consuming, especially if you have a lot of images from the same lens with this issue. Whether good or bad, lens manufacturers are assuming automatic lens correction when designing new lenses, particularly those for mirrorless cameras.
Although the click boxes for distortion and chromatic aberration certainly help, it still entails extra steps. I will be much happier when full automatic lens correction is implemented.
Image Quality
I really had no problems with the image quality in the previous version but Skylum states “Enhanced image quality on image view” is one of the improvements. I did notice, however, that the initial image is better than before. By “better” I mean less flat with slightly more contrast and slightly more vivid color and overall a sharper appearance. From what I can gather the rendering is just more refined at any magnification. Previously it looked exactly like the Adobe Standard which is pretty blah and we have come to accept that as the “look” of a raw image. I often say raw is blah.

There is actually a good reason for the flat look of raw images, in that if your image is contrasty and saturated at the onset you have probably sacrificed some subtle detail in highlights and shadows and nuances of variations in hue and tone. I saw a similarly improved version previously with ON1 Photo Raw. Initially, I was a little taken aback with the changes to ON1’s rendering in this regard and then realized that nothing was lost and it is just less work to get a raw file back to a starting point that is more like the original scene. Furthermore, even Adobe offers variations of their standard profile via Camera Calibration which offers different looks/starting points. Of course, if employ major manipulation then these subtleties are a moot point.
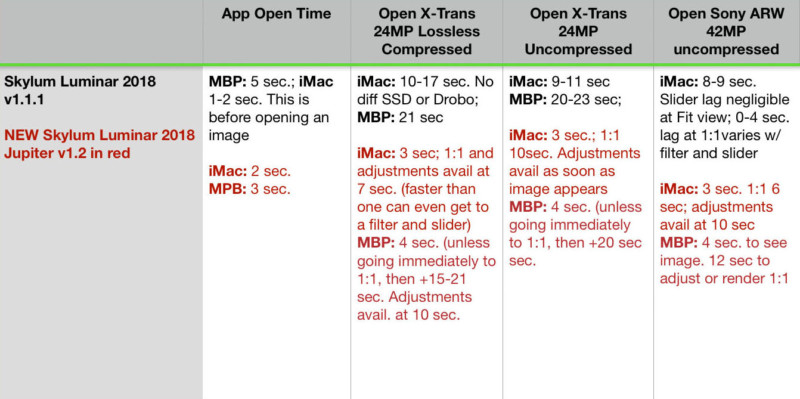
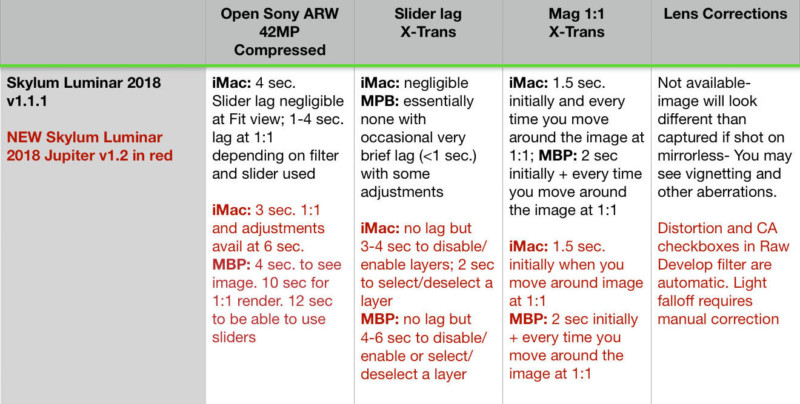
Comparison Chart
Below I’ve included my tests of the previous version of Luminar for comparison. Note that the results for updated version 1.2 of Luminar (Jupiter) are in red. I’ve evaluated the factors that are important to everyday editing, particularly Fuji X-Trans files along with Sony ARW 42MP files, both of which are a challenge to any processor. For timing, I used a digital stopwatch and did numerous runs of each test.

Favorite Touches
There are some not-so-obvious but nice features. Some of these are new with this version and a few were implemented previously. They are:
• F key shortcut for full-screen preview
• Cmd-L to see/hide filters
• Ability to see just your favorite filters (selectable) or other categories
• Ability to save custom workspaces
• Separate opacity slider for each layer and ability to rename layers
Conclusion
The speed increases alone in Luminar “Jupiter” version 1.2 make it well worth the update/upgrade. The only real shortcoming was just my wish that Skylum would have incorporated full automatic lens corrections instead of the checkboxes. I’m sure we’ll see it soon and one needs to consider the many pluses. The speed increase is impressive and useful. Most importantly I think it also leads to an increase in enjoyment as you can start using that lovely interface right away when opening raw files — even those pesky Fuji X-Trans raw files.
About the author: Joel Wolfson is an internationally published photographer who loves teaching as much as shooting. The opinions expressed in this article are solely those of the author. He shares his 30 years of experience as a working pro with other photographers and enthusiasts by way of his workshops, 1 on 1 training, webinars, articles, blog and speaking engagements. He is one of the pioneers of digital photography, having conducted digital photography seminars for Apple and other corporations starting in the early 90s. This article was also published here.