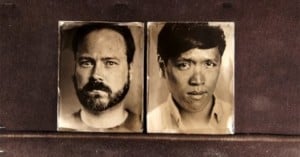
The Science Behind Tintype Photography
Here’s another video featuring SF photo shop Photobooth and its tintype …
Here’s another video featuring SF photo shop Photobooth and its tintype …

Since November 2011 I’d been thinking about an astrophotography project: take a photo of the moon each day from full moon to full moon, then combine it into a seamless movie that looks as if someone had moved the sun around the moon for one minute. I found similar videos, but most were simulations done in software, or photographic ones that weren’t very smooth. Seemed simple enough, mostly because I didn’t see the complications that would come along with this project caused by... physics.
My plan involved setting the same exposure each night starting with the full moon, and let the moon’s dark side gradually move across its face while the lit side stayed about the same brightness. Adjust the photos’ angles to match each other, throw all of them into Final Cut Pro X and add cross dissolve transitions between them, and I’d get a smooth movie showing every phase of the moon.

By and large, as a professional of whatever description, clients hire you based on experience and expertise, grace under pressure, problem-solving skills, and your finely-tuned ability to transcend the limitations of the assignment and distill the essence of an idea into its most purely realized form.
Okay so that’s what they tell you in college, but honestly it’s mostly just blather. Assignment photography is a hot-dog factory where the end results are images rather than sausages. If people saw what went into some of this stuff there’s no way they’d want anything to do with it. The sad reality is that there are all kinds of reasons you’re brought in on projects, some of them more edifying than others. Sometimes you’re exactly the right person for the job, other times you’re just a camera monkey. My favourite is the “wouldn’t-it-be-cool-if” call, where everyone gets all excited about an idea that turns out to be completely impractical. Well, this is the story of one of those ideas that actually managed to see the light of day.
Columbus, Ohio-based photographer Nick Fancher works as the lifestyle photographer of Men’s online …

Here’s a video in which photographer Ryan Schude walks through how he went …

Photoshop guru Scott Kelby has released a …
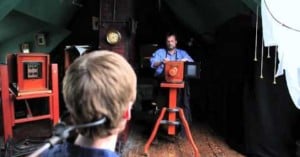
Ever wonder how photographs were made back in the days of the Civil War? This video by the George …
Not too long ago I finally got around to picking up a decent manual flash for exploring lighting and speedlight techniques. I picked up a Yongnuo YN-560 Speedlight Flash for Canon and Nikon, and my friend Sean was kind enough to send me his old radio triggers to play with. I was mostly all set to start exploring the world of off-camera lighting...

Kai of DigitalRev shares some tips — both serious and humorous — on …

Here’s a brief video in which Los Angeles-based photographer Mike Kelley shares his …

To capture a behind-the-scenes look at what it’s like to photograph a wedding, photographer …

An earlier post here on PetaPixel showcased a wonderful image of a flock of cell phones and the method used to create it. In a rather snarky comment, I said to get back to me when they started tossing babies, and linked to my daughter merrily jumping in her crib with her toys. Mike was kind enough to approach me about writing up a small walk-through on how I created my image, and who can honestly turn down a chance to show off their baby daughter looking so cute?

If you’ve never done studio portraits before, check out this uber-helpful video that quickly runs through five basic lighting …

Here’s a video in which interior photographer Roger Brooks walks through how he …
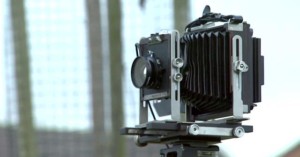
If you’ve never shot with a large format camera before, you might find this video illuminating. In it, photographer …

Update: Looks like the video was removed Here’s an interesting behind-the-scenes look at a photo shoot with San Francisco-based …

In this video, commercial photographer Jay P. Morgan walks through how he went about shooting a composite sports photograph of Mexican soccer player Rafael Márquez.

Photographer Zack Arias has written up a …

Photographer duo Joachim Guanzon and Marden Blake (AKA aesonica) created this short behind-the-scenes …
Photo enthusiast Robert Simpson created this informative behind-the-scenes video detailing how he created …

Here’s an illuminating (pun intended) video walkthrough by photographer Eric Curry, showing how …

The popular deal-a-day website Woot made this fun behind-the-scenes video showing how the site’s product photographs are made.
Here’s an educational time-lapse tutorial by Los Angeles-based architectural photographer Mike Kelley in …

Want to adorn a wall with a giant print using your own photography? Here’s a great video in which …

Here’s a video in which renowned street photographer Joel Meyerowitz shows us his …

After Hurricane Katrina hit New Orleans, photographer Richard Misrach visited the empty city …
If you want to do street photography, attacking people with cameras like …

Street photographer Eric Kim generated some buzz last month by recording …
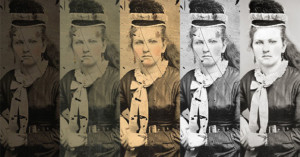
Photo restorer Bob Rosinsky of Top Dog Imaging wrote …

Some friends of mine asked me to shoot a quick band photograph of them recently without any preparation or planning. Luckily, the location was pretty nice (we were at a hostel) and the weather was a bit cloudy so there wasn't harsh sunlight.
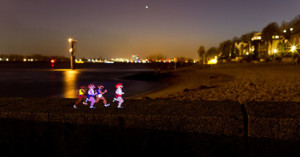
I imagine, almost everyone interested in photography has seen the stunning pictures created with a technique called light painting. You set your camera to long exposure, 20 to 30 seconds or even longer, and use a light source, a flashlight or LED light, to "paint" with it. Most pictures have some kind of magic touch to it because you see only the track of light afterwards and not the actual light source. Light stencils are somewhat related to light painting. It uses the long exposure as well but uses a flash to illuminate a stencil to stamp the motive into the picture.

If you want to know the ins and outs of shooting a college basketball game, check out this awesome …

What does it take to shoot portraits of random strangers on a sidewalk? Photographer Clay Enos, known for his portraits for the movie Watchmen, walks us through his process for capturing impromptu portraits of passers-by on a white backdrop.
Here's an easy to follow video in which commercial and advertising photographer Jay P. Morgan walks us through how he went about shooting a portrait of a jazz player with a three light setup.
Certain higher end flashes have a strobe (AKA repeating flash) mode that can flash repeatedly, freezing a moving subject in various positions in a single exposure. This tutorial will teach you how to create a similar effect using light painting techniques, resulting in the above photo.
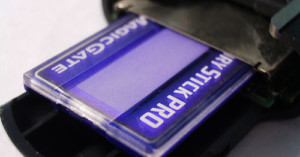
Last night my pastor emailed me telling me that he had accidentally deleted an entire folder of photographs off his Sony compact camera, and that Sony's technical support informed him that it would cost $200-300 for them to recover the photos. After I got a hold of the memory card, I checked some of the recovery programs I've used in the past, but discovered that they now require paid licenses to actual do recovery (though analysis is free). I then stumbled across PhotoRec, a free and open source command-line application that's bundled with TestDisk, something I've successfully used to regain access to inaccessible external hard drives.
In this post I'm going to show you how you can use PhotoRec to recover your photos if you've accidentally deleted them or formatted your memory card.

The Internet viral sensation "Double Rainbow" video was captured on January 8th, 2010. About two weeks later on the 23rd (and long before that video went viral), I saw a double rainbow myself when looking out my window. I quickly grabbed my camera (a Canon 40D at the time) with my 16-35mm lens (I wanted the widest shot possible) and ran out to shoot the rainbow.

My friend recently had two stray kittens randomly walk up to her doorstep. I was called over to see them, and carried my 5D and 24-70mm along. There wasn't much light to work with, and I didn't bring a flash, so I had to shoot at 1600 ISO for any chance of capturing a sharp image of the energetic kittens. I haven't done a walkthrough post for quite some time (opting to post guest posts instead), but here's a quick walkthrough of how I post-processed one particular image of a kitten. I used Adobe Camera Raw (comes with Photoshop CS4) with my adjustments, but you'll have the same settings in Lightroom, Aperture, etc...

Living in the Southwest United States gives me a great opportunity to capture lighting. Every summer “Monsoon Season” arrives, officially June 15 through Sept 15th, in Arizona. Prevailing northwesterly winds carry humid air north out of Mexico where it meets the hot air of the desert, resulting in powerful thunderstorms nearly everyday. The thunderstorms often produce localized areas of heavy wind, thick blowing dust (Haboobs), rain, and most importantly, lightning. I regularly track the storms on the local Doppler radar feeds and try to guess where the best shooting will take place.

I took this shot with my Canon EOS 450D, and a Canon 50mm f1.8 -- my favourite lens in the case of portraits especially.
I chose to make the shooting session about a hour and half before sunset when there's still a lot of light, but with a warm, lovely quality to the light. I prefer warm tones, and to emphasize these tones and balance the cool colours of my model dress and tree leaves I set White Balancing to "cloudy". You can see in the picture that the sun was on the right side of model, so she didn't have too much direct light on her face. The white wall behind acted as a discrete reflecting panel, resulting in light that's quite uniform.