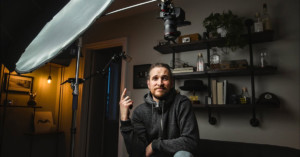
If you’re a fan of learning things through Khan Academy, then you might enjoy learning about how ISO works in this similar-styled tutorial by Dylan Bennett. Bennett might not have Salman Khan’s soothing voice, but he does his best to break down the magic of digital camera sensors into easy to understand ideas. For a more detailed and comprehensive understanding of how things work, check out Cambridge in Colour’s excellent tutorials.
Here’s a tutorial on how to do non-automated HDR for real estate photography using Photoshop CS5. The first thing you’ll need is a sturdy tripod with a level. The closer you are to a leveled image, the less correction you’ll have to do later. Read more…
Here’s a short video in which photo instructor Bryan Peterson shows how you can use sunlight and a simple reflector for creative macro shots — perfect for people who have a macro lens but lack lighting equipment.
Want to made giant prints of your tiny phone photos? Instead of doing the enlargement purely with Photoshop, Photojojo suggests using a scanner for high-quality enlarging. Simply resample the small photo at 360dpi, print it out on high quality matte paper, and then re-digitize it using a scanner at 360dpi and the print size you want. It’d be interesting to see a side-by-side comparison of this technique versus simply resizing in Photoshop and printing that image directly.
Here’s a Photoshop tutorial by Twin Cities Photography Group teaching how you can use Photoshop’s High Pass Filter to soften the skin on a portrait subject without losing the skin’s texture.
Want to learn the basics of studio lighting? Here’s a two-hour-long lecture with photographer Joey Quintero in which he gives an overview of the basic principles, techniques, and tools.
For his wedding, designer Matt Frank built this photo booth that looks like a giant Lomo camera. It comprises a Mac running Photo Booth, a monitor for reviewing photos, halogen lighting, and a hacked Easy Button that acts as a shutter release. Frank writes,
I decided to build my own photo booth after trying to rent one from local photography studios. The going rate for a rented photo booth is around $600 in addition to the hourly rate of the attendent to watch over the equipment. As this was not in my wedding budget, and I did not want to deal with an additional vendor, I decided to build my own for under $200. [#]
The total cost for the DIY photobooth came out to about $150. Frank has also written up a step-by-step tutorial on how it was built.
If you’ve never done studio portraits before, check out this uber-helpful video that quickly runs through five basic lighting techniques commonly used by photographers everywhere.