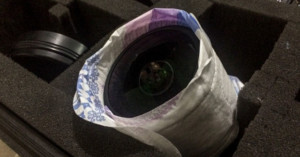
Posts Tagged ‘trick’

Use a Dab of Toothpaste to Position Nails when Hanging Picture Frames

Use a Dab of Toothpaste to Position Nails when Hanging Picture Frames toothpaste mini

Have trouble figuring out exactly where you need to hammer in a nail when hanging up a picture frame? The Industrial Cottage suggests using toothpaste. Simply dab a small amount onto the end of the picture hook, and gently tap the hook into the wall when you find the desire location for your frame. The mark left by the toothpaste is where you’ll need to put in a nail. Just remember to wipe off the toothpaste from the wall and from the frame when you’re done!

(via The Industrial Cottage via Lifehacker)

Falling Water Frozen in Mid-Air with the Help of Frame Rate Trickery

When recording video, a camera’s frame rate can produce some pretty strange effects. If matched up with a helicopter’s blades, a helicopter looks like it’s hovering in midair with motionless blades. YouTube user mrbibio found that the same thing can be done with falling water. His technique is brilliant: by pressing a water tube against a speaker, mrbibio was able to control the vibration frequency of the water flowing through the tube. He then adjusted the pulses of the water to match up with the frame rate of his Canon 5D Mark II. The result is a video of the water looking as though it’s frozen in time.

(via Gizmodo via Photography Bay)

How to Create a Mind-Bending Camera-less Mirror Self-Portrait

How to Create a Mind Bending Camera less Mirror Self Portrait selfportrait mini

Snapping a self-portrait of oneself in a mirror is something every photographer has probably done before, but have you ever created one in which there isn’t a camera in the shot? The images look impossible, but they’re not too difficult to create using some careful planning and clever Photoshop trickery. Basically, all you need to do is photograph each arm and your head separately and then stitch the photographs together. Joshua Dunlop over at ExpertPhotography has published a tutorial on the technique.

Hidden Camera Mirror Photo Trick [ExpertPhotography]

Use Your Collapsible Light Reflector as a Wind Machine for Flowing Hair

Use Your Collapsible Light Reflector as a Wind Machine for Flowing Hair hair mini

Want to capture some wind-blown hair in a portrait photograph but don’t have access to an electric fan or wind machine? Photographer Benjamin Von Wong has a quick tip just for you: use your collapsible light reflector to create the needed wind. Simply have someone off camera fan the reflector at your subject in the direction and intensity that you want, and voila! instant wind machine!

Use a Drop of Water as a Macro Lens for Phone Photographs

Use a Drop of Water as a Macro Lens for Phone Photographs iphonemacro mini

Here’s a super cool trick: instead of buying a special macro lens for your smart phone, simply use a drop of water! Carefully place a drop of water over your lens, carefully invert the phone, and voila — instant macro shots with the cheapest lens you’ll ever own. Alex Wild over at Scientific American has more details on the technique and some great sample shots taken with it.

Transform Your iPhone Into a Microscope: Just Add Water (via Gizmodo)

Use Your Car as a Photography Blind to Get Close to Wildlife

Use Your Car as a Photography Blind to Get Close to Wildlife carblind mini

Want to get closer to animals when doing wildlife photography? If there’s access, your car can do the trick by serving as a photography blind. Scott Bourne of Photofocus writes,

For whatever reason, most wildlife (birds included) won’t spook or flush when they see a car. Open the car door, step out of the car, now that’s a totally different situation. But as long as you stay in the car, your chances of getting close enough to wildlife to get the shot are improved by 90%.

(via Photofocus)


Image credit: CAR STUCK IN SAND – BULL ISLAND by infomatique

Keep Track of Charged Canon Batteries with the Blue Indicator Stripe

Keep Track of Charged Canon Batteries with the Blue Indicator Stripe canonbattery mini

Have you ever wondered why newer Canon DSLR battery covers have a small rectangular hole punched into them? It’s more than just for style:

Take a look at the cover. Does it have a small cut-out a few millimetres in from one edge? This is not just decoration. It is designed so that you can tell at a glance which of your batteries are fully charged and which are not. The batteries that come with this cover have a blue stripe down one side of the back. When you remove a charged battery from the charger, you can attach the cover so that the blue is visible. When you remove a discharged battery from the camera, you can attach the cover so that the blue patch is not showing.

It’s a simple and useful tip that those of you who don’t read instruction manuals may have never learned.

(via Canon Professional Network)

How to Quickly Find and Select Black and White Points in Photoshop

Here’s a nifty Photoshop tip by photographer Alex Wise on how you can use a Threshold layer to approximate black and white points in a photograph, and then use those points in the Curves tool to remove color casts from photos.

Overlay an Inverted Layer Onto a Photo to Brighten Underexposed Areas

Adam Dachis over at Lifehacker offers a simple method for correcting underexposed photo with any image editor that supports layers, inversion, and Overlay blending mode. Simply create a duplicate later, invert it, set the blending mode to Overlay, and then adjust the opacity to suit your taste. While it’s certainly not a pro photography trick — other techniques including adjusting the curves and levels may be better — it’s a quick and easy tip that may be good to know.

Fix Your Photo’s Exposure Problems in Seconds With This Simple Trick [Lifehacker]

Plug In USB Cables Correctly the First Time by Observing the Seam

Plug In USB Cables Correctly the First Time by Observing the Seam seams mini

Here’s a simple trick for those of you who find yourself always plugging in USB cables the wrong way on your first attempt: pay attention to the seam on the metal tip. Apartment Therapy writes,

Look closely on the metal tip and you’ll notice that there is a seam on one side of the connector. This seam denotes the contact side of the USB. In horizontal oriented USB ports the seam should face down. In vertical oriented USB ports the seam should face left. If you follow those rules, you’ll get your USB plugged in the right way, the first time, most of the time.

(via Apartment Therapy via Lifehacker)