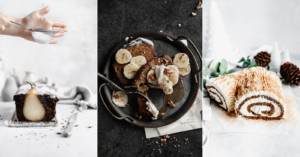
If you’re a fan of shooting portraits in outdoor environments, David Hobby of Strobist has a great tip: keep a catalog of spaces and backdrops that you stumble upon. Anytime you need a backdrop, just flip through your catalog and select the one you (or your subject) like. If you have a GPS-enabled camera, simply snap a photo at the various locations and throw them into an app that can display the locations on a map for you. There’s also a nifty free app called ShootLocal designed for this very purpose.
Kai over at DigitalRev put together this video that offers photography advice in burst mode: 50 (or 49) short and sweet tips in less than 15 minutes. If you take yourself too seriously, be warned: the tips are presented in Kai’s trademark “infotainment” style. Read more…
Hanging pictures straight is a bit difficult as it is, but when we’re talking about two screw or two nail frames, getting them exactly right can be downright frustrating. Fortunately, the folks behind the DIY site It’s Overflowing have a solution for those of you that have a bunch of these tricky frames laying around. Just use a piece of painters tape (or any tape really) to mark the distance between the two holes, and then use the tape to line up and level the holes you drill. Voila, picture-perfect picture frame hanging.
Here’s an interesting video in which street photographer John Free shares a system he’s developed to take the confusion and guesswork out of practicing street photography, called “the five Fs”. He says that contrary to popular belief, it’s not about “seeing”:
It’s not the eyes. Anybody can see that has eyes to see. It’s what we feel and what we get out of the heart that matters. We have to convey a passion. We have to convey an understanding.
The five Fs are: finding, figuring, framing, focusing, and firing.
If you’re planning to hang a bunch of picture frames on a wall, Marissa Waddell of Roost suggests laying them out on the ground to figure out frame placement. Once you’re happy with how the frames look, simply take a large sheet of wax paper and outline the frames. The paper can then be used as a guide for where to hammer in nails on the wall, giving you the exact layout you came up with.
Really more useful for landscape and macro photographers who are going to be shooting through very small apertures (f/22 and above), this video from FStoppers explains what diffraction is and how it can affect your shots. The trade off, as they explain in the video, is between a large depth of field and a sharp image; and the trick is to find your “sweet-spot.”
The difference isn’t as obvious on the video even at 1080p, so if you want to see full resolution examples be sure to head over to the original post.
Last week we reported on how photographers and a magazine are being sued for $300,000 for allegedly breaking a 2,630-year-old statue while photographing it for an assignment. While many people, including us, pointed to it as an example of why carrying liability insurance is a good idea for photographers, a more appropriate question is: does a typical insurance plan even cover something like that? David Walker over at PDN writes that it doesn’t:
And as it turns out, standard liability insurance typically carried by photographers would NOT cover the accidental dropping of, say, a $300,000 Nok figurine on the set. That’s because liability insurance policies typically exclude damage claims “for property of others in the care, custody or control of the insured,” says Scott Taylor of Taylor & Taylor Associates
[...] The Nok figurine, or any other prop or object being photographed as part of the shoot, would almost certainly fall under one of those exclusions. Architectural photographer Peter Aaron says he found out about those exclusions after an assignment some years ago where an assistant mishandled an architect’s model of a skyscraper. “It pancaked,” Aaron says. The architect demanded $5,000 in compensation. Aaron turned to his insurance company. “They said that’s not something we cover,” Aaron says. He had to pay out of pocket (though he negotiated a lower settlement).
So how can you protect yourself against damage to extremely valuable items? You can either purchase third-party property insurance in addition to your liability insurance, or just have the owners move their own valuables.
Michele over at The Scrap Shoppe offers this handy trick for hanging picture frames: hammer a nail through a clothespin and use it to determine nail placement. Simply hang the picture on the clothespin nail, figure out where you want to place the frame, and then push the clothespin into the wall to make a small indent. Voila! Target acquired.
Everybody has had pictures taken that they can hardly stand to look at. Even professional portraits that eliminate blemishes and show you in attractive poses sometimes look strained, or emotionless. Well, a recent study published in Experimental Brain Research seems to say that the remedy could be as easy as turning the other cheek. Read more…
Los Angeles-based photographer and photo assistant Shawn Corrigan has spent the past 10 years traveling the world assisting and shooting. Over time, he has developed an “everything but the kitchen sink, plus the kitchen sink” kit that he brings to each set. In addition to the absolutely essential leatherman and light meter that every assistant should carry around, here’s a checklist of others things you should consider packing. Read more…