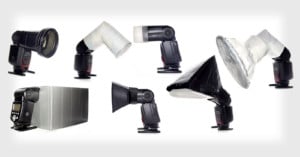
Maurice Ribble of Tech Photo Blog recently found the ingredients list for flash powder, which was used for state-of-the-art photographic lighting 150 years ago. After making some of the powder, he began to test it to see how it compares to modern day flashes (more specifically, a Canon 580EX II).
One of the tests is a simple scene that was lighted with a modern flash and then flash powder so we can compare the images. Overall I was quite impressed with the amount of light that even a small amount of flash powder makes; however, there were many disadvantages to flash powder.
If you’re interested in making your own, a simple search on Google will point you in the right direction. Be careful though — the stuff is quite dangerous.
Here’s a helpful tutorial on how to adjust the angle of your light sources to avoid the nasty reflections that show up in eyeglasses. It has to do with understanding and harnessing the “angle of incidence” and “angle of reflection” of your light.
Photographer Jay P. Morgan made this informative walkthrough showing how he shot a photograph that combines artificial light with the evening sky:
[...] its a simple street light or a full on city scape this process works. We shot a scene for Pilot Freight Services using this method and got great results. We shot our background plate of the bridge and city lights and combined it with a shot done later of the truck.
It’s not exactly a project you can do by yourself, but the concepts he explain can be applied to your nighttime photography.
German photographer Berthold Steinhilber has an awesome technique for lighting expansive locations at night: he tediously paints in the light manually with a powerful 1.8-pound headlamp powered by a 12-volt car battery. Depending on the scale of the location, his large format film exposures last anywhere from 45 minutes to 2 hours, with the aperture set between f/8 and f/16. The above photo took 1.5 hours at f/16. Read more…
The RoundFlash is a new ring flash adapter that’s lightweight and collapsible. Setting it up from its collapsed state is similar to setting up a tent: simply take the rods and stick them into the holes to expand the adapter. Read more…
Photographer duo Joachim Guanzon and Marden Blake (AKA aesonica) created this short behind-the-scenes video showing how they recently shot and Photoshopped an Audi A4 photo for a print advertisement. You can read a longer how-to over on the aesonica website:
The goal is to make it look as if you had 20+ lights, grids, flags and reflectors to shoot your project. There is nothing better than hearing someone ask how many lights were needed to create your shot and revealing that you used only one. The trick is by doing something that could realistically be done with enough equipment and lighting skill, with only one light.
On the other hand, if you get too carried away, there is nothing worse than someone asking if you used Photomatix to compile your HDR garbage shot followed by “My 13 year-old has that program too!”
Recently we shared similar on how you can do composite lighting on homes and on an airplane.
Photographer Joseph Nienstedt was at a grocery store recently when he spotted a $4 plastic flask that reminded him of a curved light modifier he had seen before. After buying it and transforming it into a diffuser using a razor, Nienstedt discovered that it provided softer light than his Sto-Fen Omni-Bounce due to the 5x larger surface area. While it’s not a very respectable look for a professional environment, using a plastic bottle as a DIY diffuser could be an option if you’re in a pinch or if you’d like to experiment with lighting.
Head on over to Nienstedt’s blog post for a step-by-step guide.
Here’s an illuminating (pun intended) video walkthrough by photographer Eric Curry, showing how he went about creating a photo of a B-25 bomber. His technique for lighting the plane is similar to the real estate photography walkthrough that we featured last weekend, and involves lighting the scene a bazillion times from different angles, and then combining the different parts of the photo in Photoshop.
As he says in the video, it’s a useful technique that can be done by “anyone with a digital camera and a tremendous amount of patience.”
We always get a laugh when news organizations or governments try to pass off bad Photoshop jobs as real images, but with the way graphics technology is advancing, bad Photoshop jobs may soon become a thing of the past. Here’s a fascinating demo into technology that can quickly and realistically insert fake 3D objects into photographs — lighting, shading and all. Aside from a few annotations provided by the user (e.g. where the light sources are), the software doesn’t need to know anything about the images. Mind-blowing stuff…
Needing a portable light box, Instructables member HHarry came up with a ingenious collapsible design that has built-in lighting. He’s also written up a tutorial on how you can build one too, but be warned: the materials may cost you up to $80, and you’ll need a good amount of know-how. However, if you’re looking for a hefty weekend project and need a convenient way to light and photograph small objects on-the-go, this one’s for you.