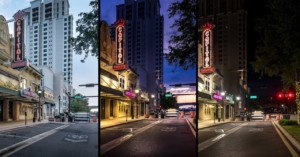
Have an old Polaroid camera lying around collecting dust? Did you know that you can use it for wet plate collodion photography? AlternativePhotography writes,
Most collodion photographers are using dedicated wet plate cameras, because wet plates are not nice to put into any ordinary modern cameras. There are instructions on how to use some normal medium and large format film cameras in the wet plate process. Most modern large format cameras are readily usable; only a special wet plate holder is needed. The drawback is the silver nitrate, possibly dripping from the holder inside the camera and eventually ruining it.
There are, however, certain types of cameras that you can use as is, without any modifications. Polaroid 100 – 400 series cameras were designed for Polaroid instant pack film, and the empty film holder can be converted to an excellent wet plate holder.
Once your film holder is modified to hold wet plates, you’ll also need to give the camera a makeshift “bulb mode” by covering its ‘Electric Eye’ light meter with black tape. The tutorial also discusses how you can expose wet plates using an enlarger and/or digitally printed film.
We’ve featured a few projects recently that combined portraits of people with photos of nature and various objects. While the look can be easily faked in Photoshop, a more satisfying way to shoot this kind of shot is to do the double exposure entirely in-camera. Read more…
New York City-based filmmaker Casey Neistat has strong opinions on social networks and how they should be used. His favorite one at the moment is Instagram, but he has a message for many of its users: “you’re doing it wrong.” The video above is his guide on how to “not suck so bad” with the photo sharing app. Don’t worry: it’s not about filters. (Be warned, though: there’s a bit of strong language).
You see, Instagram… it’s not about the pictures — it’s about the sharing. This is my family photo album from 1985. This album isn’t just precious because of the photography — it’s the documentation of life that makes me care. The magic of Instagram is that you get to peer into the lives of really interesting people.
As examples, he points to the Instagram accounts of rapper Rick Ross and singer Justin Bieber. While he’s a fan of both artists, Neistat says Ross is one that’s “doing it right”, as he regularly posts photos showing a ridiculous lifestyle that you don’t usually see. Bieber, on the other hand, floods his stream with photos of his own face.
If you ever need to remove a photograph that has been glued to paper or cardboard, you can try using the same trick that stamp collectors use: soaking in water. Amateur photographer Michael T. Lauerwrites on Quora,
Photos are processed in water so they can stay in water for a fairly long time. A lot of glue is not waterproof so it will lose strength in water. So, I’d approach this by soaking a print with paper backing in a tray with water (at room temperature) for 20-30 minutes. Take the print out of the water and lay it on a piece of rigid glass or plastic face down. Try to work the paper off the print by lifting at the edges. This part is trial and error.
After completing the work on the back, clean (squeegee) the glass/plastic and dip the print briefly in the water bath. Place the print on the glass face-up and squeegee the surface so that it’s free of water drops (this will prevent spotting). Place the print on a drying screen (a screen like what is used in a window but not metal) face down and leave it where air can circulate around it to dry over night.
Lauer warns against using heat or physical removal of the glue and paper, as both techniques could cause damage to the print.
In this tutorial I will share how I shoot “liquid flow” photos — smoke-like abstracts done by dropping cream colored with food dye into a small tank of water, then rotated 180 degrees. Read more…
Here’s a tutorial by Elizabeth Giorgi of Being Geek Chic on how you can turn your Instagram photos into beautiful canvas-style prints for about a buck a pop. You can find a text version of the tutorial here.
Watermarks are a popular way of “signing” photographs and deterring theft, but having a giant logo overlaid on your images can ruin the viewing experience. Photographer Klaus Herrmann has one solution: integrated watermarks. He writes,
[Watermarking] seems to be a viable way of protecting your images from online theft, but a watermark can ruin a photo if placed carelessly. Indeed, with a semi-transparent giant piece of text (and maybe Comic Sans as a font) written straight across the image, many people won’t bother looking at the image for more than a second. I have been applying watermarks (or, to be more precise, signatures) to my images for some time now, but I use a different philosophy by making it an integral part of each image, almost as if it was there in the original scene.
He has written up a tutorial on how you can make your watermark look like part of your photo. It’s a pretty time-intensive process, but could be useful for sharing fine-art photography online.
If you’re creating a short film that requires a “through the viewfinder” clip, there’s an easier way to create it than pointing your camera through an actual viewfinder (does anyone actually do that?). In the short tutorial above, Luke Neumann of Neumann Films shows how you can simulate the look of a viewfinder by overlaying your footage with some focusing screen images. All the necessary image and audio files are available as a free download. Read more…
A while back I was too cheap (lazy?) to get around to purchasing some speedlights and in typical DIY fashion for me, I figured I could replicate most results using nothing more than a flashlight. So one evening with my friend Sean and his wife, we decided to try out some long exposure light painting ideas. Read more…
Since November 2011 I’d been thinking about an astrophotography project: take a photo of the moon each day from full moon to full moon, then combine it into a seamless movie that looks as if someone had moved the sun around the moon for one minute. I found similar videos, but most were simulations done in software, or photographic ones that weren’t very smooth. Seemed simple enough, mostly because I didn’t see the complications that would come along with this project caused by… physics.
My plan involved setting the same exposure each night starting with the full moon, and let the moon’s dark side gradually move across its face while the lit side stayed about the same brightness. Adjust the photos’ angles to match each other, throw all of them into Final Cut Pro X and add cross dissolve transitions between them, and I’d get a smooth movie showing every phase of the moon. Read more…