
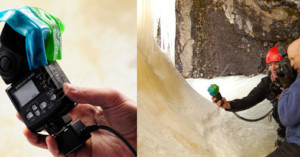
No Flash? Use a Flamethrower Instead
To promote its new Xperia phones, Sony hosted a three-day hackathon on a boat to see what creative innovations …
To promote its new Xperia phones, Sony hosted a three-day hackathon on a boat to see what creative innovations …
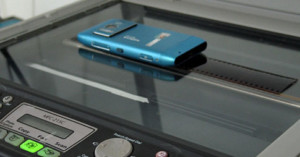
We shared a couple weeks ago that it's possible to scan film using an ordinary flatbed scanner and a DIY cardboard adapter, but did you know you can also use a large-screen cell phone or tablet computer to provide the necessary backlighting? All you need is a way to turn a large portion of the screen entirely white (e.g. a "flashlight" app). Simply place the device facedown over the film on the scanner, and scan it with the cover open.
Redscale is a technique where film is exposed on the wrong side -- rather than having the light hit the emulsion directly, you expose the film through the non-sensitive side.
The name "redscale" comes because there is a strong color shift to red due to the red-sensitive layer of the film being exposed first, rather than last (the red layer is normally the bottom layer in C-41 (color print) film). All layers are sensitive to blue light, so normally the blue layer is on top, followed by a filter. In this technique, blue light exposes the layers containing red and green dyes, but the layer containing blue dye is left unexposed due to the filter. [#]
The two main ways for doing this are loading the film upside down (if your camera allows it), or by purchasing film that has been "converted" already. A third way is to make DIY redscale film by going into a darkroom, pulling out the film, cutting it, flipping it, taping it back together, and then winding it back into the canister. Messy, but it works!
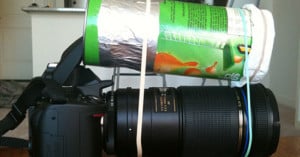
Flickr user Steve Kushnir came up with this neat idea of building a cheap DIY diffuser using a Pringles can, two layers of paper towels, and some rubber bands. He attached it to his Nikon D5000's popup flash and uses it for macro photographs of creepy crawlies.
Claire Chauvin over at Poopscape has a …
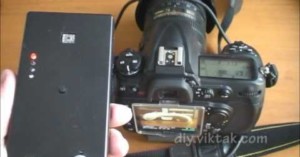
IT consultant and photo enthusiast Viktor Takacs didn’t have much success when he …
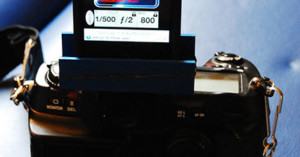
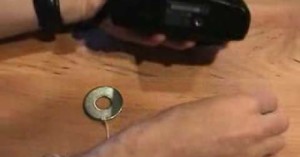
Have an older camera that doesn’t have a built-in light meter? Instead of buying an expensive light …
Cinematographer James Miller spent two years developing a technique for converting 8mm footage to digital by beaming it directly onto the sensor of a Canon 5D Mark II. He replaced the bulb on an old projector with LED lights, and used elements from a disassembled lens to focus the light. You can read a step-by-step walkthrough of this project here.

If you’re looking to buy used camera gear on sites like eBay or Craigslist, a trick you can use …
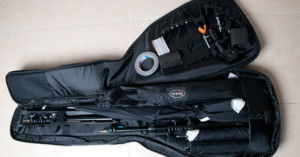
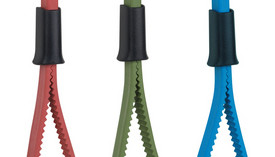
Rather than using more expensive bags or cases for moving around your lighting gear, you can buy a bass …
Last year we posted a tip on how you can use jar openers to remove stuck lens filters, but have you ever thought of using them as a cheap follow focus? Tony Carretti was shopping at Bed, Bath & Beyond when he came across a twist jar opener in the kitchen aisle that he realized could be used on his camera.
Photographer John B. Crane was ice climbing in Colorado when he came upon a little ice cave full of "tiny wonders". Wishing he had a green gel, he suddenly had the brilliant idea of using some Fruit Roll-Ups he had brought along for that purpose.

How do photographers get those wide images that bleed through the edges of the negative, showing the sprocket holes? It's a technique that allows your to create stunning panoramic images -- these little bits of film become art in themselves. These photographs are achieved by loading 35mm film into a 120 medium format camera. This tutorial was written with the Holga in mind, but the same technique works for other 120 cameras as well.
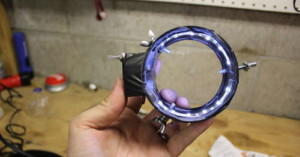
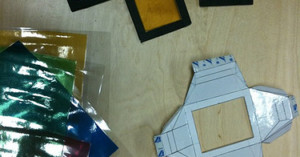
I had some stuff lying around as well as saw some parts as I was out and thought this would be fun to make. I have around $20 invested in parts. On eBay I saw ring lights for anywhere around $40 on up, so this will save you money and it was fun to make.
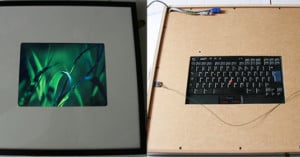
Erik Pettersson was looking for a nice digital frame, but found that all the commercially available ones were too …
You’ve likely seen this DIY trick before, but it doesn’t hurt to share this for those who haven’t. Instead …
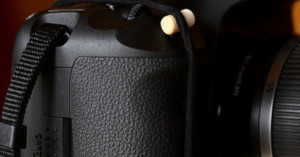
Need to hold down the shutter release for extended periods of time, but don’t want to shell out money …
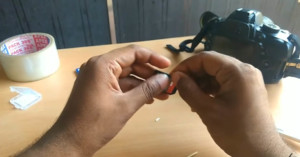
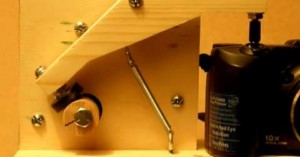
I needed a foot switch for my DSLR camera so that I could take hands-free pictures. On a long-shot, I went down to the local Radioshack to see if they had one. As expected, they didn't have any camera foot switches, but I did luck out that they had all the parts necessary to build my own. Here is how to throw together a 5-minute camera foot switch with easily obtainable parts from Radioshack.
Here’s a clever trick to keep in mind if you use SD cards for your photography: if the locking …
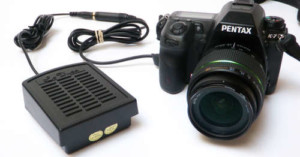
Time-lapses are usually created using intervalometers — devices that electronically trigger the shutter …

You’ve probably seen the special keyboard covers for Mac keyboards that show you the Photoshop shortcut each key is …
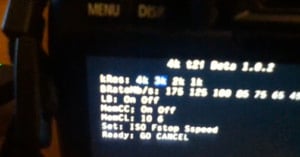
4K video recording may soon be available to Canon T2i/550D users willing to load a firmware hack onto their cameras. Apparently a guy known as Earz62801 on YouTube will be releasing a firmware hack on 1/1/11 that will give the T2i/550D 4K, 3K, and 2K recording capabilities and bit rates between 45MB/s and 175MB/s. He claims that 91 seconds of footage can be recorded at 2K and 175MB/s, though the time drops down to 6 seconds for 4K.
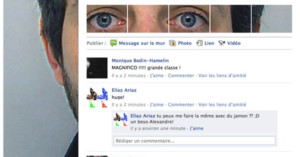
Why stick with a boring old Facebook picture when you can use the new photo strip as part of a larger, more creative portrait? That's exactly what Alexandre Oudin did with his.
If you’re planning to give any gifts to photography-enthusiasts this Christmas, you can try adding a little awesomeness to …

If you care about not having your photographs used with permission, there’s a Firefox extension called …

Dmitry Sklyarov of Russian software company ElcomSoft announced yesterday that the encryption system used by Canon to prove the authenticity of photographs is flawed and unfixable. This is the system that's used to prove that images were not altered after being captured by the camera, and has applications in things such as court cases.
To prove their point, ElcomSoft published a series of ridiculous and obviously "Photoshopped" images (e.g. the astronaut planting a Soviet flag seen above) that all correctly pass Canon's authenticity verification.
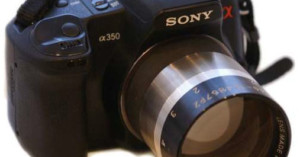
Flickr member scenery_and_fish found a Kowa 65mm f/0.75 x-ray lens, and mounted it to a Nikon D90 by using macro extension tubes and epoxy. The lens is fixed focus, lacks an iris, and is one beastly piece of glass.
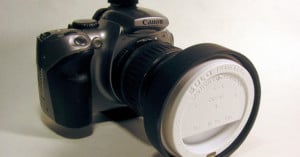
Did you know that reading glasses can be used as a cheap macro lens for your camera phone? Make reader Sean Lee discovered this neat hack and wrote a short tutorial on the technique.
If you need some quick white balancing for whatever reason, and don’t have a white balance card or Expodisc …

One day, ordinary digital cameras might be able to capture not just the image of a scene, but the …
Here’s a quick tip by Vimeo user Braxton McCarthy: use rubber bands when …
Today I spent a couple of hours designing and making a simple box to fit directly onto a normal flash unit. I also made a couple of colored filters. After doing all this I thought I could share this with others and hopefully make them happy by doing so.

Update on 12/9/21: This video has been taken down by the creator. YouTube user Prippman created this nifty follow focus …
Want more precision in your focus adjustments when shooting video with your DSLR, but don't want to shell out money for a pricey follow focus? Flickr user Adam Lisagor shot this photo showing how he created his own DIY follow focus for $6. All you need is a steel hose clamp, drawer handle, nut, and bolt. Drill a hole through the clamp, and put it together as shown above.
This neat DIY video shows how you can convert an ordinary digital camera into a night vision camera. The …
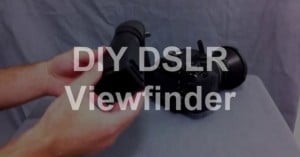
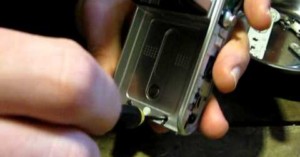
Alan Morris created a DIY LCD viewfinder loupe by slicing the viewfinder off …

Here's a useful idea related to the memory card recovery tutorial we shared yesterday: if you're ever confronted by someone who forces you to delete your photos (and our magical photographers' rights gray card doesn't work), go ahead and delete them! What most people don't know is that deleted photos can easily be recovered afterward. Even photos on a memory card that's formatted and completely wiped can usually be restored.
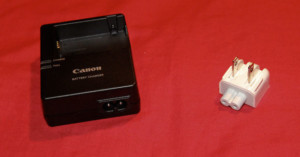
Some battery chargers (e.g. those that come with Canon's pro and prosumer cameras) plug directly into the wall and have prongs that fold into the charger, while others (e.g. the Canon T2i charger) connect to the wall via a removable cable. Though this may be more space efficient when connecting to a socket or surge protector, the extra chord takes up space and can be a hassle. CheesyCam has a clever solution: use an Apple wall plug duck head adapter to transform the charger into a wall charger.

For whatever reason, Vimeo user Aniebres decided to combine the bulkiness of an SLR camera with the lowly sensor of a phone camera. Taking an old Canon film SLR, he gutted it and created a space for his iPhone to snap into place. What's sad is that the SLR acts as a completely useless shell, and the lens has to be removed for photos to be taken. If only he took off the lame Apple sticker on the front, he might be able to pass off as a photographer... as long as he only snapped photos while changing lenses or something.
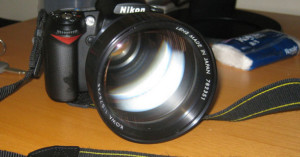
The ratio between the focal length and the aperture (diameter) of a lens is called the f/number. The smaller the f/number, the more light is let in. Fast lenses start around f/2.0, and the light let in goes as the inverse square. Compared to f/2.0, f /1.4 lets in twice as much light, f/1.0 four times, and f/0.71 eight times. The fastest camera lenses designed for DSLRs and widely available are between f/1.4 and f/1.2, but lenses as fast as f/0.75 have been made in quantity for special applications, and some of those are available quite cheaply via scrap yards, surplus stores, or eBay.
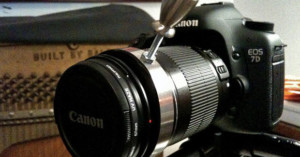
These ultra-fast lenses usually are branded either Kowa or Rodenstock and were designed for use in medical or semiconductor industry equipment, etc. They are not well-suited for use on DSLR cameras, and are no substitute for an f/1.4 or f/1.2 lens that was designed for your camera. However, they easily can produce very distinctive images. Here's how to use one on a DSLR.