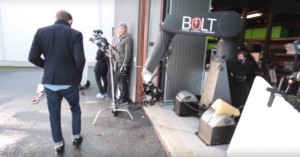
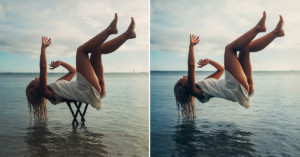
Posts Tagged ‘beforeandafter’

Satellite Photographs Showing the Rapid Spread of Humans Across the Earth

Satellite Photographs Showing the Rapid Spread of Humans Across the Earth spread1 mini

2008 marked the first time in history that more of Earth’s population lived in cities rather than in the countryside, and by 2050 nearly 70% of the world’s population will reside in large cities. A new series of satellite photographs captured decades apart by NASA’s Landsat department and the U.S. Geological Survey offers a striking look at how human cities have spread across the face of the Earth in just a few short years. The image above shows Las Vegas in 1984 and in 2011.
Read more…

How Before and After Bodybuilding Photos are Often Faked

Here’s a clip from the bodybuilding documentary “Bigger Faster Stronger” in which photographer Rich Schaff spills the beans on some industry secrets for how those unbelievable before-and-after photos promoting bodybuilding products are made. He shows how both shots can be of the same model on the same day, with various tricks and image manipulations used to achieve the drastic differences you see.
Read more…

Portraits of Fighters Before and After Boxing Matches

Portraits of Fighters Before and After Boxing Matches boxer1 mini

For his project titled 141 Boxers, photographer Nicolai Howalt shot portraits of boxers before and after boxing matches. The images side-by-side tell the stories of what happened in between when they were captured.
Read more…

Before and After Comparisons of Adobe’s Amazing Image Deblurring Feature

Before and After Comparisons of Adobes Amazing Image Deblurring Feature deblur1 mini

Last week we shared a sneak peek at some jaw-dropping image deblurring technology currently in development at Adobe. The video wasn’t the best quality and was captured from the audience, so we didn’t get to see the example images very clearly. Adobe has now released an official video of the demo, giving us a better glimpse at what the feature can do.
Read more…

Before and After Google Satellite Photos Show Tsunami’s Devastation

Before and After Google Satellite Photos Show Tsunamis Devastation beforeandafter

Here’s a Picasa gallery showing Google satellite imagery of various locations in Japan before and after the 2011 Sendai earthquake and tsunami. It’s a pretty startling birds-eye-view of how devastating the tsunami actually was.

Japan (via Boing Boing)

Editing for Portraits

This entry will describe my thought process when editing a portrait, though it could apply to general photos too.

Here’s the original photo I will be working with straight out of camera (i.e. RAW but processed to JPEG without any edits using Adobe Standard for color settings).

Editing for Portraits dpportrait1

My initial reaction is that it’s underexposed on the skin. Then I notice that it’s crooked, but that doesn’t bother me too much in this picture. I also notice that it’s a bit on the cold side. (Read: Check exposure, composition, and white balance. Not necessarily in that order).

So I make some really basic edits. Since I’m not going to crop or rotate (I usually worry about composition first), I increase the exposure until I like where the skin tones are (while making the WB a bit warmer). Sometimes I’ll use fill light or recovery depending on the situation but in this case increasing the exposure was sufficient. In the end, it’s about making the skin look as I want (and harsh change in dynamic range on the skin usually looks bad but it’s not a problem in this picture). The next thing I usually do is to play with the black clipping and contrast until I’m happy. However the contrast in this picture is already to my taste so I didn’t touch anything. Then I sharpen using preset sharpening in LR. I usually don’t change the preset sharpening unless I think it looks bad. So here’s the picture after those edits (hover over to compare):

Editing for Portraits dpportrait2

Now take a look at the following picture. Can you figure out the two things I did to finish it off? (Hover your mouse over it to compare)

Editing for Portraits dpportrait3

The first edit is a bit more obvious than the second. I added a lens correction vignette to the outside. I do this to most of my images and it’s more of a personal taste thing (and to bring the subject out more) than anything else. The second edit is a bit harder to catch, but it’s all in the eyes…

Did you catch it? Look at his eyes. Often for single person portraits, I will do spot editing on the whites of the eyes to make them a bit whiter because they tend to be shaded in soft lighting due to eyebrows/eyelashes/eyelids.

That is all! Of course, this isn’t comprehensive in any way but is just an example of how I typically think and how I thought about this picture.


This article was originally published here.

Dandelion in the Wind

Here’s a photograph I took today while hiking with friends on the Bailey Cove Trailhead in the Shasta-Trinity National Forest:

Dandelion in the Wind sang1

Since I wanted to capture the small flowers flying off of the dandelion as my friend blew it, I needed to separate them from the busy background by using the smallest depth of field possible (in this case, it was f/2.8). This blurred the dry grass in the background enough to make the flying dandelion flowers stand out more.

While this photograph captured what I intended to, it still needs a good amount of post-processing work. First, notice that white balance is off, my friend’s face is blown out, and that certain areas of the photograph are too dark. We can correct these things (and add a little vibrance) with the following settings (shown in Adobe Camera RAW):

Dandelion in the Wind sang2

These changes result in the following image (hover your mouse over it to compare it with the original):

Dandelion in the Wind sang21

Now we can finish off this basic post-processing improvement by increasing sharpness a little, tweaking the hue of the yellow grass in the background, and adding some vignetting. This is what results (hover to compare):

Dandelion in the Wind sang3