Does 900 DPI Make Better Prints?
900 dpi prints?! That’s kinda crazy, right? You just need to print at 300 or 240 or 200 because somebody on the Internet told me no one can tell the difference.
For 16×20 and larger fine art prints, it’s worked really well. But for 11×14 and smaller, there’s always been something lacking for me.
If you’ve ever seen an original print made by Ansel Adams, it’s hard to miss the sheer amount of detail captured. Minute blades of grass, caterpillar holes in aspen leaves, the many textures of Yosemite’s granite and trees. And no wonder because a large number of Ansel’s photographs used 8×10 film, which is roughly equivalent to 1,000 megapixels (yes, one thousand — a gigapixel!)
Film’s resolution varies depending on lenses, aperture, and diffraction, but 3500 dpi is a good ballpark for an 8×10 original. So when you look at an 8×10 inch print from 8×10 inch film by Ansel, you are looking at about 35,000 x 28,000 pixels, which is over ten times the amount of information in an 8×10 print made at 300 dpi (3000 x 2400 pixels). All those extra pixels make a difference, and that analog 8×10 film print quality is something I’ve longed for in my digital prints.
So I tried some things on my Canon PRO-4000 printer on a hunch and curiosity. I made a print from a very high dpi file. The result was something I never expected to see. It was significantly sharper than the prints I had been making at 300 dpi, the resolution everyone said was correct.
I wasn’t sure if what I was seeing was true, so I compared it to my library of test prints. And sure enough, what I was seeing was real.
This wasn’t a simple comparison. I’ve made fine art digital prints for clients for over twenty years, owned two $100,000 Chromira printers, as well as about every generation of inkjet printer since 2000. My high-end clients have high expectations…some of them even worked for Ansel Adams. That keeps me on my toes.
In the process of evaluating printers to meet these expectations, I’ve created a library of test prints on printers from Canon, Epson, as well as LighJets, and Chromiras, and on all kinds of papers with prints made at 300 dpi. Throw in a couple prints from other labs and it’s a snapshot of what professional fine art printing has produced in the last 20 years. This library, along with a couple Ansel Adams Special Edition Prints, gives me a point of comparison for evaluating any printer, paper, or process.
When I compared these test prints to my library, they far exceeded what has been the accepted “standard.” But this isn’t about some technical achievement. What grabbed me is they were more beautiful.
For the first time, an 8×10 digital print grabbed me the way the 8×10 Ansel Adams prints I studied while working in Yosemite grabbed me.
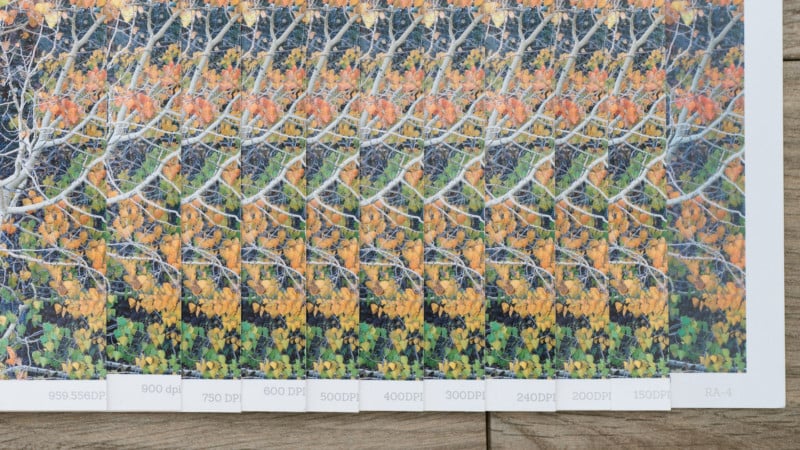
I wanted to understand how the printer handled different resolutions, so I devised a test. I took a very high-resolution file of about 100 megapixels and made copies that I then downsampled to various dpi settings from 150 dpi to 900 dpi at 8×10 inches, as well as an unresampled file at 959.556 dpi. Then I printed each of these files.
I wanted to see what was the limit of the Canon printer, how much dpi I could give it, and if I any resolutions would cause any problems. What I found was game-changing.
The more resolution I gave the printer, the better the prints got. It could handle everything I could give it.
More resolution led to sharper edges, more detail, more delicate features resolved. Fine branches moved from mushy to crisp and clear. But most amazing was how everything became more dimensional, more 3-D, more like I could reach in and grab it. It because more like those Ansel Adams prints that defined my expectations of what a photograph could be.
It makes me giddy just to think about it because it brings such a magical quality to my prints. I never expected digital printing would achieve this, and it is letting me make prints that are closer to my vision than ever before.
What makes things even better is, it’s a “free” upgrade. Giving your printer more dpi doesn’t cost you anything other than making a couple changes in your workflow, and at least with the Canon PRO 1000 and 4000 it seems to print just as fast as when I give it a 300 dpi file.
Application
Let’s talk about putting this into use. In most workflows when it’s time to prepare a file for print, you resample or resize the file to a recommended dpi. This step actually changes the file and either reduces the number of pixels or uses computer algorithms to increase the number of pixels in an attempt to replicate the original detail.
We don’t want to resample. We want to give the printer all the original resolution the camera captured, whatever that is. If you have 24 megapixels, give it 24. If you have 45 megapixels, give it 45. It requires us to change the way we think at this step. Instead of thinking about what dpi our file should be, we just give the printer everything the file has, and that will give us the best print for whatever size sensor you use.
Photoshop
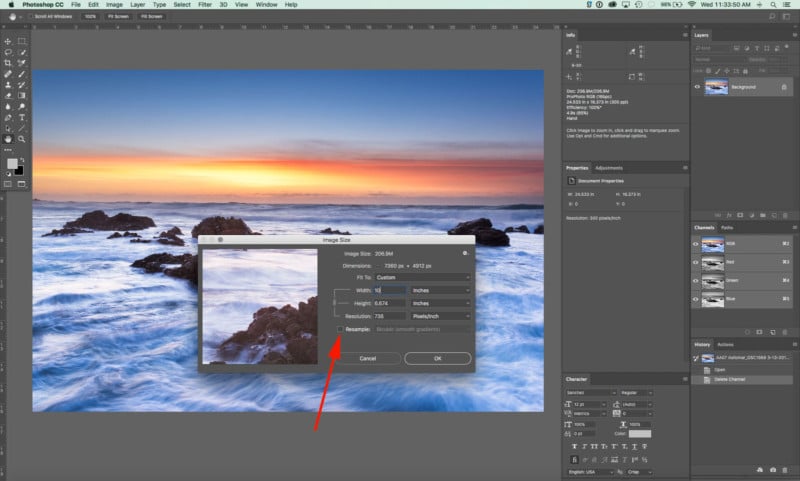
In Adobe Photoshop, uncheck “Resample”, then enter the height and width you want to print at. The resolution in pixels will stay the same, but how they are spread out, which is a fancy way of explaining dpi, will change based on the height and width you enter.
Lightroom
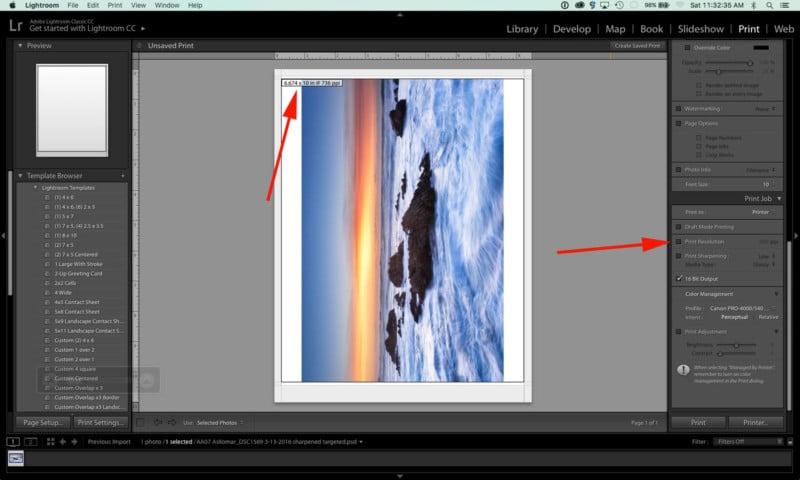
In Adobe Lightroom, turn on “Show Guides” under the menu View>Show Guides. This will show you the height, width, and resolution of your file in a little box in the upper left-hand corner of your image. Then uncheck “Print Resolution”. Now, if you change the height and width of the image, the number of pixels will stay the same, but how far they are spread out will change based on height and width.
Other Editing Software
What about ON1, Alien Skin, and other editors? I don’t own them, so you’ll have to figure it out based on my examples above. They should let you do the same thing, but they might have different names for it.
My test prints were made through the Canon Print Studio Pro plugin, but I’m suspecting that it will work through the basic Mac or Windows printer driver.
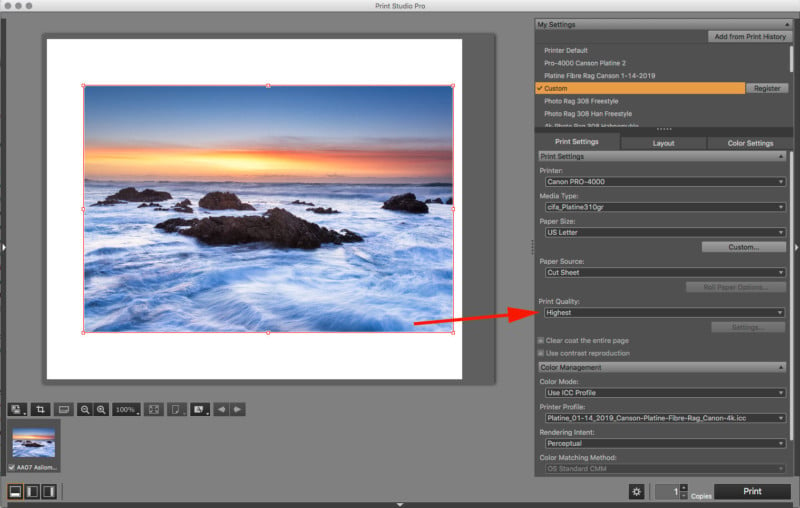
Just be sure to set the “Print Quality” to the highest setting available as shown in figure 3. This setting controls how the printer hardware works, and choosing the highest setting is essential to getting the most out of the printer.
I started this article by talking about 900 dpi prints to grab your attention, but now that I’ve explained it further, I hope you understand that I’m not telling you to print at 900 dpi. I’ll reiterate that with this process, we’re not trying to hit a specific dpi or file size. We’re just trying to give the printer everything we have. If you have 450 dpi, give it 450, or 625 dpi or whatever your file and print size turns out to. Because whenever your resolution exceeds the 300 dpi “standard”, our prints will have more detail and become more dimensional.
A couple of final details before we wrap up. As I’ve noted, my tests were done on a Canon PRO-4000 printer. I’ve also tested it on the PRO-1000 printer, and I’m assuming it will work on the current 24” and 60” versions of the Canon ProRO Printers. How, and if, it works with other models or brands will require you to do some testing. Changing any setting (variable) from my workflow may produce different results.
The other thing is that decimal numbers don’t seem to matter. For a long time, it’s been the belief that decimal numbers like 299.58 would cause rounding errors and affect quality, and therefore we should give inkjet printers whole numbers. I don’t see this as being an issue with the Canon PRO printers after using this workflow in production for myself and for my clients.
Lastly, the effect does follow a curve. The most noticeable gain in quality happens in the 400/500/600 dpi range. At higher dpis, it requires a little more squinting to see the increase at each step, but after looking closely with the naked eye and a loupe, as well as showing the prints to other knowledgeable viewers, the effect is there. I’ve printed up to 1200 dpi and it’s given me sharp definition on details that are hair thin in the print. There is a point of diminishing returns, but since there is no downside to using more dpi, I don’t worry about where that point is.
So now you have the secret to making your best prints ever. You just have to fire up your printer and put this process into action!
About the author: Rich Seiling is a photographer, master printmaker, and teacher who has worked with thousands of photographers to produce prints for museums and galleries. The opinions expressed in this article are solely those of the author. Seiling shares his printing knowledge at MakeBetterPrints.com through articles, videos, workshops, and coaching sessions.