5 Projects to Push Your iPhone Camera to its Limits
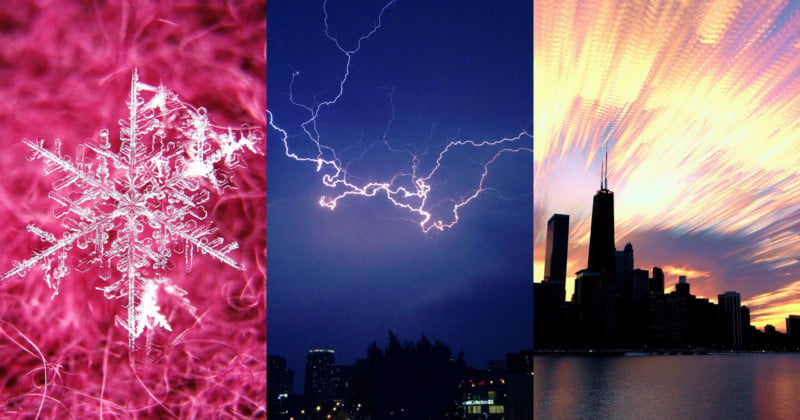
For the past few years, I have been really enjoying pushing the iPhone camera as far as it can go, to do photography projects that many people might not have realized you can do with an iPhone. I also use other cameras, but there’s something fun about the always-in-your-pocket aspect of iPhone photography.
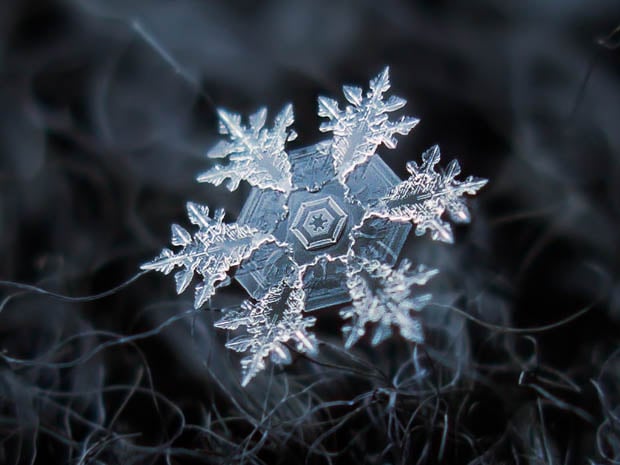
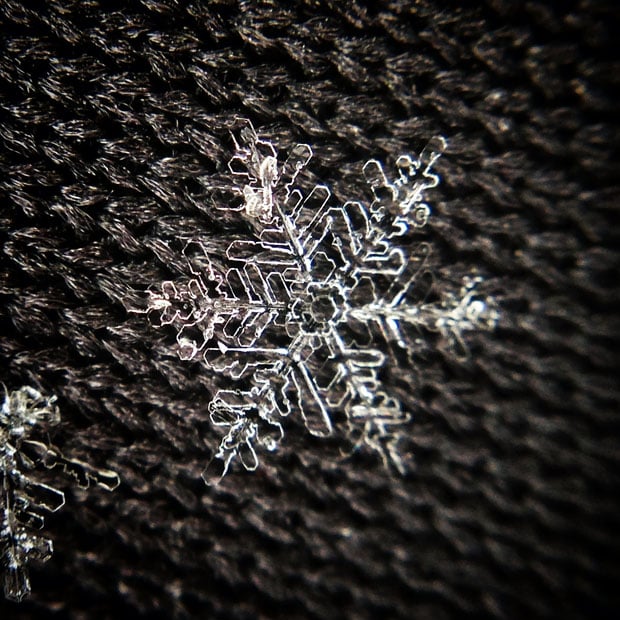
#1: Snowflake Macros
To photograph snowflake macros with an iPhone, I use an Olloclip Macro Pro at the strongest magnification (21x). It can be difficult to get the focus exactly right on such extreme closeups, but the depth of field using the iPhone is a bit more forgiving than with most larger cameras. The catch is that you have to hold your iPhone very close to the subject, so while this works well for something inanimate like snowflakes, it isn’t the best setup for something like insects which will run away if you get too close.
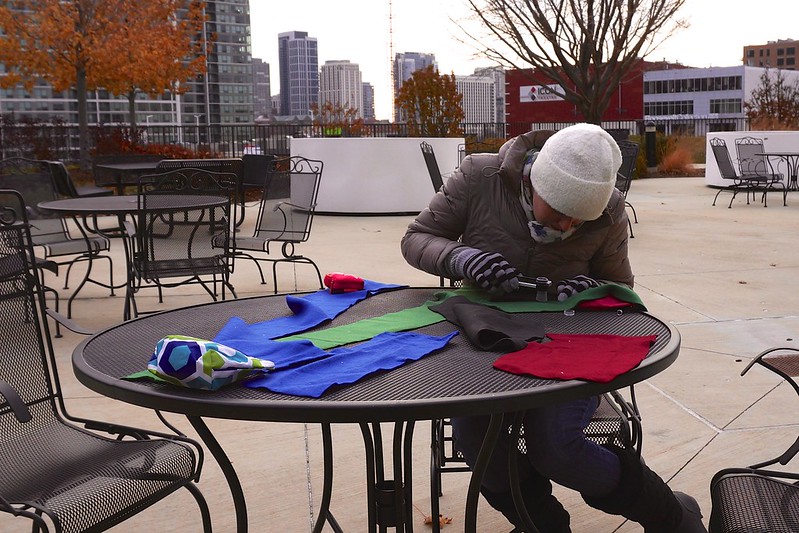
To shoot snowflakes, I usually go outside with some pieces of fleece cloth and set them up on a picnic table or similar to catch snowflakes, and then if the snowflakes look good I keep taking photos until I get too cold. Your iPhone will also get cold and shut off if you’re not careful, so a backup battery is essential here. I also like to use warming packs in my pockets to help my hands and my iPhone warm up while outside.
I’ve learned that not all snowflakes look special up close! I used to assume they all look beautiful up close (especially since I grew up in a climate where it doesn’t snow), but now I think that photographers just don’t tend to publish photos of snowflakes that aren’t pretty. Beautiful snowflake crystals only form under certain weather conditions – in particular, if it’s too warm (just at or just above freezing) you usually don’t get very nice snowflakes, and if you do they melt very quickly. After several times when I bundled up and brought all my gear outside only to see that the snowflakes weren’t worth shooting, I now don’t usually even try unless it’s about 28F or below.
I find that fleece works very well for catching snowflakes, since the fibers hold the snowflakes up in the air, which prevents them from melting as quickly, and the fleece up close provides interesting texture and color. I’ve tried some other surfaces, like origami paper and glass, but fleece cloth remains my favorite. This also allows me to add a warm and fuzzy feel to an otherwise cold scene.
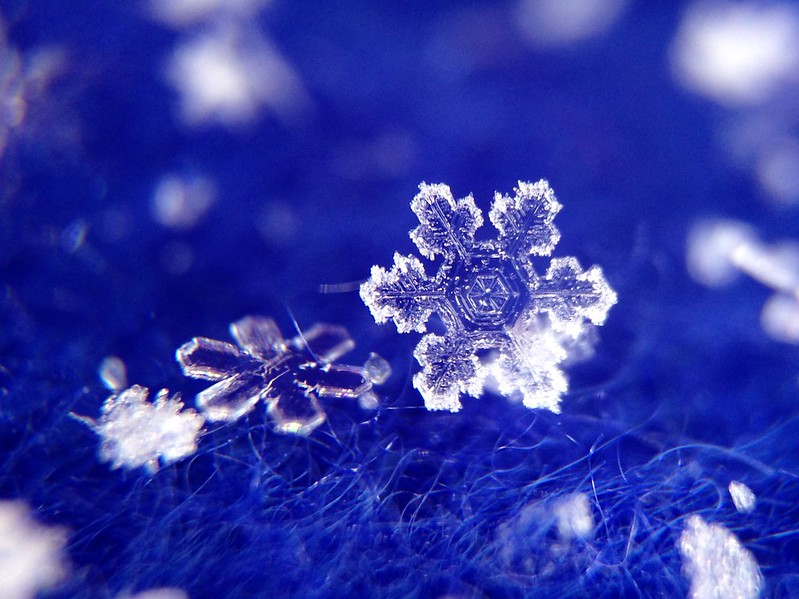
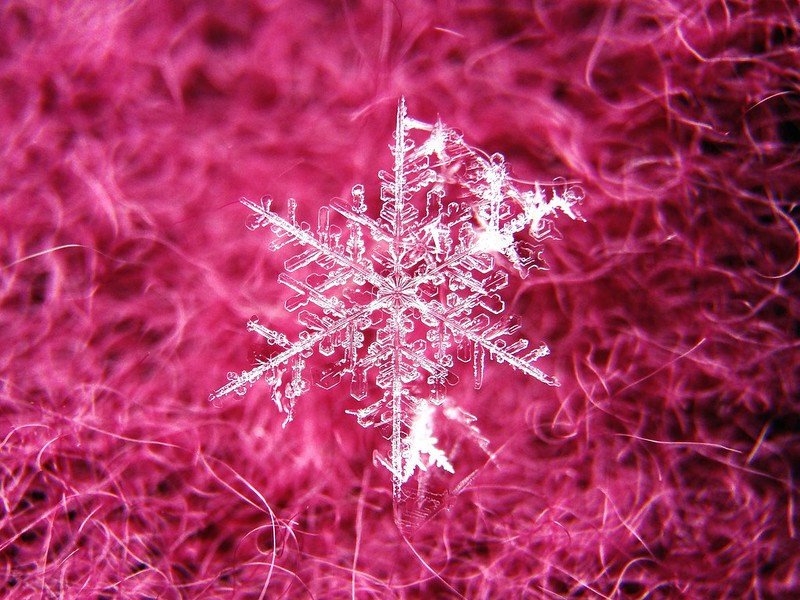
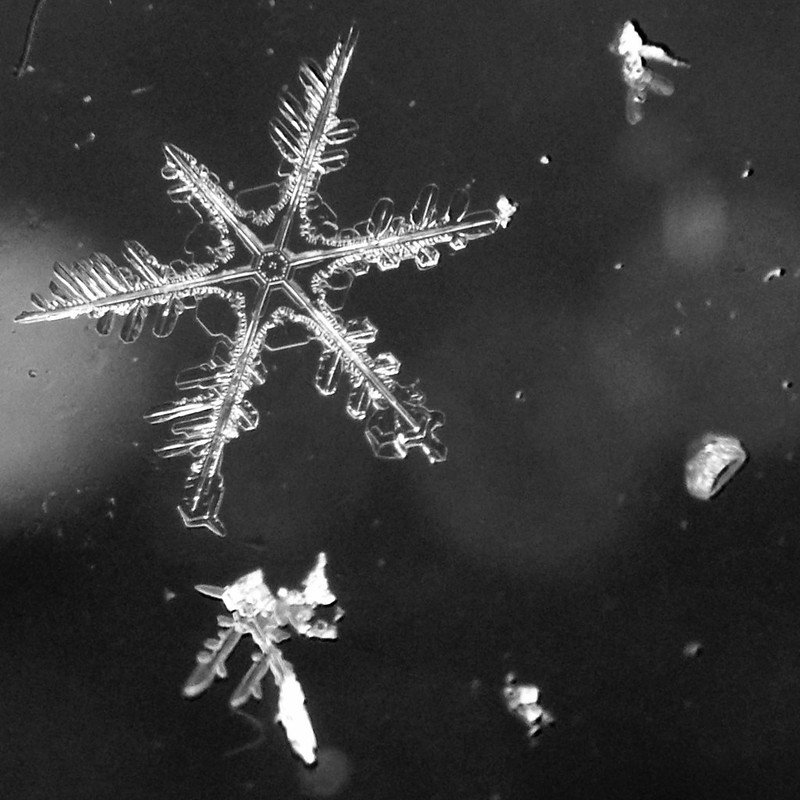
Here are some photos of snowflakes that I’ve taken with this setup:
Here’s a behind-the-scenes shot of me with my snowflake setup:
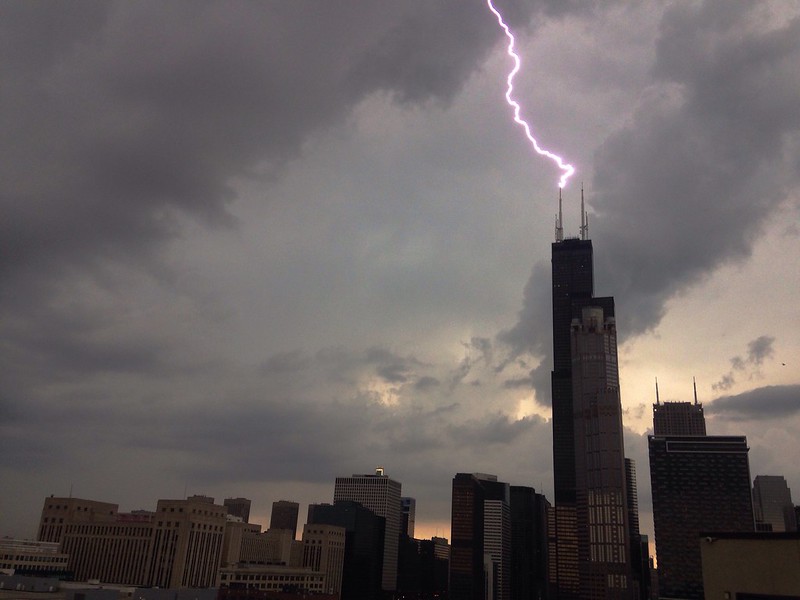
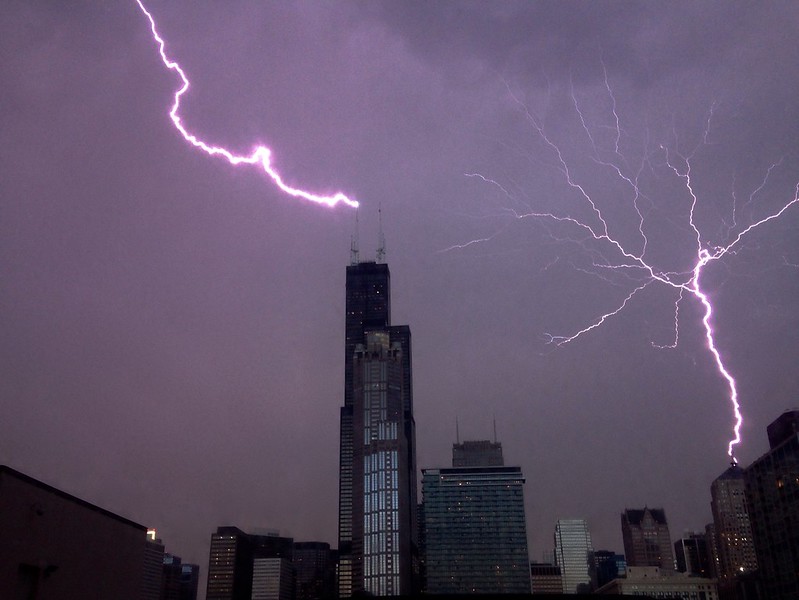
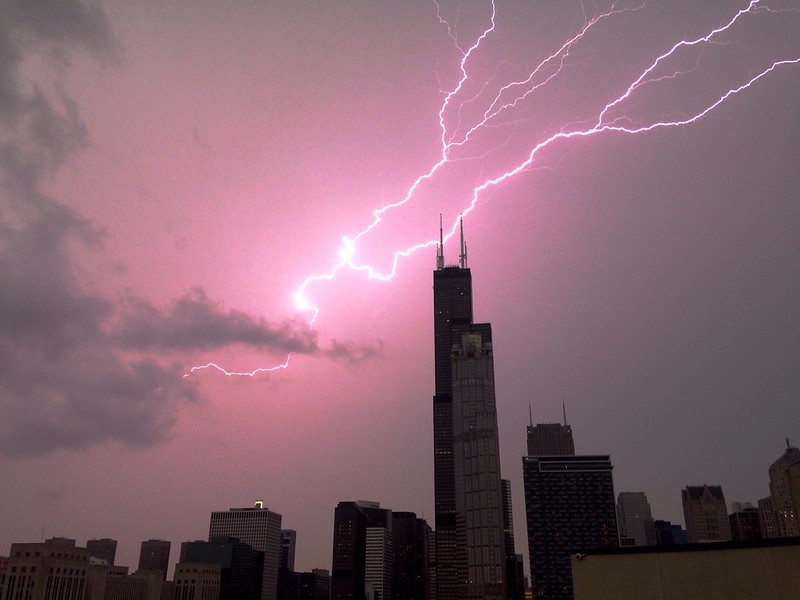
#2: Lightning Bolts
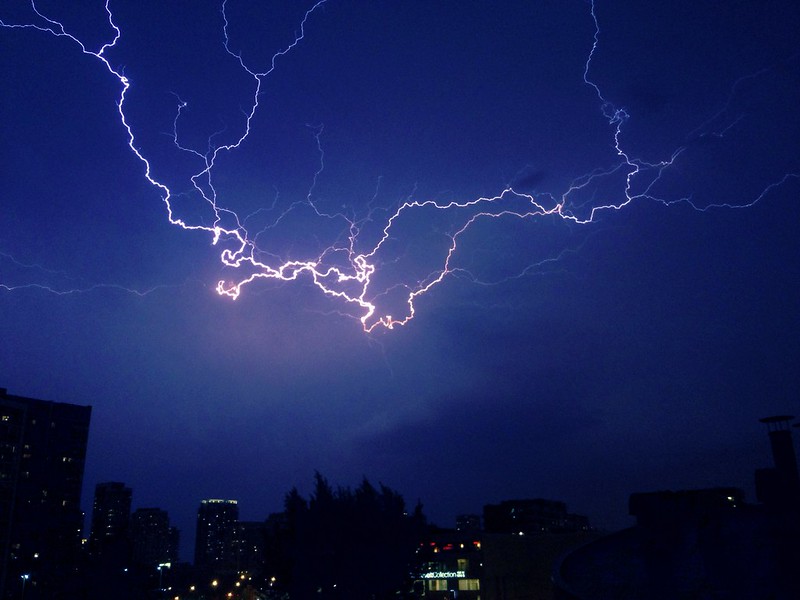
The app iLightningCam makes this almost too easy! You set up your iPhone on a tripod and iLightningCam takes lightning photos automatically based on motion detection. The hard part is finding a safe place with a good view of a storm, and knowing when to go there and set up and how long to wait before giving up.
Lightning is dangerous, so I never do this outside – but when I lived in Chicago, I was lucky enough to live in a high-rise with good views of storms through various windows and even through a doorway to the roof. When a thunderstorm is coming, the best views of lightning are often before the main storm arrives – once it’s pouring where you are, you only see flashes, not distinct bolts.
So, to catch a good view of lightning, you need to watch the weather predictions carefully and be set up before a storm arrives. I do this by watching the radar on the app Storm (by Weather Underground) and also using the webapp at LightningMaps.org which shows real-time lightning strikes. Often you can also get a good view in the other direction after the main storm passes over. Obviously, if you decide to try this, be responsible for your own safety and be careful.
A behind-the-scenes look:
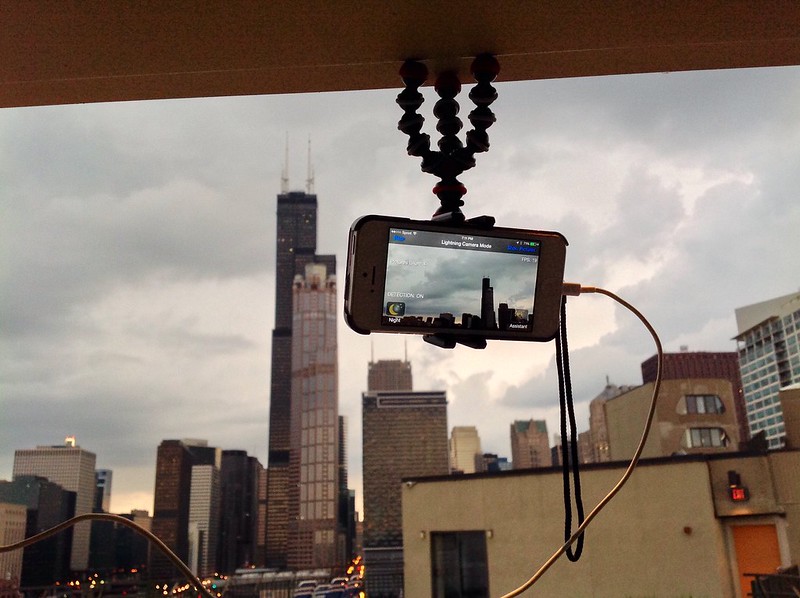
In that shot, you can also see my favorite tripod for my iPhone: a mini Joby Gorillapod with iPhone grip attachment and magnetic feet.
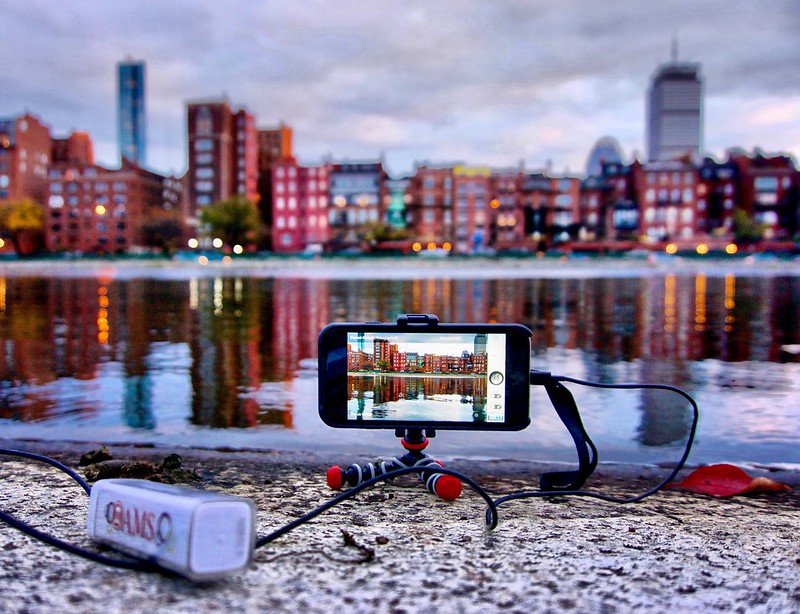
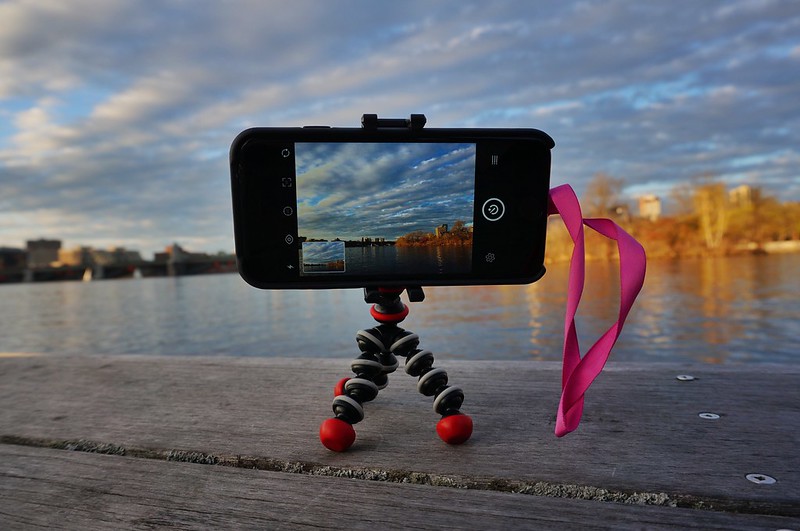
#3: Timelapses and Timestacks
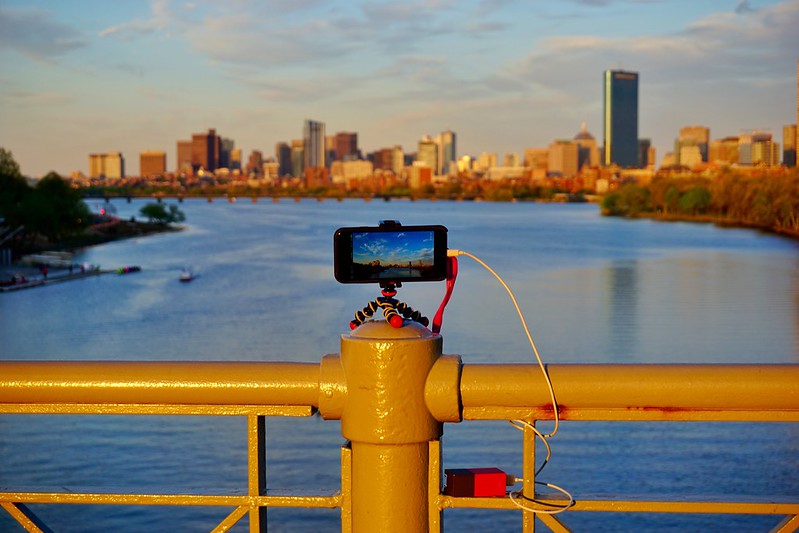
To shoot timelapses, you need a tripod, and a backup battery will really help. I use a mini Joby Gorillapod with iPhone grip attachment, and my favorite backup battery is the Fluxmob Bolt because it has built-in wall prongs (so I can recharge it at a coffee shop while I’m out and about). Here’s a behind the scenes shot of my usual setup:
I use two different apps, depending on my goal. If my goal is to produce a time-lapse video, my favorite app is Lapse-It Pro. It allows you to adjust the playback frame rate after the fact, and it also allows you to take full-frame shots – clearly that will eat a lot more memory, but I like to do it if I’m not low on space, because then I can also export individual frames to use as still photos. It also lets you transfer all the frames to your computer as a zip file using iTunes. Also, a key feature: if your battery dies during a time-lapse, you don’t lose the whole time-lapse.
Here’s a video made with Lapse-It Pro:
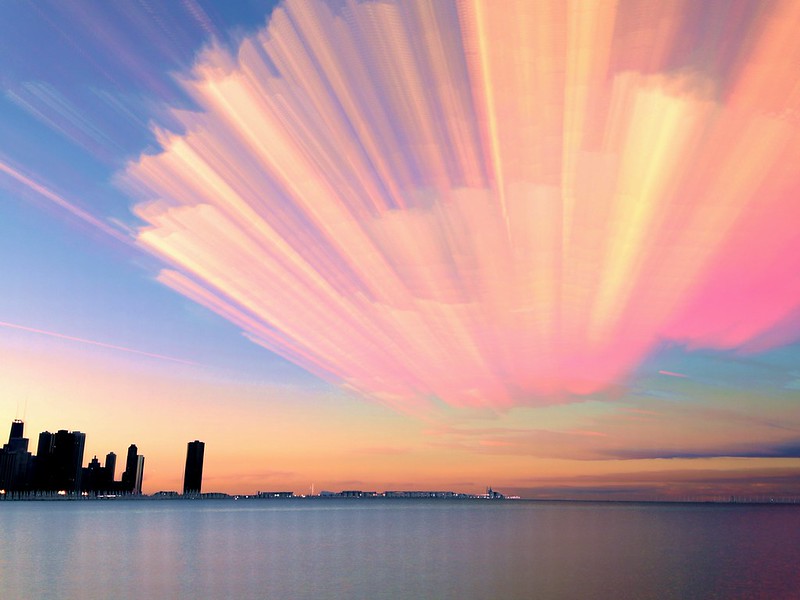
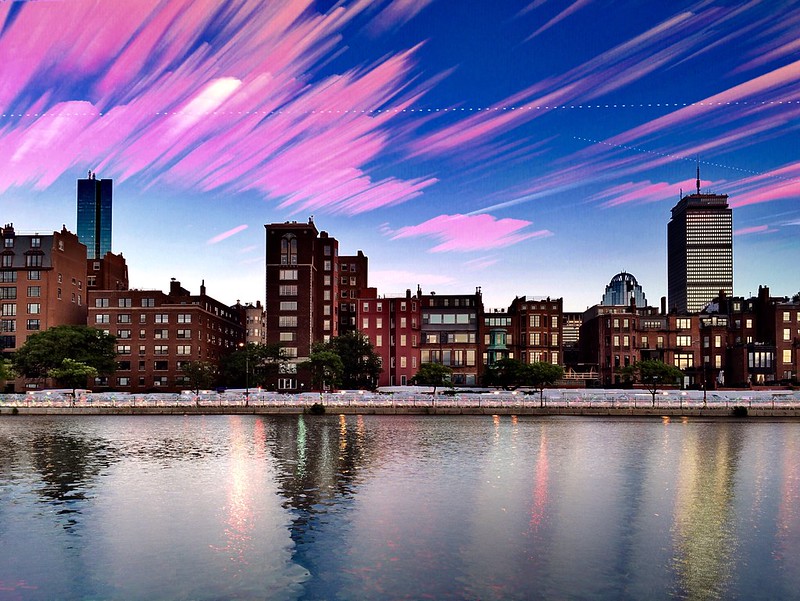
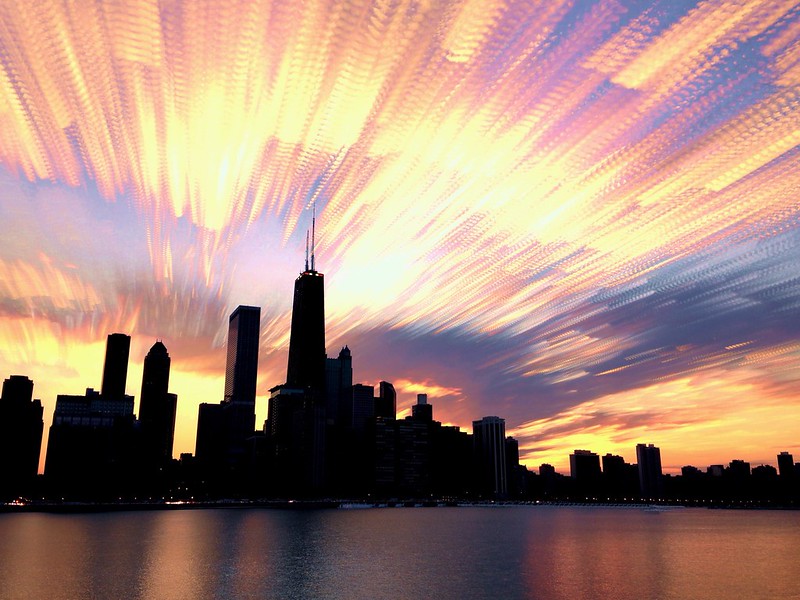
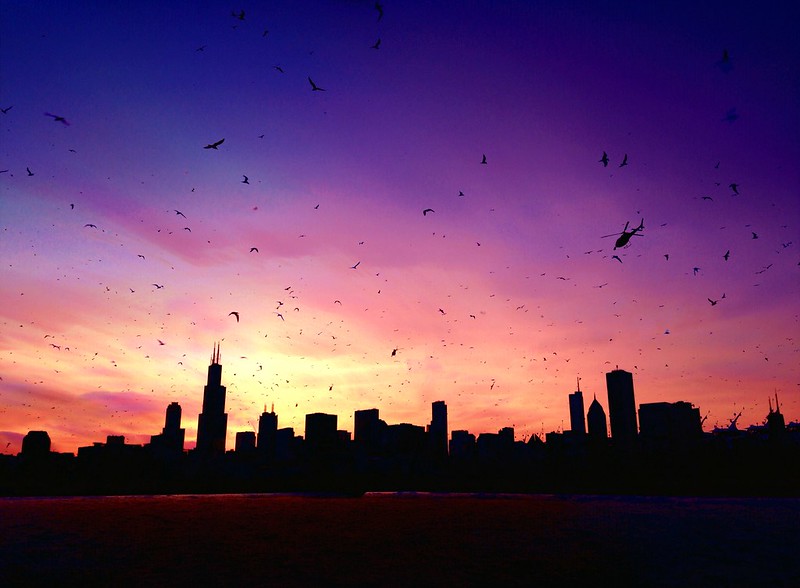
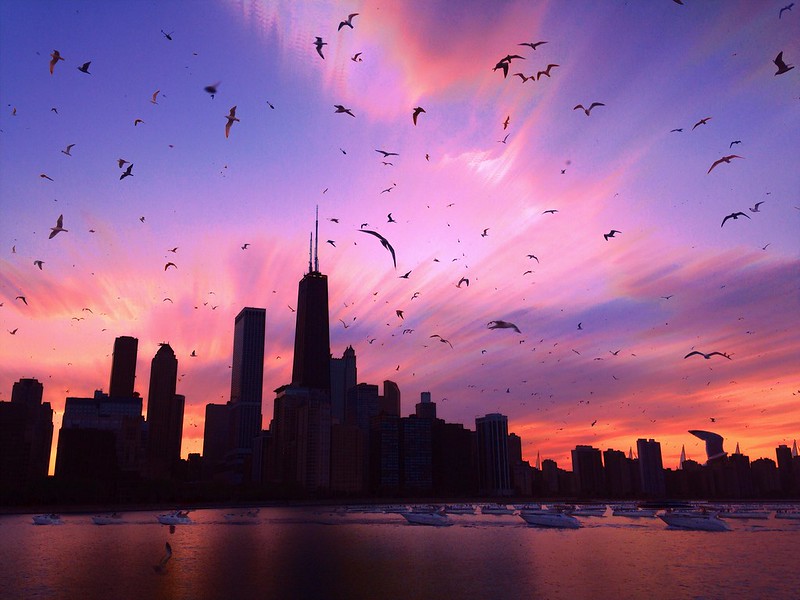
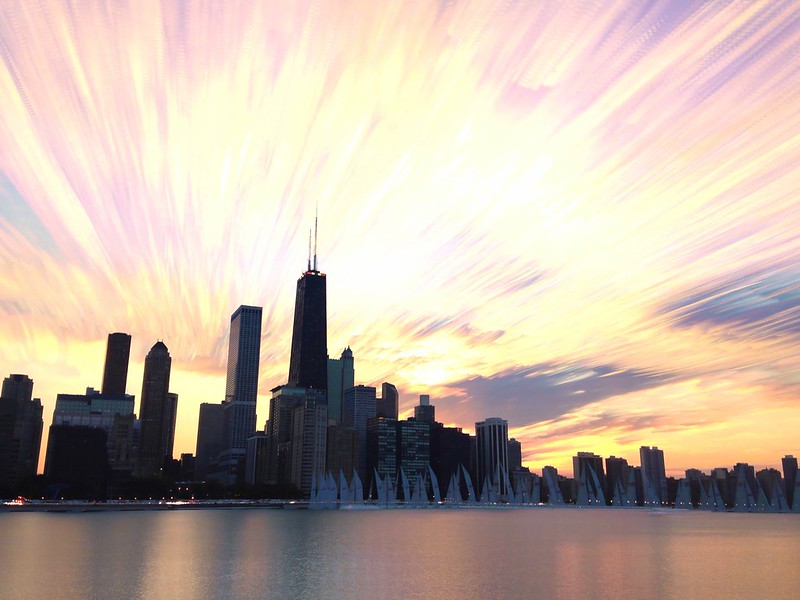
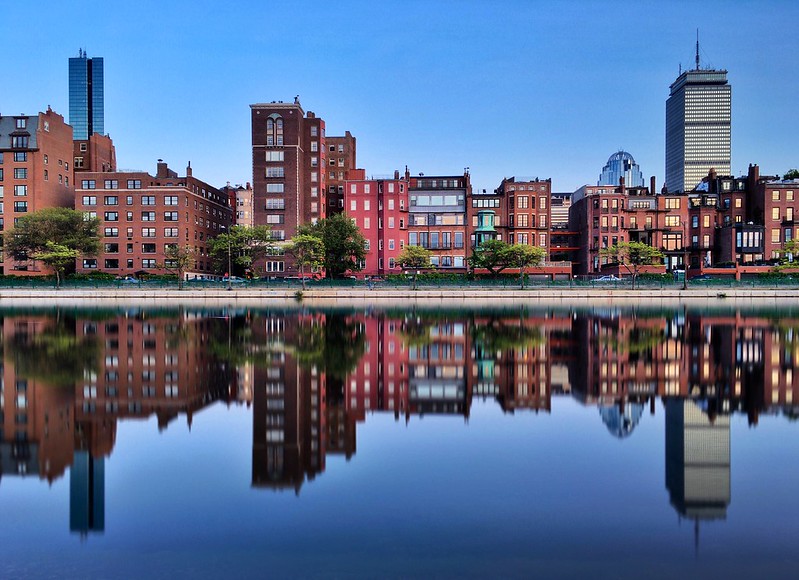
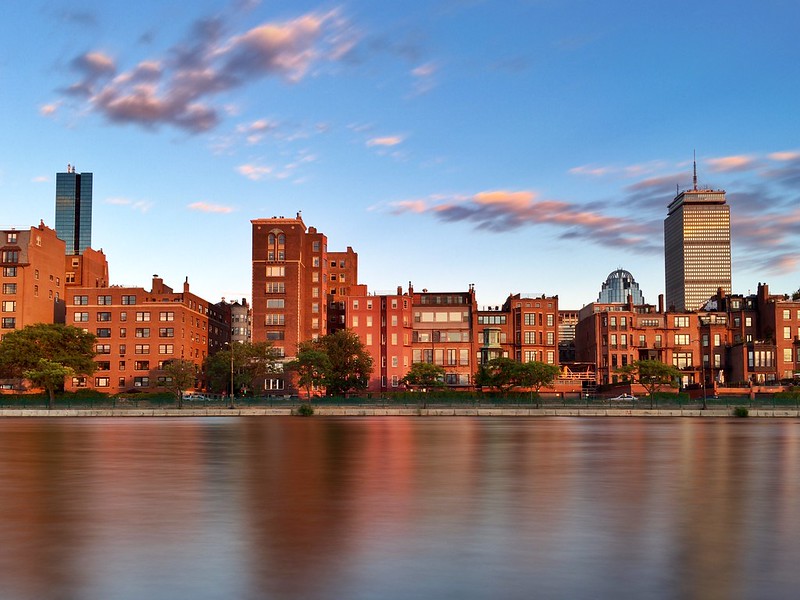
On the other hand, often my goal is to create a timestack. Instead of playing all the frames as a video, a timestack is created by blending all the frames according to some rule – typically, keeping the lightest or darkest pixel at each point. You have probably seen this technique used to create star trails, but did you know you can use it on sunsets to get interesting cloud trails? And did you know you can do this 100% on the iPhone? The app I use for this is iLapse, which has some drawbacks, but to my knowledge is the only app that will stack timelapses right on the phone (if you know of any others, please let me know).
Stacking in Lighten mode (keep the lightest pixel at each point) gives bright cloud trails:
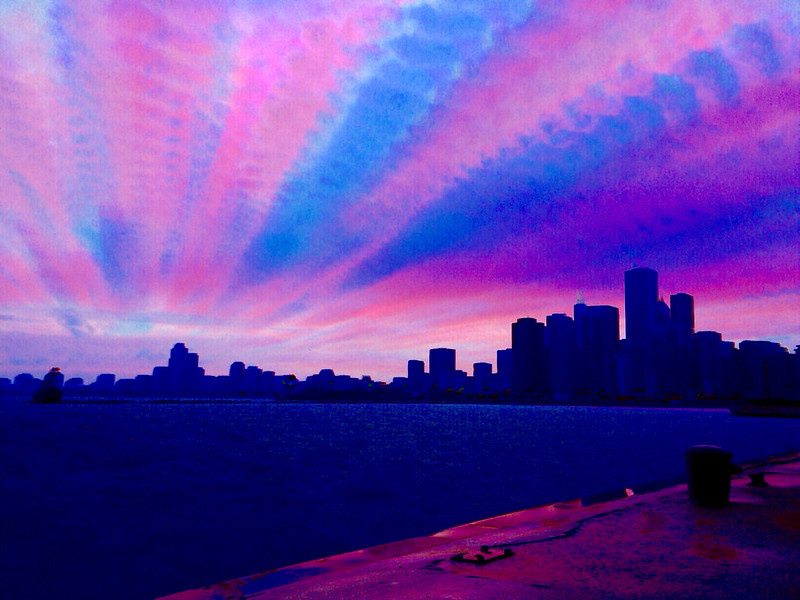
Stacking in Darken mode (keep the darkest pixel at each point) tends to give moodier clouds and lots of bird silhouettes:
For sunset timestacks, I usually try to start capturing the timelapse about 15-20 minutes before sunset, and continue 15-20 minutes after sunset. I capture frames at anywhere from every 1 second to every 6 seconds, depending on the clouds and how fast they’re moving, and also depending on how much I’m worried about using up my storage space.
Of course, if you don’t care about doing the stacking 100% on the iPhone, you can capture frames using any app or any camera, and then stack them on your computer (I use the free desktop app StarStax). But there’s something fun about doing it 100% on the phone – in Chicago I used to take the El out to a sunset view spot along the lake and then watch the timelapse stack on the train ride home.
More behind the scenes:
Notice the goose checking this one out:

Also cool: making a video of the stacking process. Though I have to admit I don’t know any way to do this 100% on the iPhone. For this example, the time-lapse was shot on the iPhone but I made this video of the progressive stacking on my computer using StarStax:
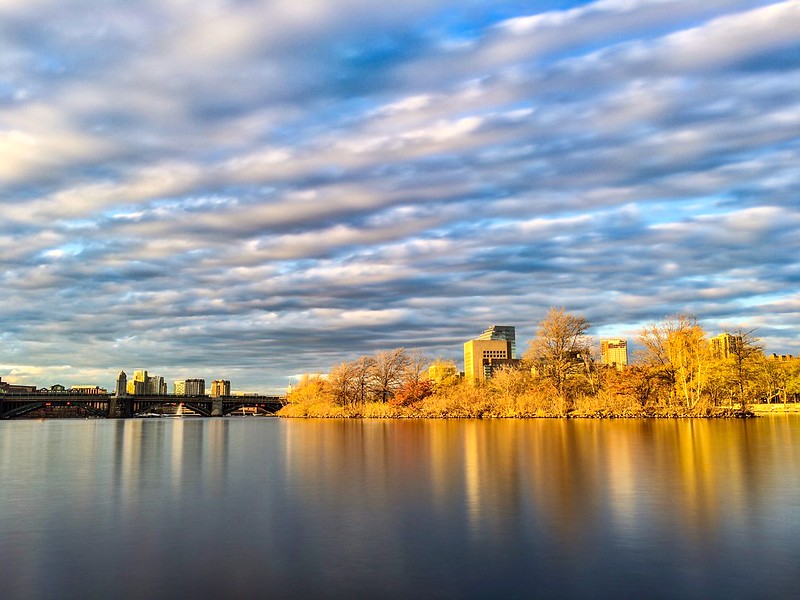
#4: Long Exposures
Doing long exposures on an iPhone is a very similar concept to the timestacking above. Since you can’t really keep the iPhone shutter open for long periods of time, iPhone long exposure apps work by blending several exposures in-camera for a long exposure effect. The app I’ve been using is Slow Shutter Cam. In these examples you can see the long exposure effect in the smoothed-out water:
Behind the scenes on long exposures using Slow Shutter Cam looks pretty much the same as on the timestacks above, but since you only need to leave the long exposure for about 8-30 seconds instead of for 30-45 minutes, a backup battery isn’t so necessary here.
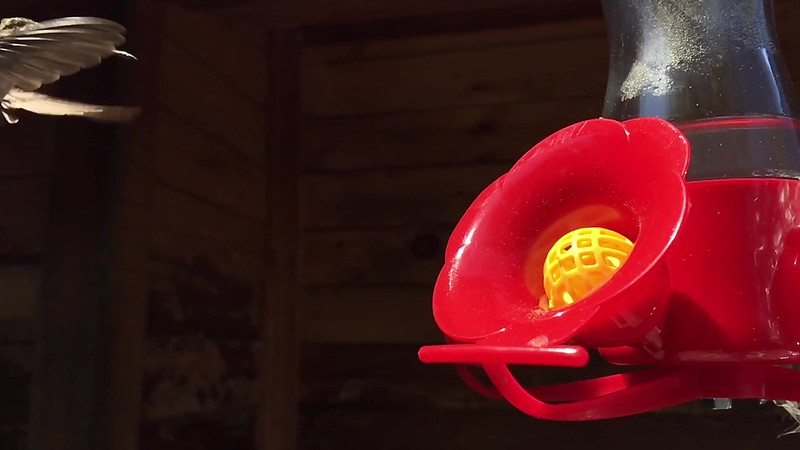
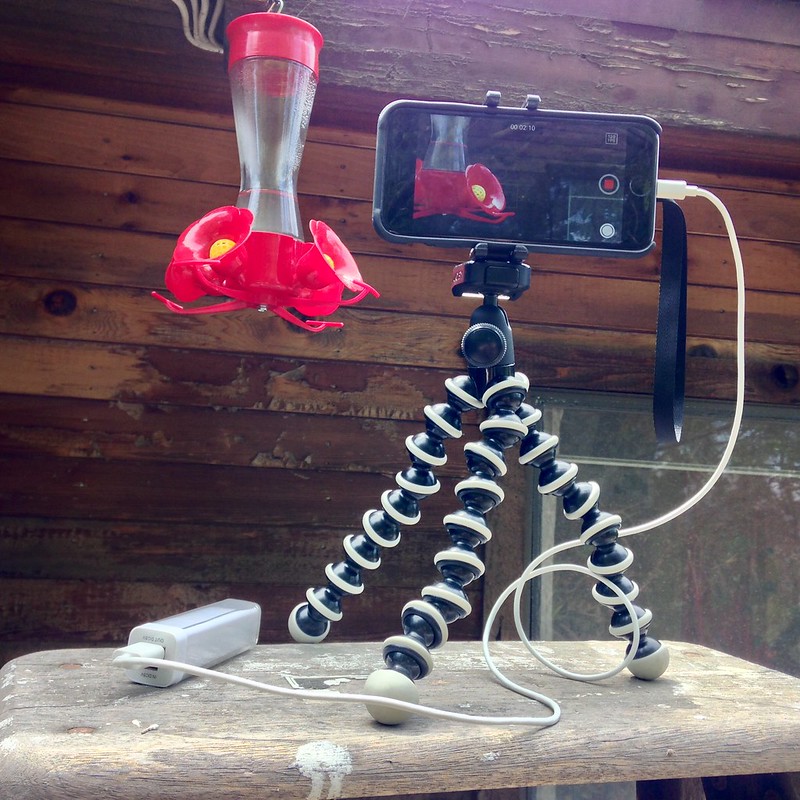
#5: Hummingbird Slow-Mo Videos
The iPhone 6s has very good slow-mo video built-in. It has two options: 120 fps at 1080p, or 240 fps at 720p. Here’s one of each, judge for yourself – I think the 240fps is clearly better for hummingbirds. Its mesmerizing to watch them at that speed, even at slightly lower resolution.
This one is 120fps and 1080p the whole way through:
This one is at 720p, starts out at regular speed and then jumps to 240fps:
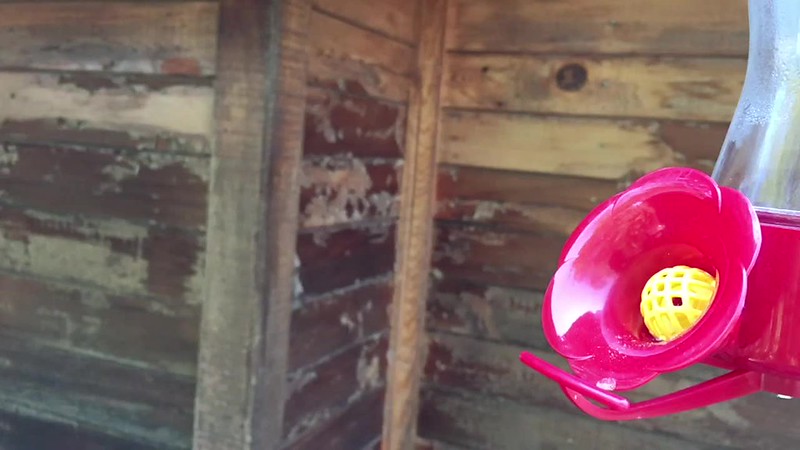
Behind the scenes: I put my iPhone on a tripod up on a ladder right next to the hummingbird feeder, and slowly scooted it closer and closer. Every time I moved it closer the birds would act suspicious for a little while and then get used to it.
About the author: Jessica Dyer is a photography enthusiast who’s active on Flickr and Instagram. She also has prints for sale (including some shot on the iPhone) on her SmugMug page.