How to Photograph the Milky Way
If you live in a remote area with dark skies, you are one of the lucky ones; the lucky ones that get to look up on a clear dark night and see a thick band of glowing light stretch across the sky.
As I got older I was pulled to the energy and activity of city life. In that life I forgot what it was like to have that blanket of stars in the sky at night. Over time I stopped looking upward and more often looked downward into my iPhone. I would read about adventure photographers in remote locations taking the most mind blowing images of the night sky I had ever seen. It made me remember the skies I grew up under.
Over time this ignited my passion for being outside at night and exploring. These amazing photographers fuelled my desire to stop looking down and instead look up at the real world that was around me. With this article, I hope to pass on some of what I’ve learned and inspire you to get outside and experience first hand the awesomeness of a crisp, clear, dark night sky near you.
Before We Start
Back in 2014, I wrote a guide on how to photograph the Moon. A lot of that knowledge transfers over to this article so if you haven’t already, I encourage you to read that article before continuing.
What You Will Need
DSLR Camera
A good camera is essential when trying to capture the majesty of the Milky Way. There are many types of cameras that will be capable of taking fantastic images of the night sky. It doesn’t have to be your traditional DLSR camera. There are some great mirror-less options available these days. The Sony ones in particular I’ve read are excellent choices with a wide array of interchangeable lenses.
My personal experience has only been with classic DSLRs but as long as your camera shoots in RAW and has manual shooting mode, I think it’s worth giving it a shot. A big factor when considering a camera to use will be its low light capabilities. For the Milky Way you are going to want to get as much light into your camera as you can before the rotation of the Earth starts to blur your image. So using a camera that can shoot a decent image at 1600 or 3200 ISO is a wise choice.
Lenses

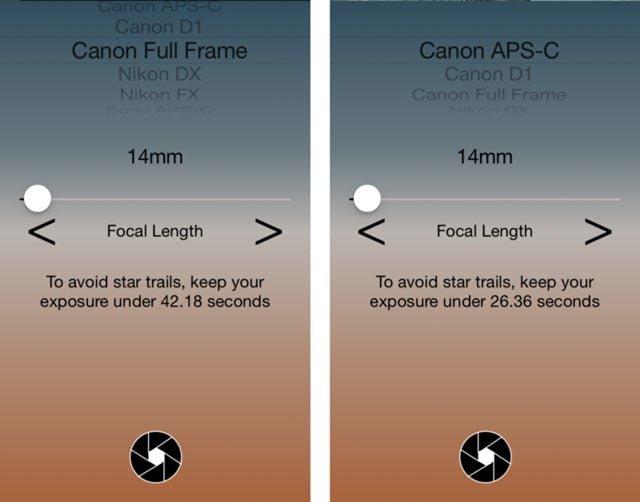
When choosing a lens, I would recommend a very wide angle lens; something that will allow you to capture a huge portion of the sky. The main reason is because the Milky Way is massive! It will stretch across the entire sky and to get it in your composition can be challenging. The wider your lens the more you will see — by wide I mean small focal length. As you get more comfortable shooting the Milky Way you can move in closer with a larger focal length to capture the galactic core and so on. To start out look at something in the 14mm — 24mm range.
The lower the lens’ aperture the better, as you will be able to let in more light with a faster lens. A personal recommendation would be the Rokinon 14mm f/2.8 lens. It’s a “budget” lens but it can produce some of the most outstanding images of the night sky. The bang for the buck is unmatched. My only gripe about it would be the vignetting it produces. Keep in mind, the 18–55mm f/3.5–5.6 kit lens that comes with most entry level DSLRs will definitely work for the Milky Way, so don’t feel you need a special lens to get started.
A Good Tripod
When taking long exposures of the night sky — 15–40 seconds — you are going to need a very sturdy platform to put your camera on. When I started taking night photos I used a cheap $50 tripod and my images were not as sharp as they could have been. This was mostly due to gusts of wind that shook my rig ever so slightly.
When you start out, just seeing the Milky Way on your camera’s LCD will be a great feeling. As you progress you will most likely yearn for a crisper image. You can mitigate this shake by using a sandbag or something heavy to hang from your tripod, however this usually means hauling something like that around with you. As you move forward in the craft I would suggest getting a heavy duty tripod that has some weight but is still portable.
When shooting the Milky Way your camera is going to be facing upward in a lot of cases. I would suggest getting a tripod that has a head that gives you the versatility to shoot right into the sky as well as along the horizon. I personally use a 3 way pan/tilt head that gives me the degrees of freedom I need to shoot all sorts of compositions. Ball heads can work as well, but they might be harder to do specific types of things like panoramics or in some cases straight up into the sky.
Remote Shutter
Using a remote to control your camera’s shutter is essential for shooting the Milky Way. You can get away with using your 2 second delay timer but it will limit you. When shooting the Milky Way you will want to use the ‘Bulb’ mode on your camera instead of the programmed shutter speeds. This will give you full control over how the long camera’s shutter stays open.
How Bulb mode works is you hold down the shutter button for as long as you want the exposure to be and when you’re done you let go of the button. This is critical for getting the best shot as you will want to let in as much light as you can before the stars start to create blurry trails in your image. Since you will be holding down the shutter button, pushing the one on your camera isn’t convenient or productive. You will end up with a lot of blurry images due to your body’s movement and the pressure applied to the button on your camera’s body.
This is where a remote shutter comes to the rescue. You can hold the remote shutter button in your hand completely independent of the body of your camera, therefore introducing no shake at all. The result will be a consistently sharper image. You can get remote shutters on eBay for a very good price. I’d recommend getting a remote with an intervalometer built in. Not much more money and you can do time lapses!
My Rig
My weapons of choice for shooting the Milky Way have evolved over time. When I first started, I used a Canon T2i and then upgraded to the Canon 6D. Recently I upgraded my tripod to a Manfrotto which was a very nice change from my el-cheapo brand tripod.
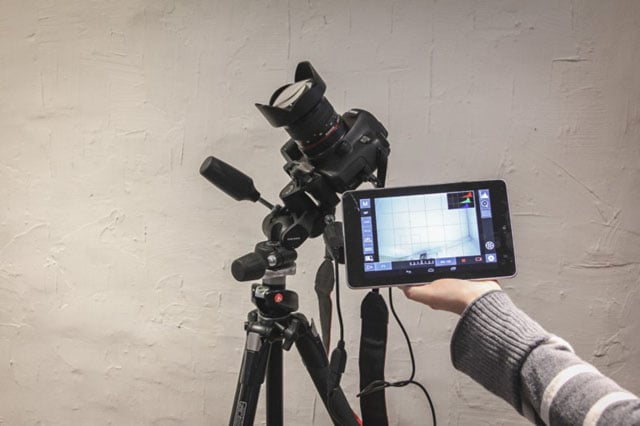
–Canon 6D Body
–Rokinon 14mm Ultra Wide-Angle f/2.8 IF ED UMC Lens
–Manfrotto 190XPROB with 804RC2 Basic Pan Tilt Head
-Nexus 7 Tablet w/ the DLSR Controller app as my Remote Shutter

Prep Work
Where
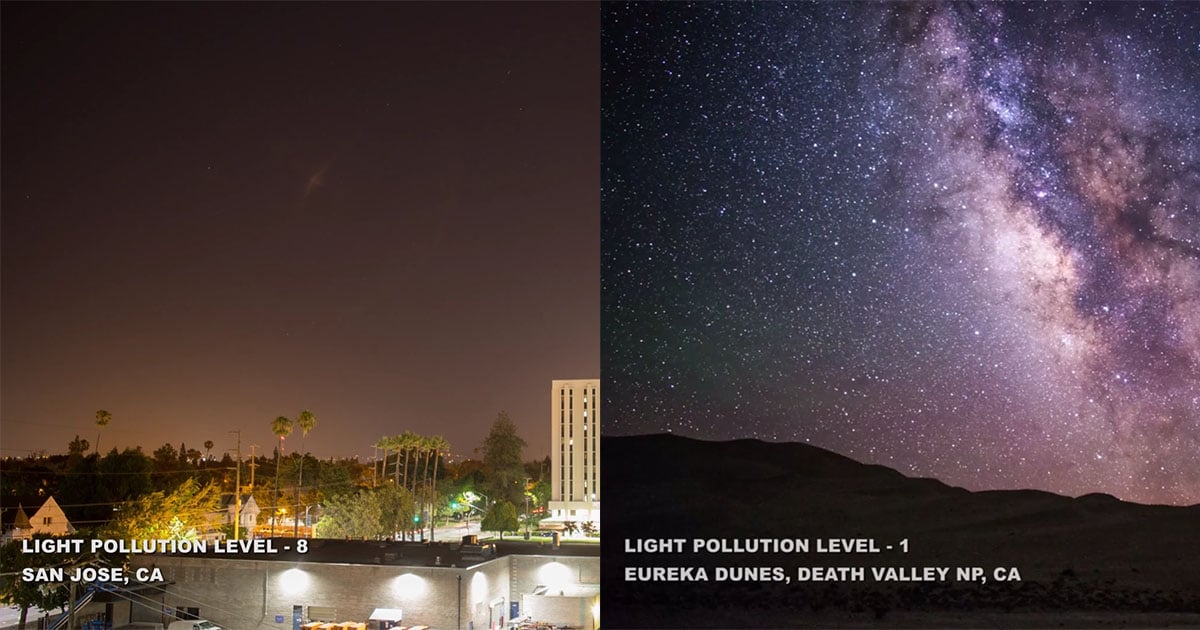
To take photos of the Milky Way you are going to have to head away from the orange dome of city lights. You will be able to capture parts of the Milky Way near cities, but to get truly amazing images you’re going to need to find a really dark location. Fortunately there are great tools to help you do just that. When planning my outing I’ll use a light pollution map to help me scout good locations to shoot the night sky. When I’m on the go I use an iPhone app called ‘Dark Sky Finder’.

What you’re looking at on these maps is light intensity. White areas are the brightest and black areas are the darkest; with a rainbow gradient that runs between them. This gradient visualizes the Bortle Scale. In my experience you can get images of the Milky Way in an Orange area, but it will be very very dim and the horizons will be bright orange.
Getting into Yellow regions will result in a much better show and what I would recommend as a minimum. Making your way into Green and Blue will yield incredible results and getting yourself into a Black zone will be an absolute feast for the eyes. Additionally, in Blue and Black zones, you’ll get to see other interesting atmospheric phenomena like Zodiacal Light, Airglow and Gegenschein which will make for an added drop of colour in your images.
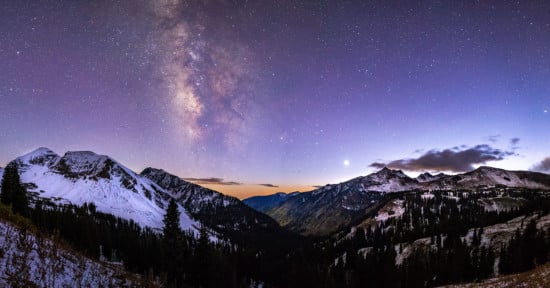
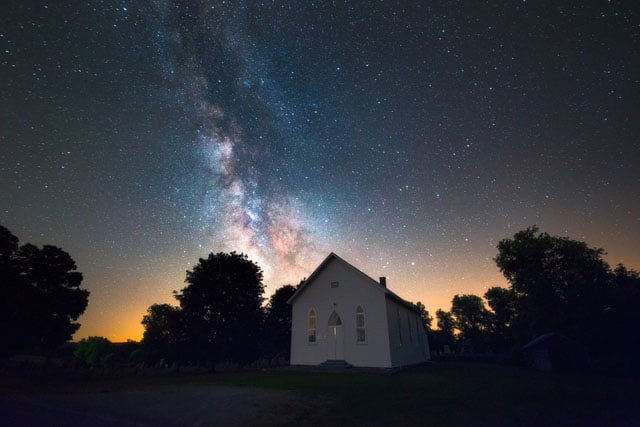
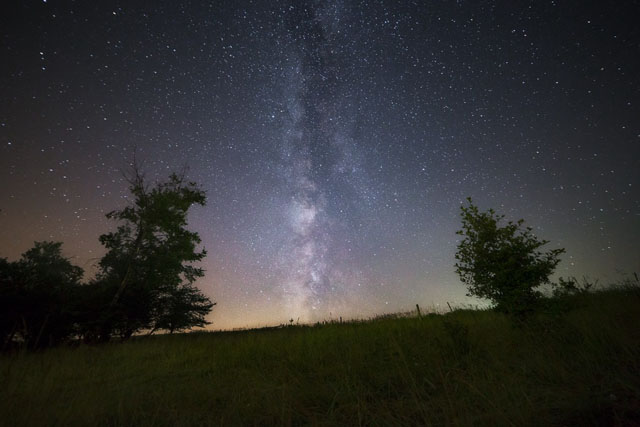
Beyond finding dark skies, I typically try and find nice natural areas that would make a good overall composition with the Milky Way like still lakes, isolated trees, rock faces or lighthouses. If you’re lucky enough to live near mountains, those are always a treat to use as a silhouette in the foreground. Using Google Maps’ satellite view and street view will help you see if the location you’re after will work for the picture you want to create.
When
The time of year will affect what parts of the Milky Way you see. What part of the world you live in will also determine what you see as well. I use an augmented reality iPhone app called Sky View to help me plan my shoot. It allows me to search for the Milky Way and more importantly change the time and date so I can see what position the Milky Way will be in at that given moment. Planning to shoot the Milky Way is important because your night will end short if what you want to capture isn’t visible when you go out.
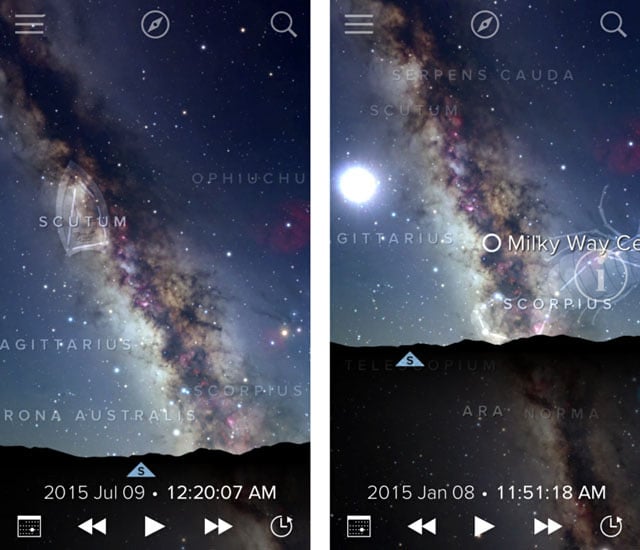
There are prime times to photograph the Milky Way and there are off times. No matter what though, you will see a part of it in a given night no matter what time of year. For example, in the Northern hemisphere where I am, the galactic core — the brightest part of the Milky Way — isn’t visible at night in the winter months, but come April the core is high enough in the night sky to be captured. Consult your starry night app to determine when the best time to view the Milky Way will be near you.
The last thing to consider when shooting the Milky Way is what phase the Moon is in and its position in the sky. Ideally you want to shoot with no Moon or very little of it showing. It will wash out the Milky Way and lead to a less than stellar result. Use the Sky View app to plan your photo shoot around when the Moon isn’t going to disrupt your composition.
Weather
Your starry photo shoot is very weather dependent and given how unpredictable it is, it’s one of the things that can’t be planned for far in advance. You just have to embrace that it is what it is. If you know the Moon isn’t in phase or visible, and you know it’s the right time of year to go Milky Way hunting, then check your 5 day weather forecast to see if you have a clear night in the near future.
If things are looking good I then refer to an absolutely amazing website that provides an astronomer’s weather forecast for the next 24–48 hours. It shows you the cloud cover, humidity, temperature and so on so you can be more confident that you will get good results on your shoot. Terrible weather can be a huge disappointment to any astrophotographer, so consult your astronomer’s forecast regularly. The website is called Clear Dark Sky and it has thousands of locations around North America. If you don’t live in North America, you may have to consult your weather service to see if they offer an astronomer’s forecast like Environment Canada does.
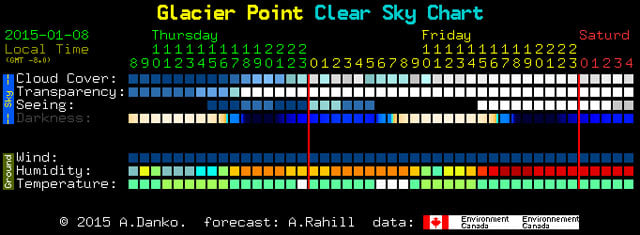
The above image shows various rows with each column corresponding to an hour of the day. The site gives you a legend showing the meaning of each row. The most important rows I refer to are the top row, cloud cover, and the 4th one, darkness. Cloud cover tells you how clear the sky is; blue is clear, white is cloudy. Darkness shows you how dark the sky will be. Dark blue is the darkest and light blue means the Moon’s effect will brighten the night sky; white of course is daylight.
Taking the Shot
Once you’re on site, have your camera ready and your remote in your hand, you’re ready to start taking pictures. This is where the fun begins. Taking shots of the Milky Way is unlike anything else I’ve photographed. In a lot of cases you’re in the middle of nowhere and it’s incredibly quiet. The dark expanse is above you and you’re there soaking it all in with your eyes.
The joy I find in long exposure photography is it gives you time to think. Most photos are 20–40 seconds long, so you have time to look up and wonder. Some of my best thinking gets done in between these frames. When the shutter snaps back into position you’re presented with an image of the sky you were looking at, but in a whole new way. In the world of a camera, time piles up upon itself; stacking to create this incredibly detailed image. The longer you let the light spill in, the more hidden details get revealed.
The human eye doesn’t work this way. It’s taking in light, storing some of it and forgetting the rest. The light doesn’t get to pile up for long. The time we experience is fixed and constant and we can’t change it. It’s like our eyes have a fixed shutter speed that can’t be adjusted to let more light in. With a camera we get to see nature in a completely different perspective; we get to escape the arrow of time for a brief moment. With this new perspective we get clues to what’s out there and perhaps even figure out how it got there in the first place.
Shutter
This is probably one of the trickier parts to shooting the Milky Way. Given that the Earth is rotating, objects in our night sky appear to move over time. When taking photos of these extraterrestrial objects we need to pay attention to this rotation so our images come out sharp. This works against us of course, because with long exposure and astrophotography we want to be able to collect as much light as we possibly can. So without venturing into the world of star tracking mounts, you will only be able to shoot for a limited time.
There are various rules for how long this time is and it depends on your camera and lens. There are formulas out there that will calculate your maximum exposure time given the size of your camera’s sensor (full frame or crop frame) and the focal length of your lens (14mm, 24mm, and so on). The 600 rule is one of the most common formulas but some prefer to use a more conservative 500 rule. I personally choose to skip the nitty gritty details and just use another iPhone app called Dark Skies. The app is simple, you just input the type of camera and the focal length and it spits out the exposure time in seconds. Use this number as a starting point and adjust your settings to give the best final result.
Aperture and ISO
The other settings on our camera are going to be fairly straight forward compared to shutter speed. For aperture you need to set your lens to wide open or the smallest f/ number. For example the 14mm lens I use has a maximum aperture of 2.8, so I’ll set my camera to it. For ISO I typically choose the highest number that will yield a quality image. With the Canon 6D I have that is typically 3200 or 6400 maximum. Beyond that the noise starts to destroy the image. From here play with the balance of shutter speed, aperture and ISO to give you the exposure you’re after.
Focusing
When shooting at night it can be a challenge to get your camera to auto-focus on anything. Best forget about auto focusing in this circumstance and change to manual focus instead. Once on manual, move the focus ring on your lens to the infinity symbol. From here if your camera has a live view mode you can fine tune your focus. Flip on live view and then digitally zoom into a bright star. Use the focus ring to bring the star into a sharp focus. From here take a few test shots and zoom in to see how the focus appears. Stars should be solid dots with no halo or bokeh.
Composition
When you are out, take a lot of photos. Play with landscape images and portrait images. Take shorter exposures, take longer ones. My only rule is to try and collect as much light as I can. I can take up to 10–20 shots of just one composition with small tweaks to position and exposure. This is how you stumbled on making really interesting Milky Way images, or capturing a surprise shooting star. I tend to always anchor a foreground element that people can identify with to provide the sense of scale. It also draws the eye in and lets the Milky Way play a supporting role to the foreground element.
The golden ratio always plays into my images first and foremost. After that I’ll try the rule of thirds and see how it changes things. Composition is really in the eye of the beholder. When you are first starting out, a good thing to do is get inspired by other great Milky Way photography and try and recreate it in your own way. From that you’ll develop your own sense of where to place things in the frame. Don’t sweat it too much however, the more images you take the better your eye will get, and really, you probably can’t take a bad picture of the Milky Way.
The Captured Image
Don’t be too disillusioned if the images you capture aren’t like what you’re used to seeing on the Internet. In long exposure photography you are going to be collecting all light around you, not just the light you want. To bring the Milky Way to life you need to post process your images using software like Lightroom or PixInsight. An essential part to shooting a fantastic Milky Way image is to shoot in RAW instead of JPG. RAW images will collect so much more information and give you more room to play in post processing. In a lot of ways when you are in the field capturing your shot, you are doing half the battle. The rest happens when you get home and start processing the image on your computer.
Post processing will allow you to bring out the detail you want in your image and hide the detail you don’t want. It will also allow you to correct some of the imperfections like vignetting, chromatic aberration and distortion in your lens’ optics. Lastly it will help you polish your composition by correcting the white balance, crop, rotation and perspective.
Some believe post processing is cheating or somehow ‘faking it’. It is true that post processing can be taken way to far and create more of a fantasy image rather than an image one might deem as reality. Keep in mind that long exposure photography won’t represent what your eye can see, it will reveal what your eye isn’t capable of seeing. So, no matter what, it might be judged harshly as not looking ‘real’.
Knowing this, how far you choose to take your post processing depends on you, the photographer. If you want your images to represent what’s naturally there, I would heed the less-is-more approach when it comes to enhancing the colour in your images. When it comes to shaping the light in the image, the more hidden details you’re able to reveal the better photographer I believe you are.
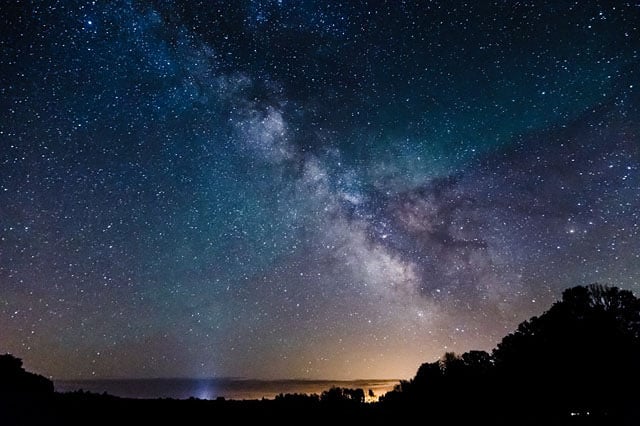
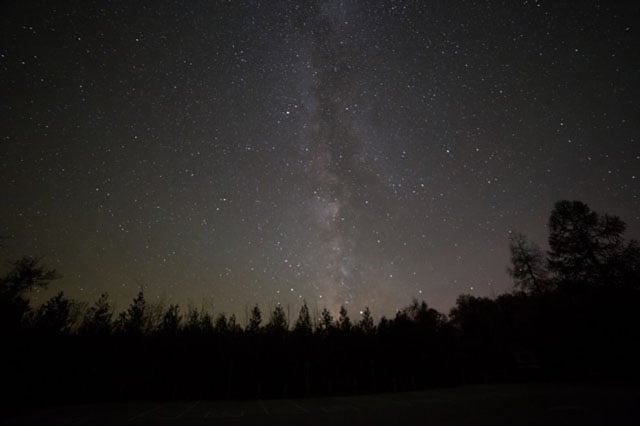
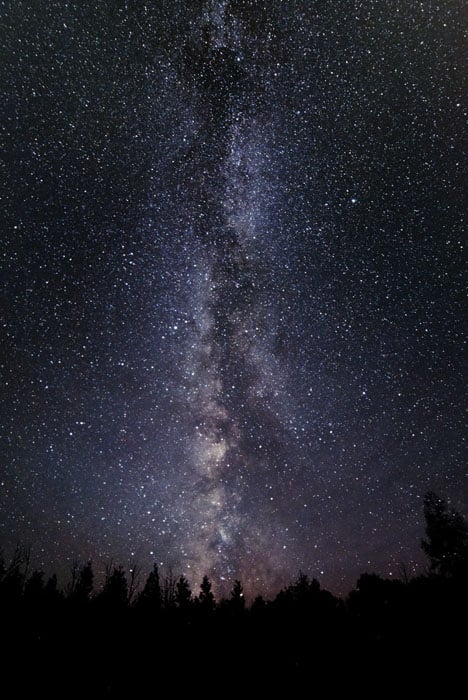
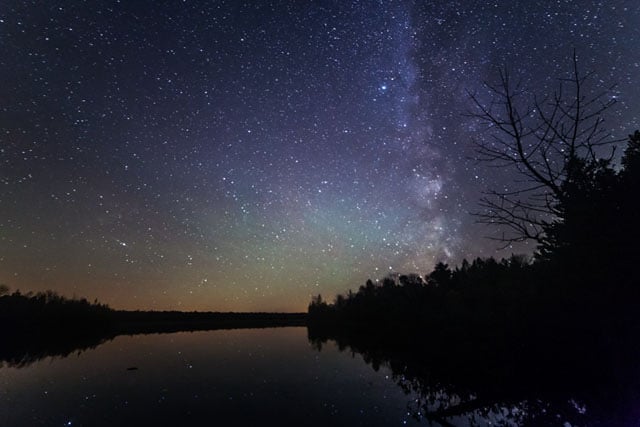
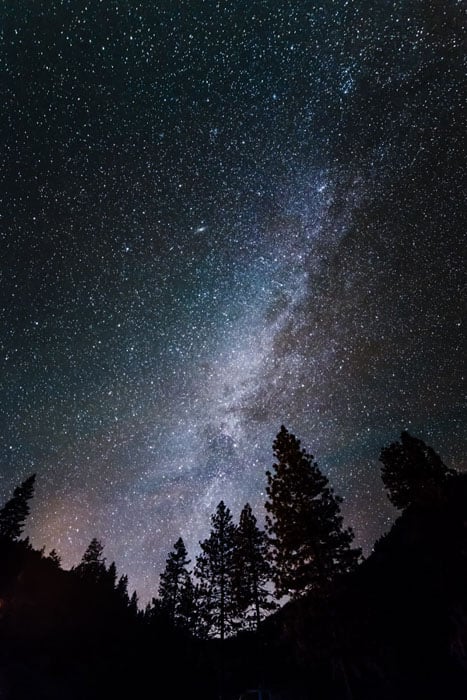
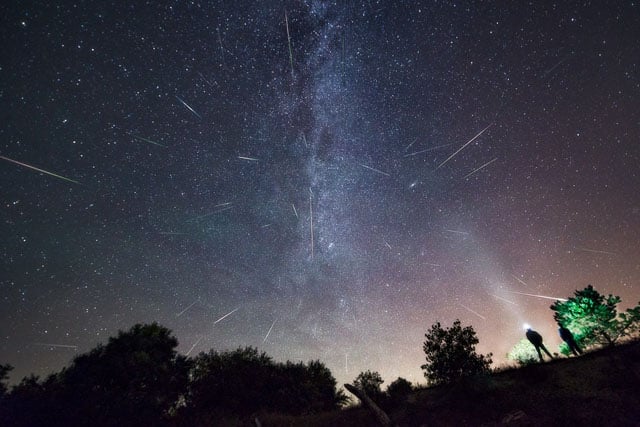
Some Other Examples


I hope you found this article helpful and inspiring. Time to get outside!
About the author: Matt is a freelancer web designer/developer and documentary photographer. Connect with him on Twitter, Instagram, Facebook, or his website. This article was also published here.