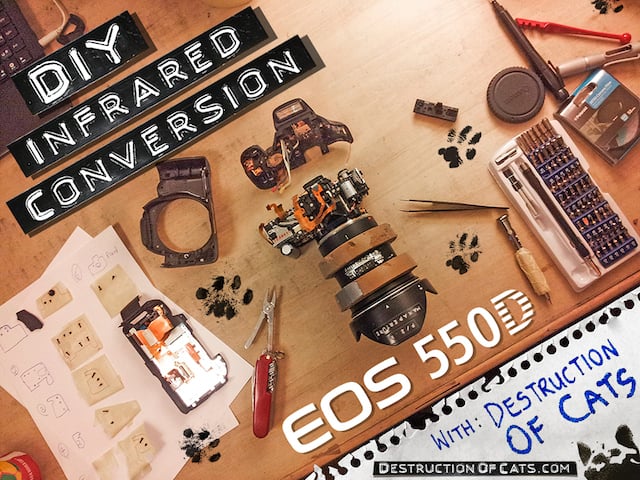
DIY: How to Turn Your Canon T2i Into a Full-Fledged Infrared Camera
“Until the 20th century, ‘reality’ was everything humans could touch, smell, see and hear. Since the initial publication of the chartered electromagnetic spectrum… humans have learned that what they can touch, smell, see and hear is less than one millionth of reality.”
Foreword by Niles Davis:
Destruction Of Cats Technologies brings you cutting edge innovations at the forefront of the photographic revFURlution with the aid of duct tape, cardboard and other salvageable treasures found in neglected trashcans in deserted alleyways.
3 years ago, in the alleyways of Bondi Beach, Stevender hacked into his camera against the wishes of his friends, family and ancestors to reveal a hidden spectrum invisible to mere mortals: Infrared.
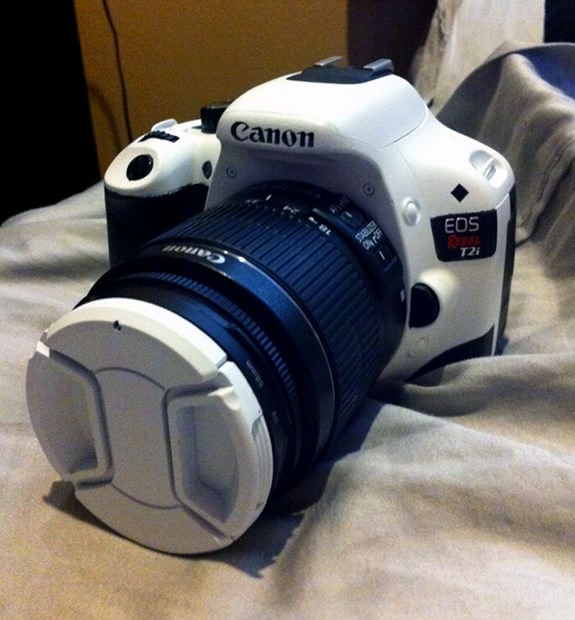
Without permission, Stevender has mauled my pristine EOS 550D (Rebel T2i) with his raggy paws and performed black magic so dank it would send a shiver down Mr. Crowley’s crooked spine. Now my frankensteined camera has the ability to photograph and film the world in the surreal spectrum of infrared.
This is how he did it.
Random Disclaimer: As we claw through your camera, let’s make it clear that you have entrusted the fate and future of your photography career in our furry paws by your own choice. Once you receive your new revolutionary camera that will make you question the world around you once again (or maybe even for the first time), we are not liable for any missing parts, dismembered rat tails left behind in the body, urinous aroma, etc. This is not a soldering or glass cutting class — you must learn these things on your own. A basic understand of electronics is assumed.

Most camera sensors are sensitive to wavelengths of visible AND infrared light. However, IR light has no use in visible light photography because the camera be will metering for light that we (obviously) cannot see, resulting in unpredictable exposures.
Because of this, a piece of glass designed to block wavelengths of infrared light (A.K.A. the infamous ‘hot mirror’) is placed over the camera sensor in everything from DSLR’s to smartphones. By using a special IR filter on the end of your lens, it is possible to peek into the infrared spectrum, but a combination of the hot mirror over the camera sensor and the dark IR glass mean resulting exposure times will be at least 10–20 seconds… on a sunny day. For swift pawpetrators like ourselves that need to flea the scene of the crime, long seconds of exposure could lead to a long sentence in the pet penitentiary
In order to regain this lost IR sensitivity, we will break into the fortress of an EOS 550D DSLR, excommunicate the hot mirror and replace it with a piece of glass designed to block all light EXCEPT for infrared. With no barriers to attenuate wavelengths of the IR spectrum before they hit the CMOS sensor, we can finally see into the invisible world of infrared in real-time. This makes it possible to capture moments down to the thousandth of second, take advantage of high ISO at night and even record video.
Step 1:
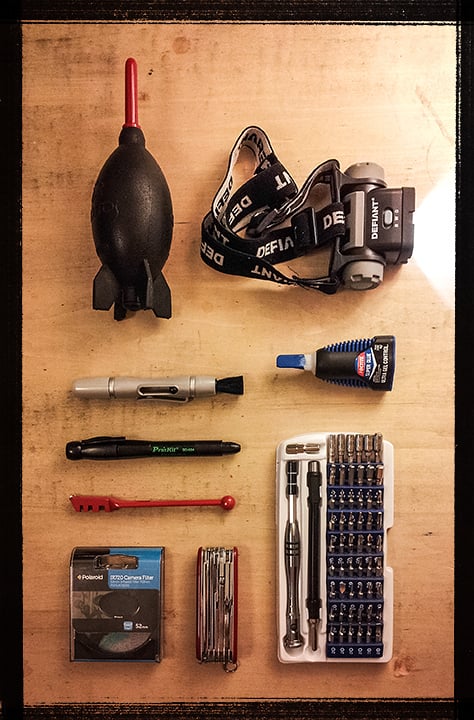
You Will Need:
- Infrared Filter. (We are using a Polaroid 720nm IR filter)
- Glass Cutter ($2)
- Superglue
- Screwdriver Set
- Various Tools (Eg. Pliers, knife etc)
- Cleaning Equipment (Eg. Blower, brush, carbon pen etc)
- Flashlight
Optional:
- Sandpaper
- Masking tape
Step 2:
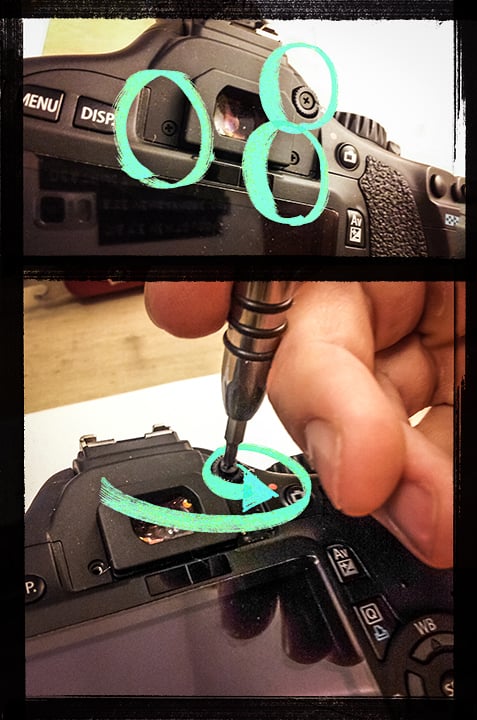
We begin by removing the 3 screws behind the eye-cup. This includes the screw in the diopter adjustment dial.
Step 3:

- Remove 3 screws from the left hand side of the body (2 are located beneath the usb socket cover).
- Remove 2 screws from the right hand side of the body.
- Remove 2 screws from the front cover.
- Remove 7 screws from the bottom of the body.
Step 4:
With all screws removed, the back cover should pop off. Caution: It is attached to the body by a very delicate ribbon cable. Using your fingernail (or other thin tool) flip up the plastic lock holding it in place and it will slide out. The back cover can be put aside.
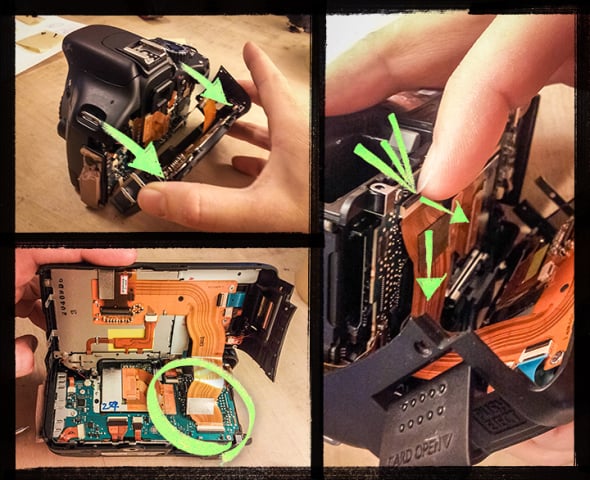
Step 5:
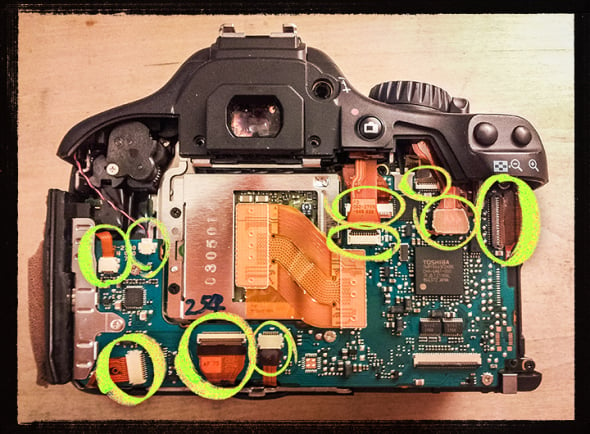
Like old shoes, we’ve broken in. Next, we must unplug all 10 cables (9 of which are very delicate ribbon cables) attached to the circuit board (above, circled). There are 3 methods through which these cables can be removed:
- By flipping up plastic locks (Such as in step 4).
- Some cables have a small hole just behind the plug in which a pin or small screw driver can be inserted to pull the cable out.
- Some cables simply snap downwards into a socket on the circuit board and can be removed by prying upwards on the corner with a fingernail or similar type of tool.
Note: A few cables in the upper right hand corner are covered by cables which must first be removed before access is available.
Step 6:
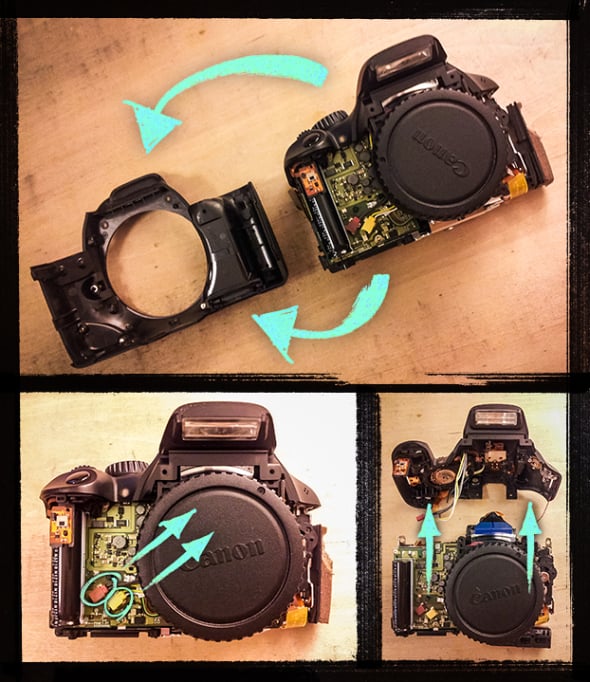
- Flip the camera over (so it is facing upwards), remove the front cover without force and put it aside.
- Remove the 2 cables plugged into the front circuit board – One red plug and one yellow plug (Bottom left hand panel – Circled in blue).
- The top panel should now come off and can be put aside.
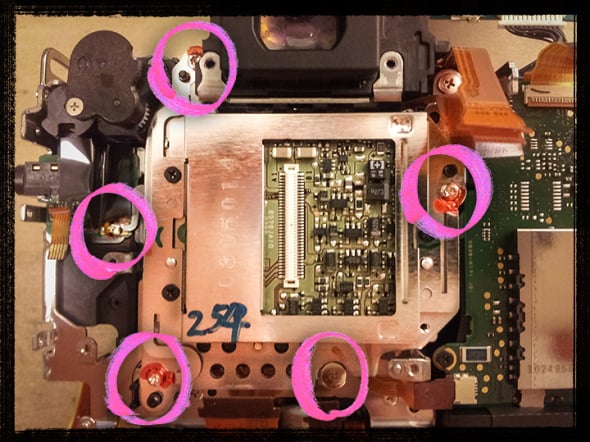
Step 7:
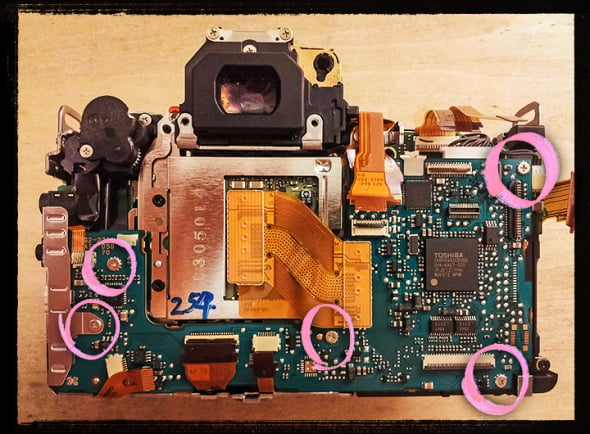
Flip the camera over again (so it is facing downwards) and remove the 5 screws as circled above.
Step 8:
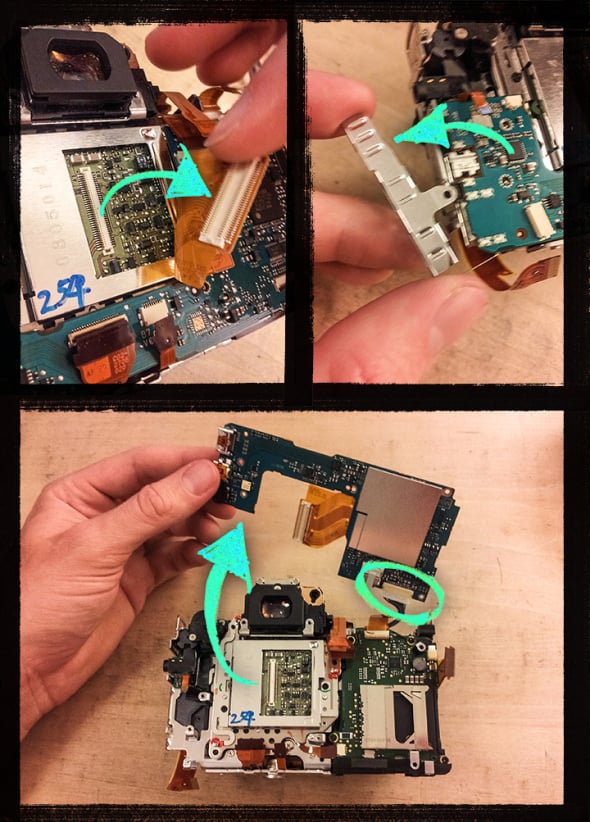
- Unplug the ribbon cable connected to the sensor. It is a plug type fit: Pry upwards with a fingernail or similar tool and it will pop off.
- Remove the grounding strip on the left hand side.
- The circuit board should now lift off the camera revealing the rear of the sensor. It can be put aside. Note: The board is still attached by a cable that is easily unplugged [Circled in last panel].
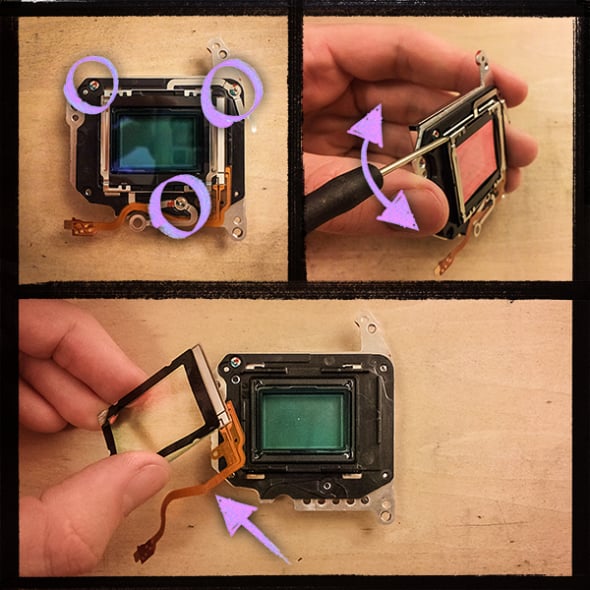
Step 9:
Get ready for ocular surgery: Remove the 5 screws circled above and gently lift the sensor out of the body. The entire body can now be put aside.
Step 10:
We have isolated the sensor assembly. An interesting characteristic of this infrared-blocking glass (as you can see above), is how it changes from hues of green/blue to red and vice-versa when viewed at different angles.
Remove the 3 screws (Circled in the 1st panel) from the front of the assembly. 2 of these screws hold a thin metal brace in place (Called the ‘support material’ by Canon). This brace secures the sensor cleaning assembly and the black plastic hot mirror mount to the sensor assembly. The metal brace is connected to the assembly by no more than some tension and a few clips. Using a flathead screwdriver (As seen in the 2nd panel), slide the tip between a corner of the metal brace and housing, apply some upward force as leverage and the metal brace should pop off.
Once removed, the sensor cleaning mechanism will simply lift off.
The sensor cleaning mechanism works by virtue of a piezoelectric crystal; An element that has the ability to convert electrical energy into mechanical energy. When the camera turns on or off (or when accessed in the menu), it enters sensor cleaning mode in which an electric current applied to the piezoelectric crystal causes it to vibrate. This vibration transfers to the exposed glass filter and simply shakes off any pieces of dust that have settled.
Unfortunately, the glass filter of the piezoelectric sensor cleaning mechanism is designed to block wavelengths of infrared light. in order to obtain maximum IR sensitivity offered by the sensor, we will not be reinstalling it during assembly.
Step 11:
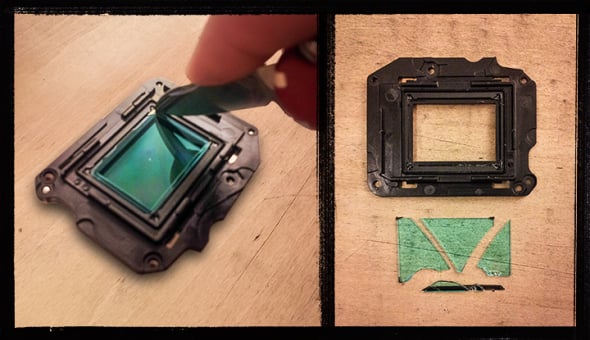
The hot mirror is held in the black plastic mount with a drop of adhesive in each of the 4 corners. You can cut through this glue with relative ease using a sharp knife, however there still may be some adhesive beneath the glass on the black plastic lip holding the the hot mirror in place. If you try and pry the thin glass out with a tool, there is a high chance for it to chip and/or shatter — likewise if you use your finger to push it out from the bottom. Patience is the key to a successful extraction here.
Lastly, we must measure the dimensions the hot mirror and note them down. We will use this when cutting our new filter of IR glass.
As you can see, I won’t be winning any awards for immaculate disassemble here. I feel like I lost my return ticket on the train, because this just turned into a one-way trip…
Step 12:
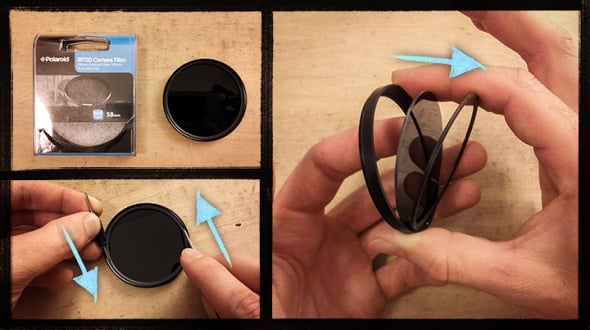
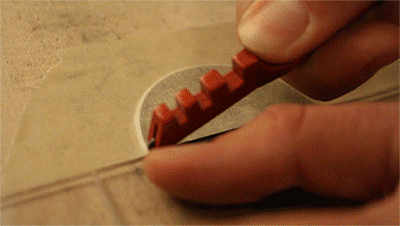
First, break open your infrared filter of choice.
You’ll notice 2 notches (opposite to each other) on the inner ring of the filter thread – This holds the piece of glass in place. Using 2 small flathead screwdrivers (or similar tool) as leverage, unscrew this inner ring by applying force in equal but opposite directions (As seen in the 2nd panel). This step will be much easier if you can enlist an additional hand or clamp to hold the filter as you unscrew the ring.
Note: Due to the small size of the notches and their proximity to your pristine IR-filter, be careful not let your tools slip and scratch/chip the glass.
Once the ring is removed, the piece of glass will come out with no force required.
Step 13:
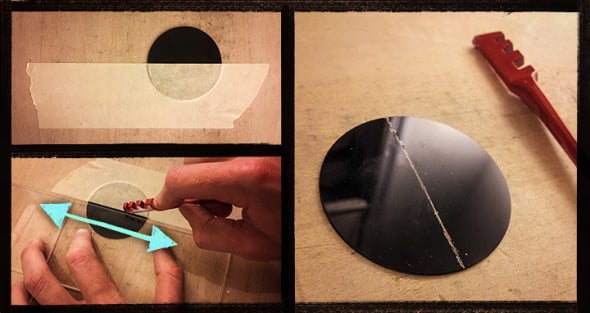
Using the measurements you obtained from step 11, we will mark the filter and use a glass cutter to whittle out a rectangle of IR-glass in order to replace the hot mirror we just removed from the black plastic mount.
Anecdote: While looking for a glass cutter at the hardware store to cut my newly acquired 720nm infrared filter, the head of the tool department (wearing a kilt) promptly assured me that nothing in the entire warehouse could cut a stamp-sized rectangle from this glass without shattering it into a thousand pieces…
With his cynical eyes fixed on mine, I slowly removed the $2 glass cutter dangling from the shelf before me, placed it in my trolley and surreptitiously walked away as he shook his head and muttered either a Lepontic phrase or something about how I shouldn’t even try — I’m not sure, It was too hard to hear over the sound of his future embarrassment.
To mark the glass before cutting, you could use a permanent marker (a quick clean with alcohol will leave no trace), but I prefer masking tape. In addition to creating a straight, easy-to-see edge, the tape will hold the piece of glass securely to my workbench while I cut.
Note: I highly recommend the use of eye protection for this part. While it may be cool to show off your scars of the DIY lifestyle, a glass shard in my eye would undoubtedly instigate a bad day.
Using a ruler (or similar material with a straight edge), press the cutting wheel into the glass and roll it along the length of your marking with a firm and consistent pressure. If done correctly, you should hear the sound of glass grinding and observe many near-microscopic shards of glass shooting in all directions (waiting to embed themselves in your feet later) while you cut. The result should be an even scoreline lightly gouged into the glass.
Now, we are going to break the glass. Stop! Unlike you would normally break glass (i.e. Like that of your smartphone screen into a fancy spiderweb design at the club), we are going to use the weighted metal ball found on the opposite end of the glass cutter to enact a controlled break. Place the scored IR glass on a surface at a slight angle (Eg. Half-propped on a ruler or magazine), secure it and tap the protruding piece very lightly a few times with the weighted end of the cutter. The glass should break evenly along your score-line.
Step 14:
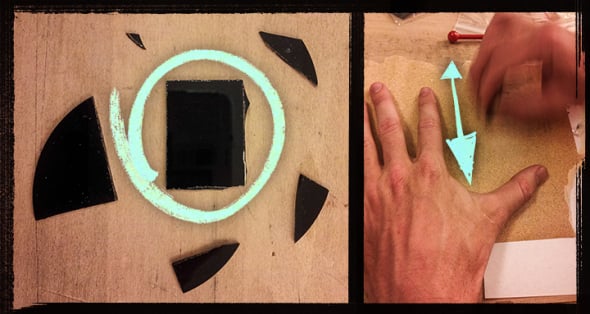
Just as every rose has its thorns, every piece of home-cut IR filter has its razor-sharp edges. Because of this, my IR filter was too big to fit into the black plastic mount. Using sandpaper, smooth your edges down in order to obtain as snug a fit as possible. Remember, if you cut a piece of glass that is too big, you can always decrease it in size, but not the other way around. With that in mind, know that it is easy to over-sand the edges. Even a gap just fractions of a mm is still a gap — no visible light should leak in.
Step 15:
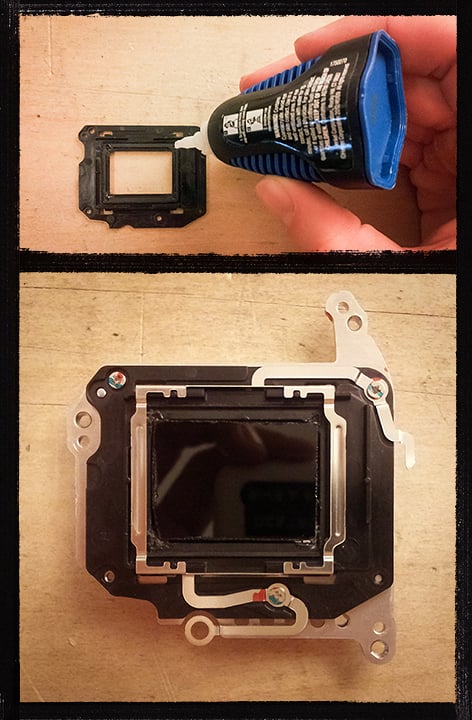
Put 4 dabs of super glue into each corner of the black plastic mount and insert your new IR filter. Reconstruct the sensor assembly sans piezoelectric sensor cleaning mechanism and admire your handiwork: This is no longer your average, boring, color photographic sensor. This is a sunglasses-wearing, invisible spectrum revealing CMOS sensor 6.9.
Finally, follow this guide in reverse to reassemble your new IR-enabled DSLR!
The World In Infrared
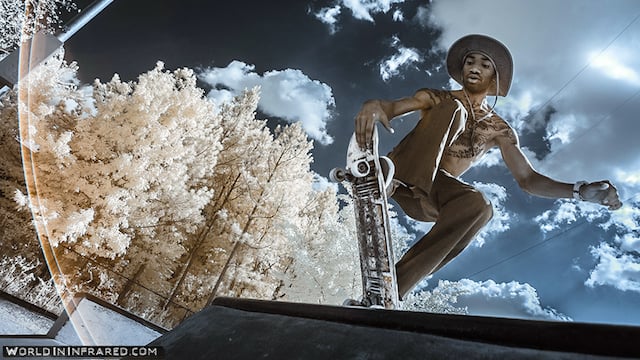
So what does the world look like in infrared?
Since landing in the USA earlier this year, I’ve used this modified camera exclusively to take pictures of the people I’ve met and places I’ve traveled to. This little project has culminated into an online portal called ‘World In Infrared‘, which currently spans 3 countries with a diverse following of many more.

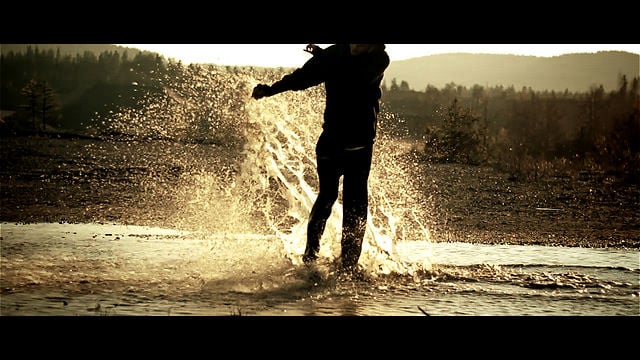
Street photography and photojournalism come together in a seamless blend of people and place through the lens of my IR-hacked camera and the invisible world of Infrared is revealed. The result is a radical shift in perspective on how we view everyday life. Places you’ve visited 1,000 times before suddenly become alien landscapes waiting to be explored.


Sunglasses are rendered transparent, black clothes appear white, the noon-time sky becomes darker than night and vegetation glows like fallen snow.
Skin color becomes nothing than a pigment of your imagination: melanin is effectively invisible to infrared light. This means humans often have virtually no perceptible skin color…


Slurred, sluggish, psychedelic, incandescent, the world is a strange place in infrared and I’m out to explore it. You can too here:
Keep up to date with the World of Infrared project on Facebook.
About the author: Steven Saphore is the co-founder and principal contributor of Destruction Of Cats, a collective of photographers, writers, illustrators & musicians. He also operates his own blog. This tutorial originally appeared here.