PetaPixel

How to Make a Cheap DIY Rain Guard for Keeping Your DSLR Dry

How to Make a Cheap DIY Rain Guard for Keeping Your DSLR Dry lensguard

I’ve always been asked how I keep my equipment dry while shooting storms, and I figure with Hurricane Sandy on the way, now would be a good time to share! This is a very simple, inexpensive, easy-to-use, and effective solution to shooting in the rain! It costs less than 5 dollars, but I have never felt the need to purchase anything to replace it.

I find this cover works so well because, not only do you have access to all your camera controls, it also provides an extension to your existing lens hood to give it further protection from the rain. So here goes:

Materials

  • Lens with lens hood
  • Duct tape
  • Circular take-out container
  • Heavyweight clear plastic bag

Tools

  • Marker
  • Knife
  • Scissors

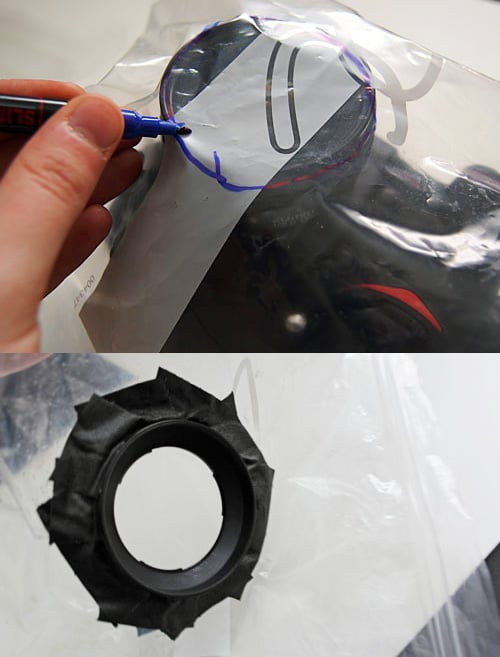
Step 1: Trace the outline of your lens hood on the back of the container

How to Make a Cheap DIY Rain Guard for Keeping Your DSLR Dry RainGuard 12

Step 2: Using the knife, cut out the circle for the lens hood. Leave a 1 or 2mm gap for the lens hood to sit on.

How to Make a Cheap DIY Rain Guard for Keeping Your DSLR Dry RainGuard 13

How to Make a Cheap DIY Rain Guard for Keeping Your DSLR Dry RainGuard 14

Step 3: Tack the lens hood in place with a few small strips of duct tape

How to Make a Cheap DIY Rain Guard for Keeping Your DSLR Dry RainGuard 15

Step 4: Tape the lens hood securely in place

How to Make a Cheap DIY Rain Guard for Keeping Your DSLR Dry RainGuard 16

How to Make a Cheap DIY Rain Guard for Keeping Your DSLR Dry RainGuard 17

Step 5: Replace the lid and, using the knife, cut out a circle large enough not to obscure the field of view of the lens

How to Make a Cheap DIY Rain Guard for Keeping Your DSLR Dry RainGuard 18

How to Make a Cheap DIY Rain Guard for Keeping Your DSLR Dry RainGuard 19

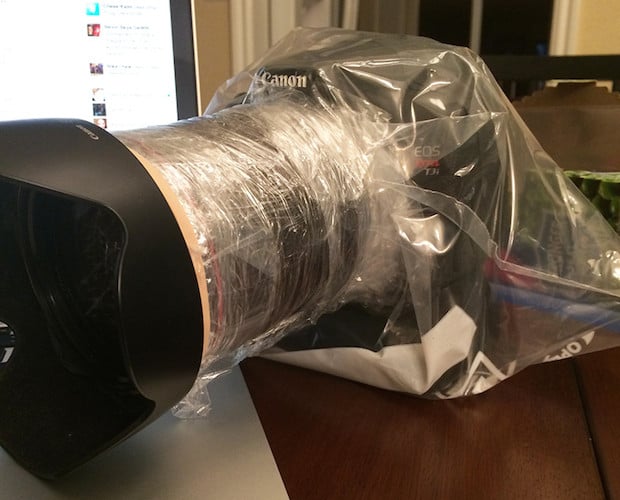
Step 6: Cut out a corner of the plastic bag using scissors, place the hood inside the bag, and re-attach the lid

How to Make a Cheap DIY Rain Guard for Keeping Your DSLR Dry RainGuard 20

Step 7: Carefully cut away excess plastic

How to Make a Cheap DIY Rain Guard for Keeping Your DSLR Dry RainGuard 21

Step 8: Tape up the edge with some duct tape to hold the lid securely in place

How to Make a Cheap DIY Rain Guard for Keeping Your DSLR Dry RainGuard 22

Step 9: Attach the lens hood to your camera and get some awesome shots from inside the storm!

How to Make a Cheap DIY Rain Guard for Keeping Your DSLR Dry RainGuard 23


About the author: Richard Gottardo is a wedding photographer based out of Toronto, Canada who also chases and photographs storms in his free time. Gottardo’s photography has been featured in various publications, advertising, and web throughout North America and the UK. Visit his website here. This post was originally published here.


  • http://www.facebook.com/jeremy.madore.3 Jeremy Madore

    “Wedding based out of Toronto” – Wedding Photographer?

  • http://www.petapixel.com Michael Zhang

    Thanks for the catch :)

  • https://twitter.com/#!/thelonelylights Adam Cross

    I think it would also be a sensible idea to also advise people to stay indoors during the hurricane, no point risking your self(or your gear!) for a photograph.

  • http://www.facebook.com/generalrap Athan Raptis

    Or, shoot with a camera/lens combo featuring ungodly weatherproofing like the Pentax K-5.

  • http://www.facebook.com/kikulino Lukas Prochazka

    everything for good picture

  • http://twitter.com/StevenWorster Steven Alan

    disagree.

  • http://www.facebook.com/nanonyous Theo Lubbe

    Question: Does this design not still allow water to potentially enter at the sides of the lens barrel at the front, or to get on the inside of the bag along the bottom, when pooling water assuming the camera is tilted upwards slightly?

    Could one not get better results taking a decent quality UV filter that one has sealed along the edges, then attaching a step-up ring to that onto which one attaches the heavyweight bag?

    It’s certainly more expensive, but also means you aren’t rendering your lens hood nor UV filter unusable without taking the time to remove all of this from the lens.

  • http://www.facebook.com/bunniebray Coby Bray

    I have a similar build but with a cheep polarize filter a uv filter and large clear garbage bags, remove glass from pol. filter lay bag across the front attach uv filter and cut plastic from between filters. the pol. filter allows the front element to rotate and if you use large garbage bags you can clime inside with the camera and stay dry as well.