Dust, Bird, and Scooter
Here’s a photograph I took of my brother skateboarding (or attempting to) back in 2005:
")
This post is a very basic tutorial on using the clone stamp tool in Photoshop to remove distracting elements from a photograph. It’s not really about the taking or the general post-processing of this photo. I’ll just touch on these two things very briefly:
This was taken with a Canon 20D at ISO 400 with a pretty fast shutter speed, 1/800th of a second. I was trying to copy some of the faded action shots you sometimes see in magazines or surreal portraits, so I asked my brother to fall off his skateboard onto the grass in dramatic ways, and took as many photographs as possible. Aside from what I’ll cover regarding the clone tool, the other things I did during post-processing were desaturate and increase contrast.
Now, here’s the original photograph that was shot in JPEG:

There were 3 things that I found distracting in the photo:
- There was a scooter lying in the background
- Dust on the lens or sensor caused spots in the sky
- A random bird decided to add a dark shape to my photo

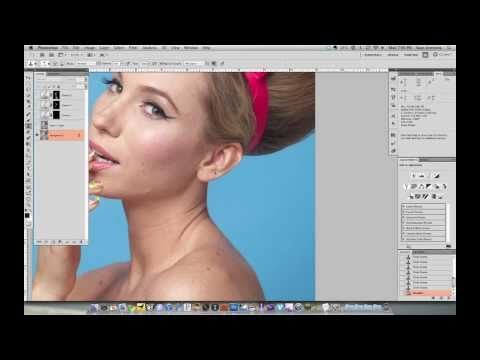
To get rid of these things, we can use the clone stamp tool. The keyboard shortcut for this tool is the S key.
First, you need to select where you want to clone pixels from. You can do this by holding the Alt key (or the Option key if you’re on a Mac) and clicking somewhere on the photo. You can then draw over the elements of the photo you want to remove, drawing over it with the pixels from the area you selected.
Here’s a video walkthrough of what I did:
After removing the unwanted elements, I then touched up the photo as described above, and ended up with this (hover over the image to compare it to the out-of-camera image):
You can use this same clone stamp tool to do some pretty awesome stuff, but this was just a basic introduction to it.